
Summer Spinach Feast: A Revolutionary Recipe for Irresistibly Fragrant, Tender Buns Your Family Will Devour
Summer Spinach Feast: A Revolutionary Recipe for Irresistibly Fragrant, Tender Buns Your Family Will Devour
As summer’s heat intensifies and perspiration depletes our energy, a vibrant, nourishing dish on the dining table becomes essential for revitalization. Enter the star of your local market: glistening spinach – nature’s perfect seasonal "emerald-green treasure"! Bursting with iron and chlorophyll, spinach offers far more substantial summer nourishment than sugary cold drinks, cutting through greasiness while replenishing vitality. Today, we’re revolutionizing this humble green with a novel yet accessible method guaranteed to make your family reach for their chopsticks the moment these buns hit the table!
Step One: Transforming Spinach into "Green Gold" Dough
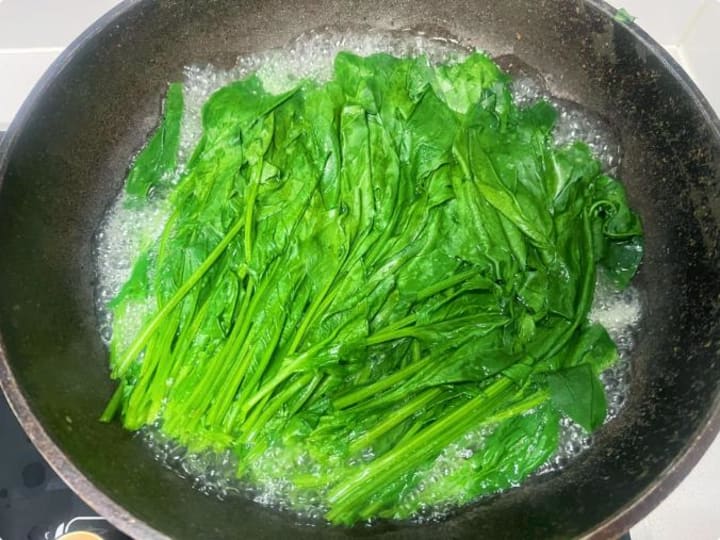
1. Select & Blanch: Choose a vibrant bunch of fresh spinach. Wash thoroughly. Bring a pot of water to a rolling boil. Add a few drops of cooking oil and a pinch of salt – this preserves the brilliant green hue. Submerge the spinach, swirling it for a mere 10-15 seconds until just wilted. Immediate removal is crucial; overcooking destroys its delicate freshness and nutrients.
Pro Tip: The oil creates a protective coating, while salt enhances color retention and flavor.
2. Shock & Squeeze: Immediately transfer the blanched spinach into ice water. This "shock" halts cooking, locking in color and texture. Once cool, drain and vigorously wring out every drop of moisture using your hands or a clean cloth. Thorough drying (aim for a near-desiccated state) is paramount for achieving the perfect dough consistency later. Finely chop the squeezed spinach.
Science Note: Removing excess water prevents the dough from becoming sticky and gummy, ensuring proper gluten development.
3. Mix & Knead: In a large mixing bowl, combine all-purpose flour, 1 teaspoon of instant yeast, and a pinch of sugar (the yeast’s "snack" to boost activity). Add the finely chopped spinach. Gradually pour in cool water (room temperature is fine in summer) while stirring with chopsticks or a fork until shaggy clumps form. Turn out onto a lightly floured surface and knead for 8-10 minutes until smooth and elastic.
Kneading Insight: Proper kneading develops gluten, giving the buns their essential structure and chew.
4. First Rise: Place the kneaded dough ball back into the lightly oiled bowl. Cover with a damp cloth or plastic wrap. Let it rest in a warm, draft-free spot for 40-60 minutes, or until roughly doubled in size. Summer warmth accelerates fermentation.
Fermentation Check: Gently poke the dough; if the indentation slowly springs back, it's ready.
Step Two: Crafting the "Umami Bomb" Filling
1. Meat Prep: Select 300g (approx. 10.5 oz) of pork shoulder or leg meat with a 30% fat ratio (三分肥七分瘦). Hand-chop or pulse in a food processor until coarsely ground – slight texture enhances the eating experience. Avoid a paste-like consistency.
Texture Tip: Hand-chopping yields superior texture, but a processor pulse works well; just don't overdo it.
2. Hydrate & Tenderize: Place the ground pork in a large bowl. Gradually add 3-4 tablespoons of chilled ginger-scallion water (made by steeping minced ginger and scallion whites in hot water, then cooling), adding 1 tablespoon at a time. Stir vigorously in one direction only (clockwise or counter-clockwise) until the liquid is fully absorbed before adding more. This "water incorporation" (打水) is key for juicy, tender filling.
Why One Direction? Stirring consistently in one direction aligns the meat proteins, creating a bouncy, cohesive texture.
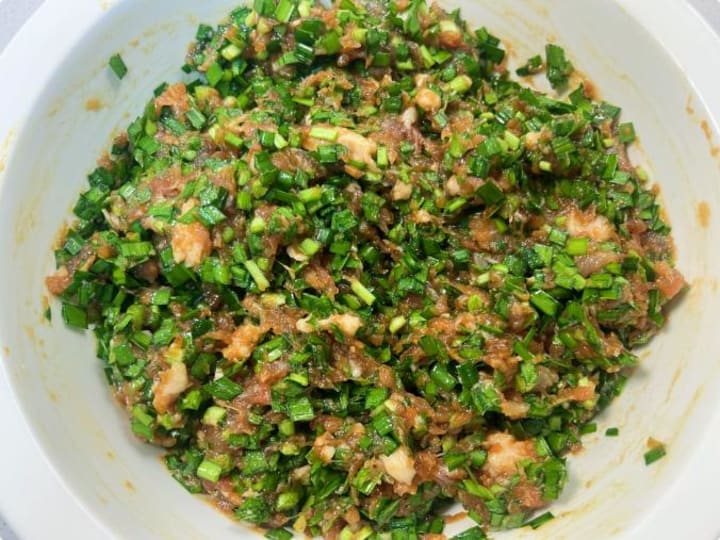
3. Season & Build Flavor: To the hydrated meat, add: 2 tablespoons light soy sauce (生抽 for savoriness), 1 teaspoon dark soy sauce (老抽 for color), 1 tablespoon oyster sauce (蚝油 for depth), ½ teaspoon white pepper powder, 1 teaspoon sesame oil, and ½ teaspoon salt (adjust to taste). Continue stirring vigorously in the same direction until the mixture becomes sticky, cohesive, and slightly elastic ("上劲" – shàng jìn). This indicates the proteins have bound properly.

4. Incorporate Greens: Finely chop 200g (approx. 7 oz) of fresh Chinese chives (韭菜). Toss them lightly with 1 teaspoon of sesame oil before adding to the meat mixture. This oil coating helps seal in the chives' moisture and prevents them from making the filling watery. Gently fold the chives into the seasoned pork until just combined. Avoid overmixing.
Chive Care: The sesame oil "seal" and gentle folding preserve the chives' bright flavor and crisp-tender bite.
Step Three: Shaping the Plump "Green Treasures"
1. Punch Down & Degas: Gently deflate the risen spinach dough on a lightly floured surface. Knead briefly (about 1-2 minutes) to expel large air bubbles trapped during fermentation. This ensures an even, smooth texture in the cooked buns.
Why Degas? Removing large bubbles prevents uneven rising and giant air pockets in the finished buns.
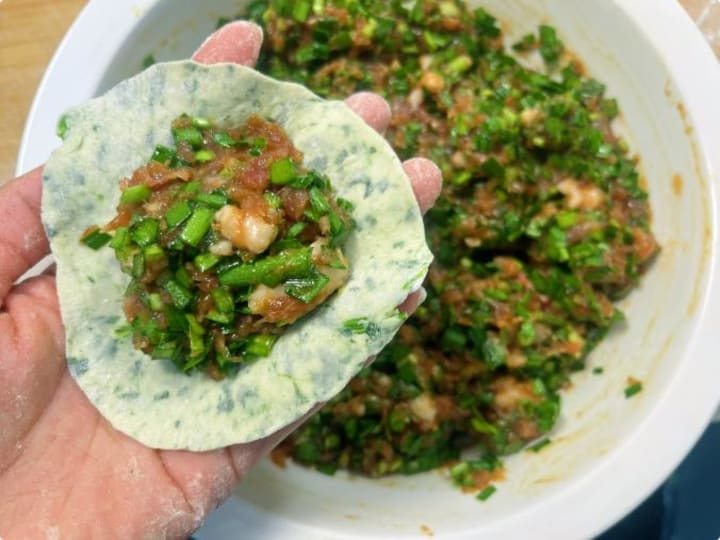
2. Portion & Roll: Roll the dough into a long log. Divide it into 12-16 equal-sized pieces using a bench scraper or knife. Flatten one piece slightly with your palm. Using a rolling pin, roll it into a 3-4 inch diameter circle, ensuring the center is slightly thicker (approx. ⅛ inch) than the edges (approx. 1/16 inch). This thickness gradient supports the filling and prevents bursting during cooking.
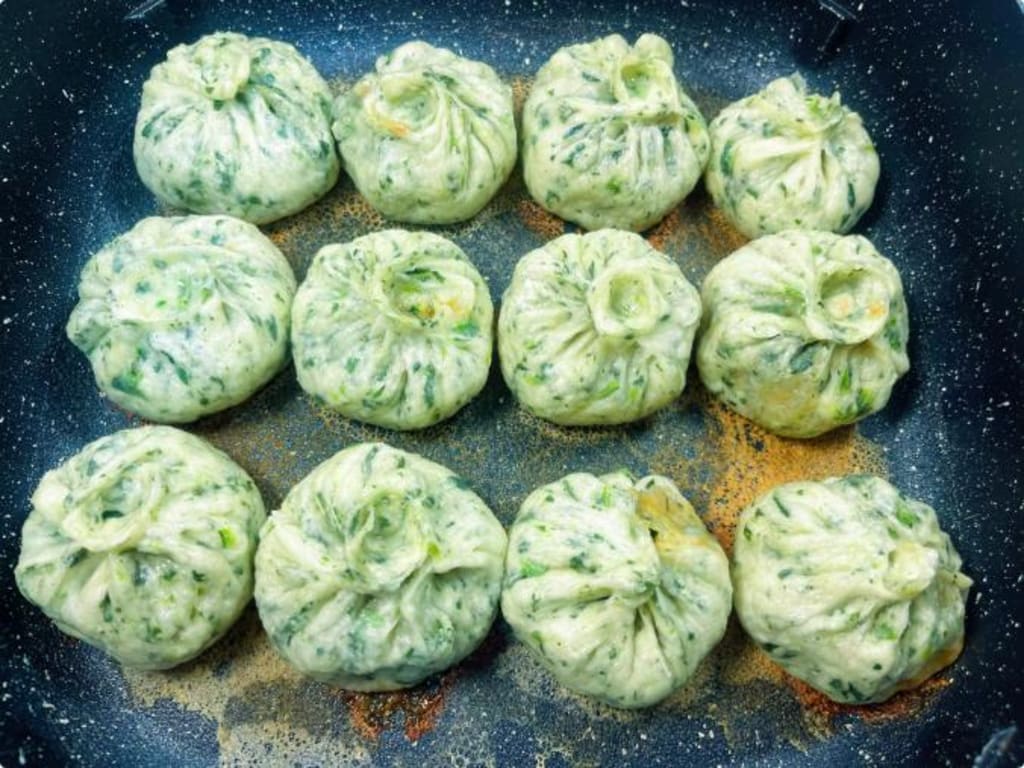
3. Fill & Seal: Place a generous heaping tablespoon of the pork-chive filling (about 1.5 oz) in the center of the wrapper. Using your preferred technique (pleated bun 包子 or crescent dumpling 饺子 style), firmly pinch the edges closed, ensuring absolutely no gaps remain to trap steam and prevent leaks. The key is a tight, secure seal.
4. Final Proof: Arrange the shaped buns on a lightly floured tray, covered loosely with plastic wrap or a damp cloth. Let them rest for 10-15 minutes. This brief "relaxation" period allows the gluten to loosen slightly, resulting in softer, puffier buns after cooking.
Step Four: The Magic "Fry-Steam" Method for Perfect Texture
1. Pan-Sear the Base: Heat 2 tablespoons of neutral cooking oil (like vegetable or canola) in a large, lidded non-stick skillet over medium-low heat. Carefully place the proofed buns seam-side up into the skillet, leaving about 1 inch of space between them to allow for expansion. Sear undisturbed for 3-4 minutes, or until the bottoms develop a deep, golden-brown crust.
Non-Stick Note: A good non-stick skillet is crucial to prevent sticking and ensure easy release.
2. The Transformative Steam: Here’s the pivotal moment! Quickly pour in 1 cup of warm starch water slurry (mix 1 cup warm water with 1 tablespoon cornstarch or all-purpose flour). Stand back – it will sizzle and steam dramatically ("滋啦"!)! Immediately cover the skillet tightly with the lid.
3. Steam to Perfection: Increase the heat to medium. Allow the buns to steam-fry for 12-15 minutes. The starchy water creates steam that cooks the buns through while simultaneously forming a delicate, lacy, crispy skirt ("冰花" bīng huā) around the base. Listen for the fierce sizzle to subside into gentle crackling.
4. Crisp & Serve: Once the water has completely evaporated (peek carefully – the sizzling sound will diminish significantly, and the aroma will be overwhelming!), remove the lid. Let the buns cook uncovered for another 1-2 minutes to crisp up the lace skirt and any remaining moisture on the tops. Slide a spatula underneath to release them – they should come out easily with the crispy lace attached. Transfer to a serving plate immediately.
The Grand Finale: Summer's Green Glory on a Plate
These Spinach-Wrapped Pork & Chive Fry-Steam Buns (菠菜猪肉韭菜生煎包) masterfully blend summer’s verdant freshness with the soul-warming essence of home cooking. Presented straight from the pan, their unique green hue instantly captivates. The textural symphony is divine: the irresistibly crispy, golden lace and seared base harmonize with the incredibly soft, fluffy spinach-infused dough. Inside, the savory, juicy pork filling bursts forth, perfectly complemented by the bright, pungent kick of fresh chives.
That bit of effort in the kitchen? Utterly worthwhile, repaid tenfold by the joyous sight of your family gathered around the table, eagerly reaching for seconds (and thirds!). Don’t let the season pass you by – seize the moment while spinach is at its peak freshness and vibrant best. Try this revolutionary method today, and transform your family table with the captivating allure and delicious flavor of these extraordinary "Green Delights." Serve hot with a side of black vinegar with ginger shreds for dipping, or a simple chili oil. Leftovers reheat beautifully in a skillet or steamer. Enjoy the taste of summer!
About the Creator
My Tous les Jours Trip
As someone who lives in a rural area, I don't get the chance to visit fancy restaurants or bakeries that often. So, when a friend told me about a French-Asian bakery that's less than an hour away, I knew I had to check it out and grab some pictures for social media. Tous les Jours ended up providing an immersive experience that went above and beyond my expectations--although I did leave with a few reservations.
By Kaitlin Shanks23 days ago in Feast
Edible Offal Market Size and Forecast 2025: A Global Shift Toward Sustainable, Affordable Protein
Edible Offal Market Size and Forecast 2025 The Edible Offal Market is projected to reach US$ 59.60 billion by 2033, rising from US$ 39.66 billion in 2024, registering a CAGR of 4.63% from 2025 to 2033, according to Renub Research. This steady expansion reflects a powerful global shift toward affordable, nutrient-dense protein sources, culturally rooted culinary practices, rising meat consumption, sustainable meat processing, and increasing awareness of food waste reduction. Particularly in developing regions and ethnic cuisine markets, offal is no longer seen as a by-product—it is emerging as both a nutritional asset and a sustainability solution.
By Aaina Oberoia day ago in Feast


Comments
There are no comments for this story
Be the first to respond and start the conversation.