
Homemade Chocolate Marshmallows – Soft, Fluffy, and Delicious
Chocolate Marshmallows


Who doesn’t love a marshmallow? Now imagine it with a rich swirl of chocolate flavor, soft as a cloud and made fresh in your kitchen. That’s what homemade chocolate marshmallows offer—next-level comfort food for hot drinks, s’mores, desserts, or just snacking straight from the tin. And best of all? They're surprisingly easy to make.
Whether you’re a seasoned home cook or trying candy-making for the first time, this guide will walk you through creating your own batch of fluffy, chocolatey marshmallows from scratch.
🧾 Ingredients
Marshmallow Base:
½ cup (120ml) cold water (for blooming the gelatin)
3 tablespoons (approx. 3 envelopes or 21g) unflavored gelatin powder
½ cup (120ml) cold water (for the sugar syrup)
1 ½ cups (300g) granulated sugar
1 cup (240ml) light corn syrup
¼ teaspoon fine salt
1 teaspoon vanilla extract
Chocolate Flavoring:
⅓ cup (35g) unsweetened cocoa powder
3 oz (85g) dark chocolate, chopped (optional but recommended)
For Coating:
½ cup (60g) powdered sugar
¼ cup (30g) cornstarch
👩🍳 Step-by-Step Instructions
Step 1: Bloom the Gelatin
Start by pouring ½ cup of cold water into the bowl of a stand mixer. Sprinkle the gelatin evenly over the surface. Let it rest for about 10 minutes. This gives the gelatin time to absorb the water and form a soft, spongy texture—preparing it to blend smoothly later.
Step 2: Prepare the Sugar Syrup
In a medium saucepan, combine the other ½ cup of cold water, sugar, corn syrup, and salt. Place over medium heat and stir gently until everything is dissolved.
Once dissolved, stop stirring and allow the mixture to cook. Attach a candy thermometer to the side of the pan and heat the mixture until it reaches 240°F (115°C). This temperature ensures the perfect springy texture for marshmallows—soft but firm enough to hold shape.
💡 Tip: Don’t stir once the sugar begins to boil. Letting it heat undisturbed helps maintain clarity and texture.
Step 3: Whip the Base
With the mixer on low speed, slowly drizzle the hot sugar syrup into the bloomed gelatin. It’s important to do this gradually so the gelatin doesn’t get overwhelmed by the heat.
Once fully added, increase the mixer to high speed. Whip the mixture for 8 to 10 minutes, or until it turns thick, glossy, and almost triples in volume. It should look like soft meringue or thick whipped cream—this is your marshmallow base.
Step 4: Add Chocolate
While the marshmallow is whipping, combine the cocoa powder with a bit of warm water to form a smooth paste. If you’re using chopped chocolate, gently melt it in the microwave or a double boiler until smooth.
When the marshmallow reaches full volume, reduce the mixer speed and quickly fold in the chocolate paste, melted dark chocolate, and vanilla extract. This step gives your marshmallows a rich, chocolatey flavor that sets them apart from the store-bought kind.
Step 5: Pour and Set
Line an 8x8 inch square baking pan with parchment paper and lightly dust with a mix of cornstarch and powdered sugar. This keeps the marshmallows from sticking to the pan.
Quickly scrape the marshmallow mixture into the prepared pan. Use a spatula lightly greased with oil or butter to smooth the top. The mixture will begin to firm up quickly, so work fast.
Let it rest at room temperature for 6 hours or overnight so it can set completely.
Step 6: Cut and Coat
In a shallow bowl, mix powdered sugar and cornstarch in equal parts.
Once the marshmallow block is firm, lift it from the pan and place it on a cutting board. Use a sharp knife or kitchen scissors to cut it into cubes. Dust each marshmallow in the coating mixture to keep them from sticking to one another.
Now, they’re ready to enjoy!
🍫 Expert Tips
Work quickly once mixing ends – marshmallows firm up fast.
Oil your tools – use a bit of cooking spray or butter on your spatula and knife.
Use a candy thermometer – accuracy is key for texture.
Customize – you can add spices like cinnamon, coffee extract, or peppermint oil for seasonal variations.
🎨 Flavor Variations
Want to take your chocolate marshmallows to the next level?
Peppermint Mocha: Add ½ teaspoon peppermint extract with the vanilla and a touch of espresso powder.
Salted Caramel Swirl: Drizzle warm caramel into the mixture before pouring it into the pan.
Chili Chocolate: Add a pinch of cayenne or chili powder to the cocoa paste for a spicy twist.
Cookies & Cream: Fold in crushed chocolate cookies right before pouring into the pan.
☕ Serving Ideas
Chocolate marshmallows are versatile and can be used in so many ways:
Drop into hot cocoa for a melty, creamy upgrade
Add to s’mores for a more decadent treat
Use as a topping for brownies or cupcakes
Wrap in clear cellophane bags for holiday gifts
Serve with fruit fondue as a dipper
🧊 Storage Tips
Room Temperature: Store marshmallows in an airtight container lined with parchment or wax paper. They’ll stay fresh for up to 2 weeks.
Avoid Humidity: Moisture can make marshmallows sticky and gooey.
Freezing: Not ideal—marshmallows can lose their texture and become rubbery after thawing.
❓ Frequently Asked Questions
Can I make these without a stand mixer?
Yes, but it will be more challenging. You’ll need a hand mixer with strong power and patience. Whipping the mixture takes time and effort.
Do I have to use corn syrup?
Corn syrup helps prevent sugar crystallization and gives marshmallows their smooth texture. You can try glucose syrup as a substitute, but results may vary.
What if I don’t have a candy thermometer?
It’s highly recommended for this recipe. If you’re in a pinch, test by dropping a bit of syrup into cold water. If it forms a soft, squishy ball, it’s ready.
Can I color or decorate the marshmallows?
Absolutely! You can swirl in food coloring before setting, dust the tops with cocoa powder, or even drizzle with chocolate.
💬 Final Thoughts
Homemade chocolate marshmallows are a fun, tasty project that yields incredibly satisfying results. They’re soft, flavorful, and totally customizable. Once you’ve made them from scratch, you’ll wonder how you ever settled for the store-bought version.
So grab your apron and mixer—your next favorite chocolate treat is just a few steps away.
About the Creator
Freshlymaderecipes
Welcome I'm passionate about creating easy, delicious recipes that bring joy to every table. From quick weeknight meals to delightful treats, flavorful dishes and savor the journey with me! 🌟
Keep reading
More stories from Freshlymaderecipes and writers in Feast and other communities.
🥦 Broccoli Cheese Soup: The Ultimate Comfort in a Bowl
When the weather cools and comfort food calls, there’s one cozy classic that always delivers: Broccoli Cheese Soup. Creamy, rich, and brimming with tender broccoli and melted cheddar, this soup is as comforting as a soft blanket on a cold day. Whether you're a soup season enthusiast or simply craving a hearty one-pot meal, this beloved dish deserves a permanent spot in your recipe rotation.
By Freshlymaderecipes7 months ago in Feast
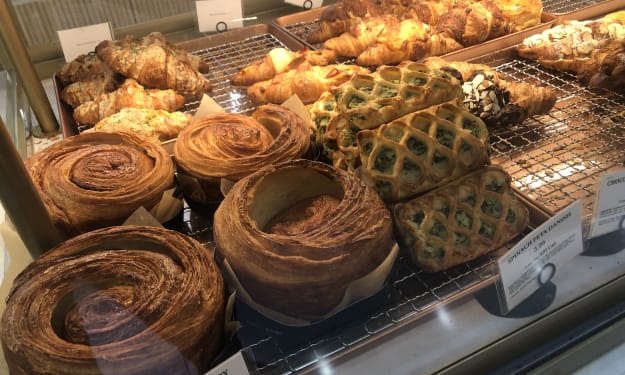
My Tous les Jours Trip
As someone who lives in a rural area, I don't get the chance to visit fancy restaurants or bakeries that often. So, when a friend told me about a French-Asian bakery that's less than an hour away, I knew I had to check it out and grab some pictures for social media. Tous les Jours ended up providing an immersive experience that went above and beyond my expectations--although I did leave with a few reservations.
By Kaitlin Shanks19 days ago in Feast
Vegan Food Market Trends & Summary (2025–2033)
Introduction The global shift toward healthier, more ethical, and environmentally responsible consumption has transformed vegan food from a niche lifestyle choice into a fast-growing mainstream market. According to Renub Research, the Vegan Food Market was valued at USD 20.06 billion in 2024 and is projected to reach USD 46.09 billion by 2033, expanding at a robust CAGR of 9.68% during 2025–2033. This impressive trajectory reflects not only changing consumer values but also rapid innovation across food technology, retail, and distribution.
By jaiklin Fanandishabout 10 hours ago in Feast


Comments
There are no comments for this story
Be the first to respond and start the conversation.