
DIY Furniture Upcycling: Transforming Old Pieces into Stylish Gems
That piece of furniture is not ready to go to the Goodwill yet.
Are you tired of the same old furniture in your home? Instead of splurging on new pieces, why not tap into your creative side and embark on a DIY furniture upcycling journey? Upcycling is the art of transforming old, worn-out furniture into stylish, one-of-a-kind gems that breathe new life into your space. In this article, we will explore the world of DIY furniture upcycling, providing you with inspiration, tips, and real-life examples to help you unleash your creativity and turn outdated furniture into stunning pieces that will be the envy of all.
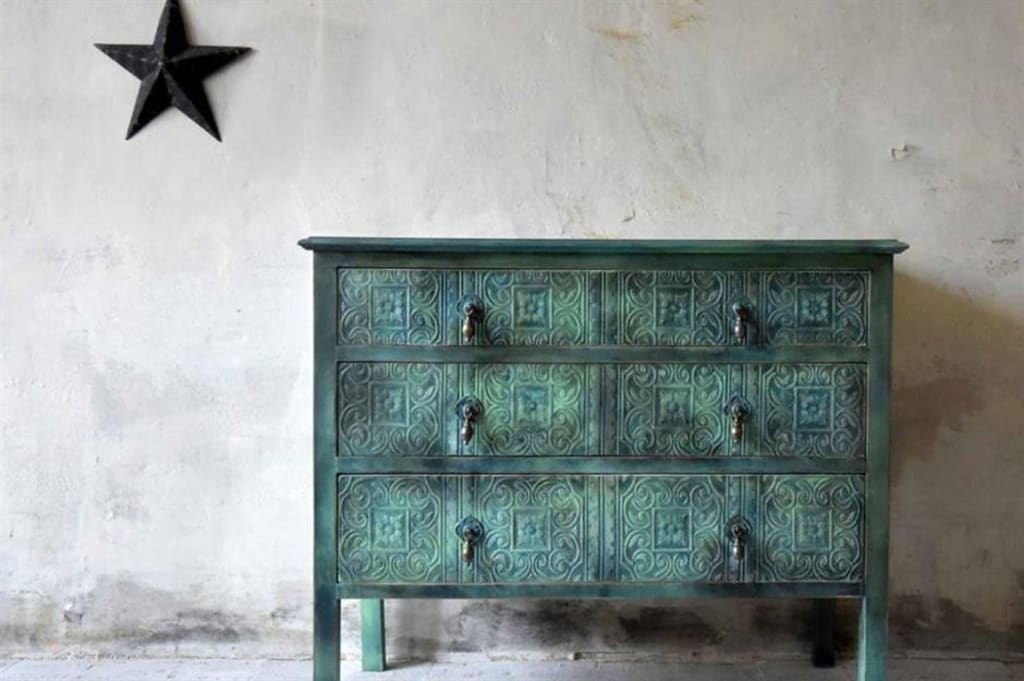
Choose the Right Piece: The first step in DIY furniture upcycling is selecting the right piece to transform. Look for solid, well-built furniture that has good bones but may be outdated in terms of style or finish. Thrift stores, flea markets, or even your own attic can be treasure troves for finding furniture with potential. Consider the size, shape, and functionality of the piece to ensure it fits your needs and can be transformed to suit your style. Sarah stumbled upon an old wooden dresser at a local thrift store. While the piece had scratches and a dated finish, she recognized its sturdy construction and saw the potential for a stunning transformation. With a vision in mind, she took on the challenge of upcycling the dresser into a chic statement piece for her bedroom.
Clean and Repair: Before diving into the creative process, it's crucial to clean and repair the furniture. Remove any dirt, grime, or old finishes using appropriate cleaning products. Inspect the piece for any structural damage or loose parts and make necessary repairs. Ensuring a solid foundation will guarantee a successful upcycling project. Jason and Lisa acquired an antique dining table from a family member. Before starting the upcycling process, they carefully cleaned the table, removing years of dirt and grime. They also tightened loose screws and reinforced wobbly legs, ensuring the table was structurally sound before applying their creative touch.
Choose a Design Concept: Consider the overall style and aesthetic you want to achieve with your upcycled furniture. Browse magazines, websites, or social media platforms like Pinterest for inspiration. Whether it's a vintage, rustic, or modern look, having a design concept in mind will guide your decision-making process and create a cohesive final result. David, a DIY enthusiast, decided to upcycle a plain wooden coffee table into a mid-century modern masterpiece. He researched iconic mid-century designs and incorporated elements like clean lines, tapered legs, and bold geometric patterns into his upcycling project.
Sand and Prep: To ensure a smooth and professional-looking finish, it's important to sand the furniture thoroughly. Use sandpaper or a power sander to remove the existing finish or roughen the surface for better paint adhesion. Take your time with this step, paying attention to details and achieving a consistent surface texture. Emily, a furniture upcycling enthusiast, acquired an old wooden bookshelf. She meticulously sanded the entire piece, removing the old varnish and creating a smooth surface. This step prepared the bookshelf for the paint and allowed for a flawless final result.
Get Creative with Paint: Paint is a powerful tool in furniture upcycling. Choose a high-quality paint suitable for your desired finish (e.g., chalk paint, latex paint) and unleash your creativity. Consider bold colors, ombre effects, distressed finishes, or even stenciling for added visual interest. Don't be afraid to experiment and let your personal style shine through. Mike, a DIY enthusiast, upcycled a tired-looking dresser into a vibrant statement piece for his living room. He opted for a bold turquoise color and added a distressed finish to give the piece a vintage, shabby-chic look. The final result was a show-stopping dresser that became the focal point of the room.
Accentuate with Hardware and Details: Small details can make a big difference in transforming a piece of furniture. Consider replacing outdated or worn-out hardware with stylish knobs, handles, or drawer pulls. Add decorative trim, stencil patterns, or even decoupage to create unique focal points. These subtle touches will elevate the overall aesthetic of the upcycled piece. Olivia, a creative DIYer, upcycled an old wooden side table by adding metallic accents. She replaced the plain wooden drawer pulls with sleek gold handles and applied metallic gold paint to the table legs, creating a glamorous and eye-catching piece that perfectly complemented her living room decor.
DIY furniture upcycling is a rewarding journey that allows you to transform old, forgotten furniture into stylish gems that reflect your personal style and creativity. By choosing the right piece, cleaning and repairing, selecting a design concept, sanding and prepping, getting creative with paint, and accentuating with hardware and details, you can breathe new life into outdated furniture and create unique statement pieces for your home. So, let your imagination run wild, embrace your inner artist, and embark on the adventure of DIY furniture upcycling. The possibilities are endless, and the results will be truly remarkable.
About the Creator
Keep reading
More stories from Grace Tyson and writers in Longevity and other communities.
10 Must-Try DIY Craft Projects for Home Decor Enthusiasts
Are you a home decor enthusiast looking for unique and personalized ways to spruce up your living space? Look no further! In this article, we have curated a list of 10 must-try DIY craft projects that will unleash your creativity and add a touch of charm to your home. From repurposing everyday items to creating stunning wall art, these projects offer endless possibilities for expressing your personal style. So, grab your crafting supplies and get ready to embark on an exciting journey of DIY home decor!
By Grace Tyson3 years ago in Longevity
Day 4 of Quitting
If this is how sobriety feels, maybe it’s better to go through life a little buzzed… this, along with other hits like, I want to kill myself, I wish I was dead, and I’m going to throw myself off a bridge have been the only thoughts on rotation these past few days. I promise myself that if, in a month, I still feel like this (‘this’ meaning despondent, full of rage, and simultaneously numb) I can go back to smoking. Until mid-February though? Nicotine is off the table.
By sleepy drafts11 days ago in Longevity
Newborn Screening Market Size and Forecast 2025–2033
Introduction The global newborn screening market is emerging as a cornerstone of preventive healthcare, ensuring that life-threatening and disabling conditions are identified at the earliest possible stage of life. According to Renub Research, the newborn screening market is projected to expand from US$ 874.56 million in 2024 to US$ 1,622.78 million by 2033, registering a robust compound annual growth rate (CAGR) of 7.11% from 2025 to 2033.
By Janine Root 4 days ago in Longevity


Comments
There are no comments for this story
Be the first to respond and start the conversation.