
Guide to Removing Clothes in Photoshop: Ethical Considerations and Techniques
Mastering Photoshop's Tools While Prioritizing Ethical Editing Practices

Photoshop is a powerful tool with endless capabilities for photo editing, retouching, and creative design. One of the more controversial aspects of Photoshop is its ability to manipulate images, including the removal of clothing. This ability raises serious ethical concerns about privacy, consent, and the potential for misuse.
In this article, we'll cover the technical steps for modifying images in Photoshop for professional reasons, such as fashion retouching, product mockups, or costume design, while stressing the importance of adhering to ethical guidelines.
Why Would You Remove Clothes in Photoshop?
Before we dive into the "how," it’s important to clarify the professional, legitimate reasons for removing or altering clothing in Photoshop:
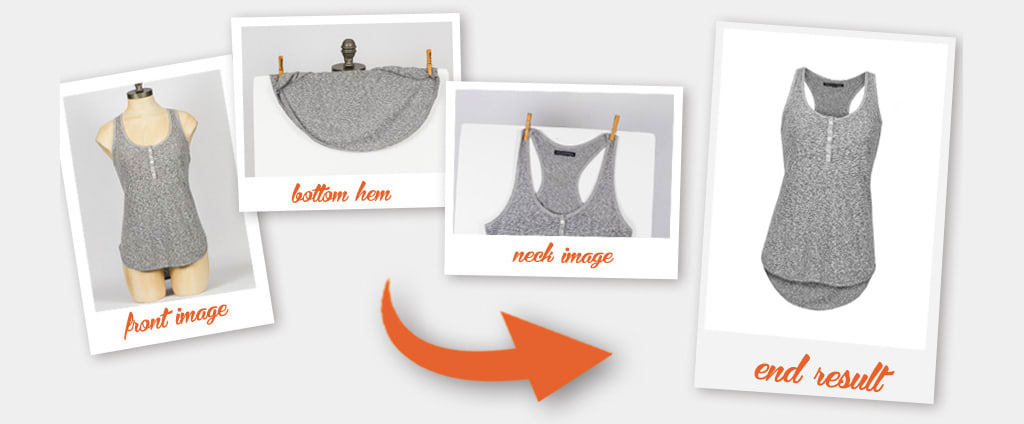
Fashion Design and Mockups: Fashion designers often create digital clothing designs by removing parts of existing outfits in photos to mock up or showcase their own designs.
Product Photography: In e-commerce, the removal or modification of clothing might be required to highlight specific products or design variations, such as adding logos or changing colors.
Artistic Expression: Sometimes, photo manipulation serves an artistic or illustrative purpose where clothing elements are adjusted for conceptual work or digital paintings.
Ethical Considerations: Privacy, Consent, and Context
Before discussing any technical steps, it's crucial to understand that removing or altering someone's clothing in Photoshop without their consent is a violation of privacy and can have serious legal consequences. Ethical photo editing requires permission from all individuals involved, especially when dealing with personal images.
Consent: Always obtain explicit permission from the subject of the photo before altering their appearance.
Respect Boundaries: Avoid any edits that may invade personal privacy or misrepresent the subject.
Purpose Matters: Make sure the edits serve a professional or creative purpose that aligns with ethical standards.
How to (Ethically) Remove Clothing in Photoshop
Now, let's walk through the process of removing or modifying clothing in Photoshop for professional purposes, such as creating mockups or digital alterations.
Step 1: Open the Image in Photoshop
Start by opening the image in Photoshop. You can either drag and drop the file or open it through File > Open.
Step 2: Use the Pen Tool or Lasso Tool to Select the Area
Once the image is open, select the area of clothing you want to modify or remove using the Pen Tool (P) or the Lasso Tool (L). These tools allow for precise selections, especially when working around complex edges like fabric.
Pen Tool: The Pen Tool gives you more control and precision when selecting areas with hard edges.
Lasso Tool: For more organic or quick selections, the Lasso Tool works well with freeform shapes.
Step 3: Create a Layer Mask
After selecting the area of clothing, create a layer mask by clicking on the "Add Layer Mask" button at the bottom of the Layers panel. This will hide the selected area temporarily without actually deleting it, allowing you to make non-destructive edits.
Step 4: Use the Clone Stamp Tool or Brush Tool
Once the clothing area is hidden, use the Clone Stamp Tool (S) or the Brush Tool (B) to fill in the underlying area.
Clone Stamp Tool: Samples nearby pixels and allows you to "clone" parts of the background or skin to cover up the removed clothing.
Brush Tool: For artistic work, use the Brush Tool to paint over the area, giving you more control over how the final result looks.
Ensure the skin tone and background blend seamlessly to avoid any visible signs of manipulation.
Step 5: Refine Edges and Textures
Once you've removed the clothing, it's essential to refine the edges and add texture where necessary. You can use blending modes, the Smudge Tool, or Dodge and Burn techniques to make the final edit more realistic.
Smudge Tool: Softens harsh edges and blends the textures smoothly.
Dodge and Burn: Lighten or darken certain areas to create more natural-looking shadows and highlights.
Step 6: Final Touches
After completing the main edit, make sure the overall image looks natural and cohesive. Adjust colors, contrast, and sharpness using adjustment layers like Hue/Saturation or Levels.
Conclusion: Ethical Usage is Key
While Photoshop provides endless creative possibilities, including the removal of clothing, it’s vital to practice ethical editing. Always work with consent, clear purpose, and professional standards in mind. Whether you’re working on fashion designs, product mockups, or digital artwork, understanding the implications of your edits will help you stay on the right side of the ethical line.
About the Creator
Perfect Retouching
Perfect Retouching offers the best solution for all photo retouching services. We provide Jewellery, Product, Beauty, and Headshot Retouching Services by our expert team at budget price.
Visit here- https://www.perfectretouching.com/
Reader insights
Nice work
Very well written. Keep up the good work!
Top insight
Compelling and original writing
Creative use of language & vocab
Keep reading
More stories from Perfect Retouching and writers in Art and other communities.
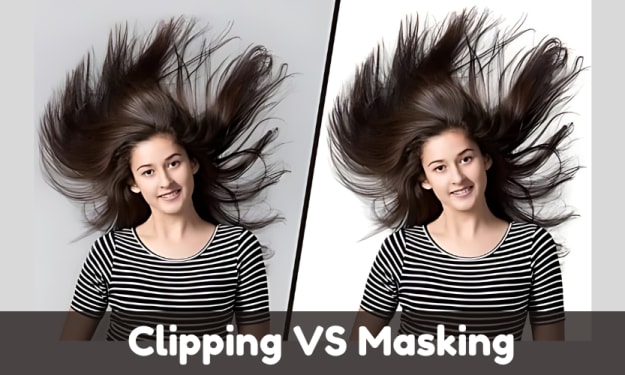
Clipping Path vs. Clipping Mask: Which Technique is Best for Your Design Needs?
In the world of photo editing, especially for e-commerce and graphic design, two techniques stand out for isolating objects from backgrounds—clipping path and clipping mask. While both are essential tools in image manipulation, they serve different purposes and are used in distinct scenarios. Understanding the differences between these two techniques is crucial for selecting the right one for your project. Here’s a detailed breakdown:
By Perfect Retouchingabout a year ago in Art
Jim Sloan
By Brian D’Ambrosio At 90, Jim Sloan has lived several lifetimes’ worth of work—carpenter, sign painter, excavator, sawmiller, road-builder and the go-to rattlesnake remover of Galisteo, New Mexico. Art may be the through-line, but it has never been the source of his income, nor the center of his universe. Sloan has always kept one foot in the studio and the other in the soil, without bothering to decide which world he truly belongs to. The truth is that he fits cleanly into neither, and he has long since stopped trying.
By Brian D'Ambrosio 7 days ago in Art


Comments
There are no comments for this story
Be the first to respond and start the conversation.