
Standard Video Quality for Uploading on YouTube(2025 Guide)
Best Resolutions, Encoding Settings, and Quality Optimization Tips

When uploading videos to YouTube, understanding the recommended quality settings is essential to ensure the best viewing experience. YouTube supports a wide range of resolutions and encoding formats, but choosing the right settings can significantly impact video clarity and performance.
1. Recommended Video Resolutions
YouTube automatically adjusts playback quality based on the viewer’s internet speed and device. However, uploading in the highest possible resolution ensures that viewers get the best experience.
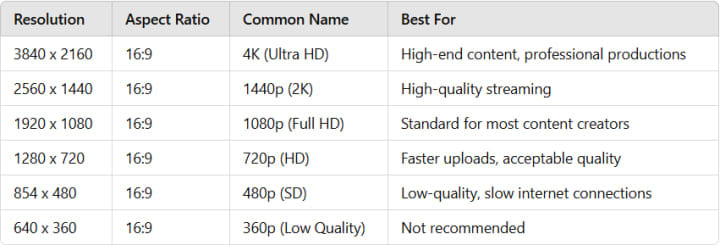
1080p at 60 FPS is the most commonly used resolution among content creators, balancing quality and file size. However, 4K resolution is becoming increasingly popular for professional content.
2. Best Video Encoding and File Formats
To ensure high-quality playback, YouTube recommends specific file formats and encoding settings:
Preferred Format:
- Container: MP4
- Codec: H.264
- Audio Codec: AAC-LC
- Frame Rate: 24, 30, or 60 FPS (match original recording)
Bitrate Settings for H.264 Encoding (Standard Dynamic Range)

Higher bitrates improve quality but increase file size. YouTube re-encodes all uploads, so using a higher bitrate helps retain more detail after compression.
3. How to Improve Video Quality Before Uploading
Even if a video is recorded in high resolution, compression and poor settings can degrade quality. Here are some steps to optimize video quality before uploading:
Recording Best Practices
- Use a camera capable of at least 1080p at 30 FPS.
- Ensure proper lighting to minimize noise and artifacts.
- Use a tripod or gimbal to stabilize footage.
- Record at the highest bitrate possible within your storage and processing limits.
Using AI to Enhance Video Quality
If the original footage is low-resolution or has noise, AI-based video enhancement tools can help improve quality before uploading.
AVCLabs Video Enhancer AI offers:
- Upscaling low-resolution videos to 1080p, 4K, or even 8K.
- Reducing noise and compression artifacts for clearer visuals.
- Increasing frame rate for smoother motion.
- Color enhancement and sharpening for a more professional look.
Steps to Enhance Video Quality Using AVCLabs Video Enhancer AI
- Install AVCLabs Video Enhancer AI.
- Import your video into the software.
- Choose enhancement options such as upscaling to 4K, reducing noise, and stabilizing motion.
- Process and export the improved video.
- Upload the enhanced video to YouTube.
For videos recorded in 720p or lower, upscaling with AI can significantly improve sharpness and clarity.
4. Common Issues and Fixes When Uploading to YouTube
Loss of Quality After Uploading
YouTube compresses videos during processing, often reducing quality. It may take hours before higher-resolution versions are available.
Solution:
Upload at a higher bitrate than the recommended minimum.
Allow time for YouTube to process the HD/4K version before sharing the link.
Color Changes After Uploading
Incorrect color settings can cause shifts in saturation or brightness.
Solution:
Ensure the video is encoded in Rec. 709 color space.
Adjust color grading before exporting.
Choppy Motion or Stuttering
Low frame rates or improper encoding settings can cause choppy playback.
Solution:
- Record at 30 or 60 FPS.
- Use frame interpolation software to increase FPS before uploading.
5. Final Recommendations
- Always record in at least 1080p at 30/60 FPS.
- Use MP4 (H.264) format for best compatibility.
- Upload at a higher resolution (e.g., 4K) for better playback quality.
- Enhance video quality with AI tools before uploading.
- Allow YouTube to fully process the HD version before sharing.
By following these guidelines, content creators can maximize video quality and provide the best viewing experience on YouTube.
About the Creator
EveWilliams
Youtuber
Keep reading
More stories from EveWilliams and writers in Photography and other communities.
What Are the Best iPhone Camera Settings for Filming YouTube Videos?
1. Resolution and Frame Rate For the best clarity and smooth motion, the resolution and frame rate settings are key. Resolution: To capture stunning detail, 4K resolution is your best option. Depending on your content style, you can choose either 30fps (frames per second) for standard, smooth footage or 60fps for a more cinematic, fluid look, particularly for dynamic scenes.
By EveWilliams12 months ago in Photography
Gold Chrysotype Photography Is Back and the Colours Are Breathtaking
There is a moment when a chrysotype print is lifted from its chemical bath and held up to the light stops people mid-breath. The colours that bloom across the surface — soft dusty pinks fading into deep magenta, rich cyans pooling at the edges, velvety blacks settling into the grain of the paper — look less like a photograph and more like something pulled from a dream.
By CurlsAndCommas4 days ago in Photography
Hottest in the Office
Dear Rafi, You’re very distracting to work around. For the first second I saw you the other day, I thought you were some type of executive. It took a moment to realize no, you were just the new guy, dressed up for the job he wants. Be still, my heart.
By Gabriel Shames5 days ago in Pride


Comments
There are no comments for this story
Be the first to respond and start the conversation.