
How to Import PST Files into Microsoft 365: Expert-Recommended Methods
Upload PST Files into the Microsoft 365 account. Learn the best solutions to import your PST files into Office 365 quickly.


Many organizations, big and small, are slowly and steadily moving their databases to cloud platforms. As opposed to going on server storage, cloud platforms offer better security features and improve workflow with easy collaboration. This is why companies are looking for a reliable solution to import PST files into Office 365 efficiently.
This article will go over in detail about the best methods to import PST files to Office 365 mailbox quickly. We’ll also talk about some pre-requisites of the process and the precautions to be taken. Additionally, we’ll mention top PST to Office 365 migration tool for a quicker alternative to import PST files.
Reasons to import PST to Office 365
There can be various reasons which compel users to import PST files to Office 365. Read about the most common reasons listed below:
- Backup: PST files can be stored safely in Office 365 mailbox to create a backup of the data. These files can thus be recovered in case of system crash or file corruption.
- Centralized storage: Storing all your PST files at a single place makes it much easier to manage them and search them up when needed.
- Advanced security features: Office 365 offers multiple features to keep your files protected against phishing attacks and ransomware threats.
- Regular updates: Office 365 regularly releases new updates to make the user experience better.
- Easy accessibility: Saving data in Office 365 allows users to easily share their data with clients and colleagues and makes collaboration a lot easier.
Important Pre-Requisites to Import PST to Office 365
It is extremely necessary to carefully plan out the entire migration process to successfully migrate PST files to Office 365. There are some essential pre-requisites that must be fulfilled for a safe migration. Let’s know about these requirements in detail:
- Follow the 3-2-1 backup strategy: Create multiple copies of your data with the 3-2-1 backup strategy and store it at multiple locations to avoid data loss.
- Import required data: Analyse what data needs to be migrated on priority to avoid clutter and confusion.
- File size limitations: Large PST files may create issues while importing them to Office 365. Split oversized PST files to avoid any errors or file corruption.
- Assign permissions: Properly assign correct permissions and roles to required users to avoid any authentication related errors.
- Check PST files for corruption: Verify that your PST files are healthy. Trying to import corrupt PST file to Office 365 may cause data loss.
Steps to Import PST to Office 365 Efficiently
The only way to manually import PST files to Office 365 is via the network upload method. With Microsoft’s Azure AzCopy tool, the process to import PST to Office 365 is divided in 4 steps. Let’s know about them in detail.
Step 1: Assign Required Permissions
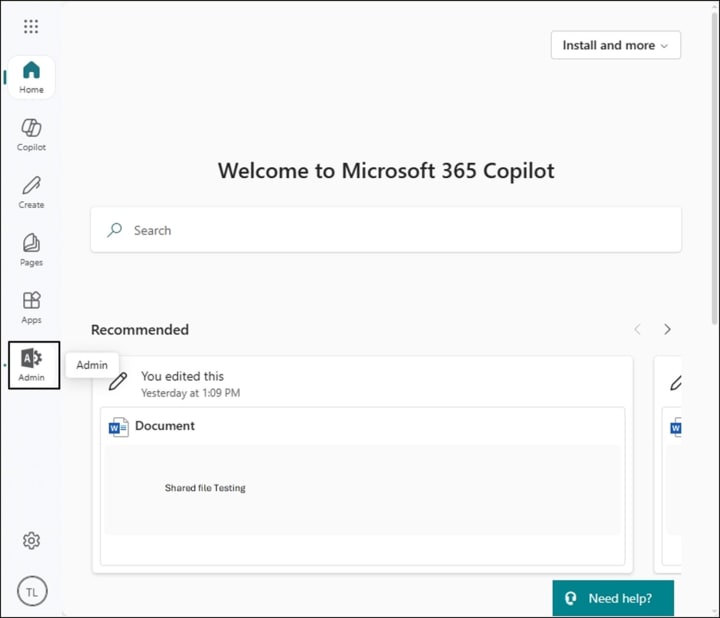
- Sign into Office 365 account using the correct admin account credentials.
- On the Microsoft 365 homepage, click on Admin to navigate to Microsoft 365 admin center.
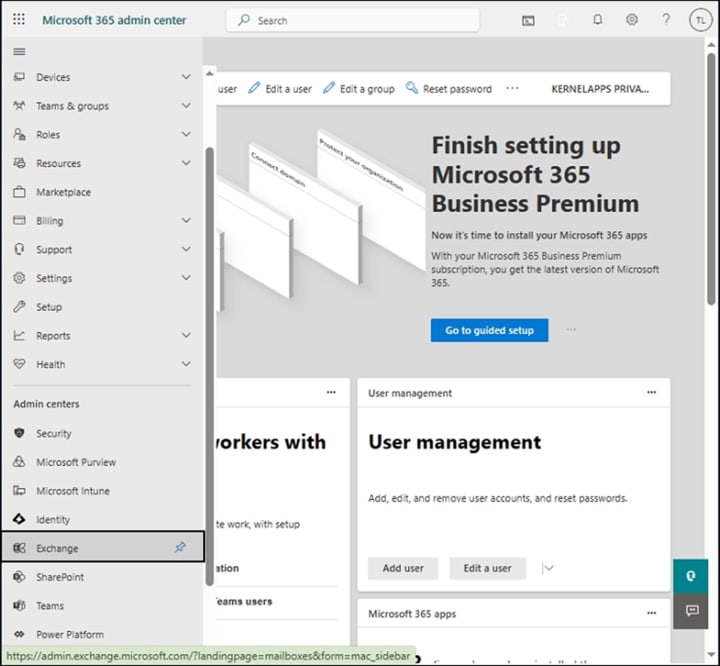
- Choose Exchange from the Admin center section to open the Exchange admin center.
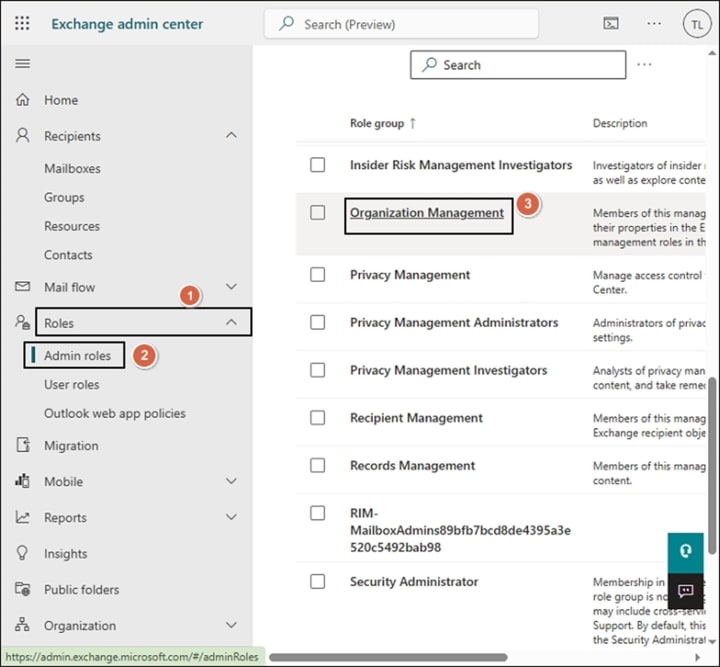
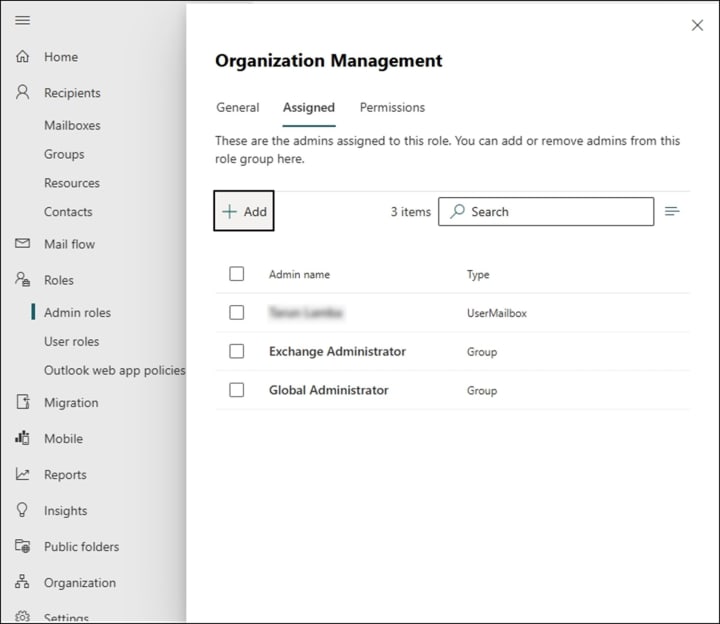
- First, click on Roles and then choose Admin roles.
- Then, scroll down the list and click on Organization Management.
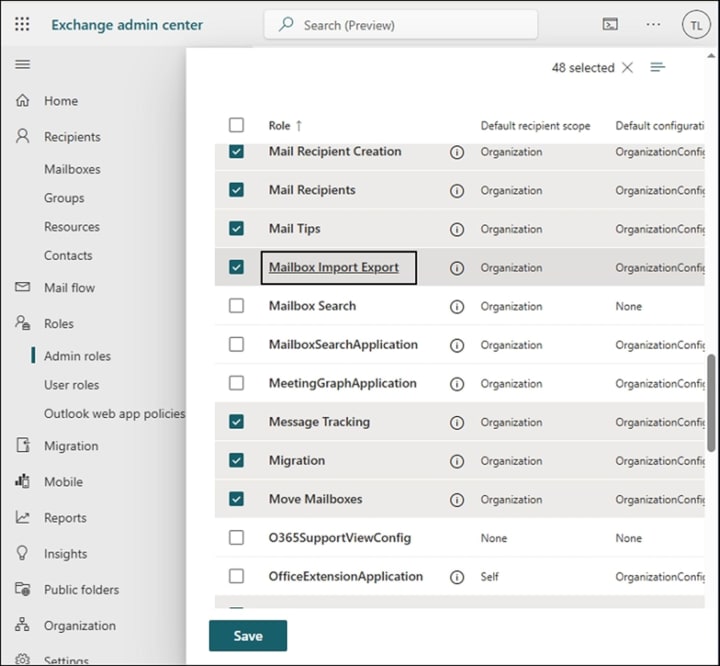
- Go to the Permissions tab and tick the Mailbox Import Export checkbox. Click on Save.
- In the Assigned tab, click on Add to choose the necessary users.
Step 2: Create a PST Import Job
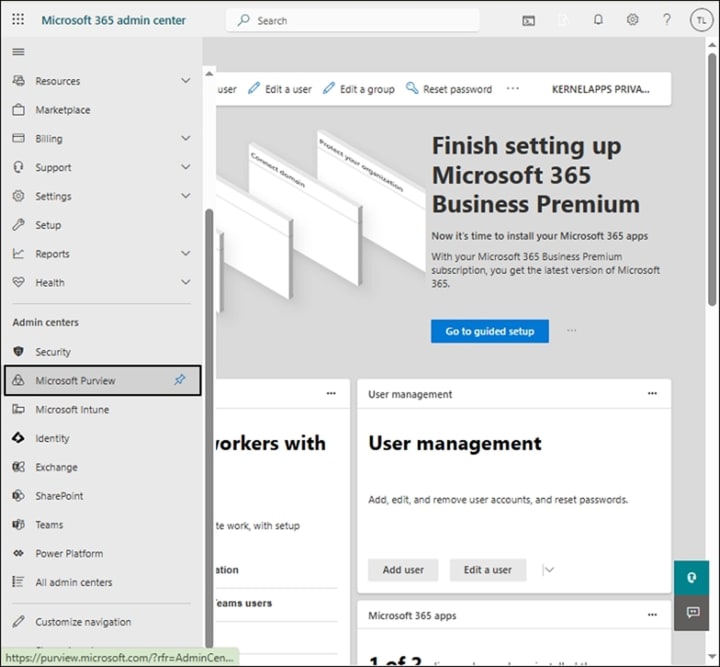
- Go to Microsoft 365 admin center again and launch the Microsoft Purview window.
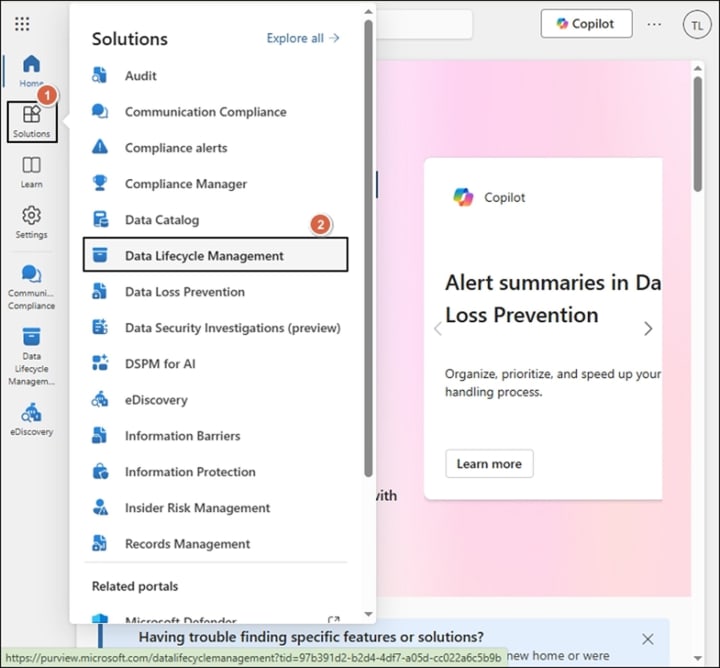
- Then go to the Solutions tab and click on Data Lifecycle Management.
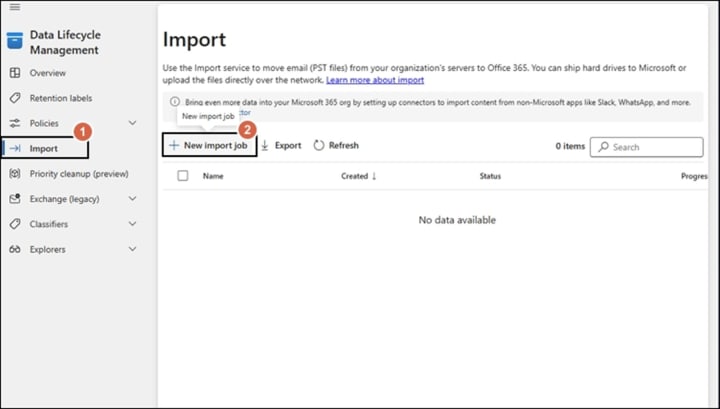
- Select Import from the list and click on the New import job option.
- Name the newly created PST import job and click on Next.

- Then, select the Upload your data option and click on Next to proceed.

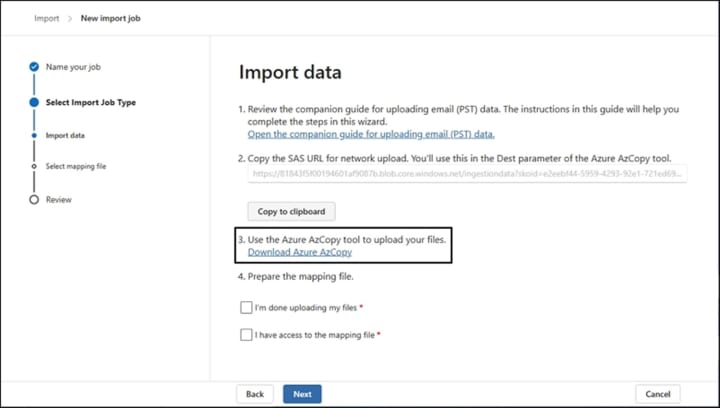
- Copy the SAS URL by clicking on the Show network upload SAS URL option.
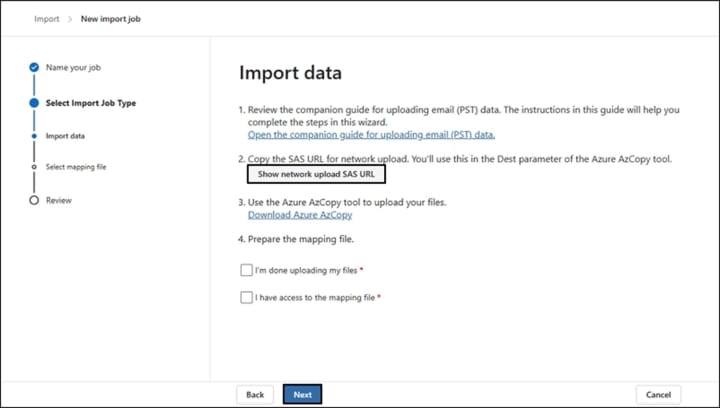
- Download the Azure AzCopy tool to finally start the import process.
Step 3: Upload PST to Azure Storage
- Open the cmdlet prompt on your system and open the folder where your azcopy.exe file is saved.
- Type ‘cd’ in front of the location where the Azure exe is saved and run it in the command prompt.
- Open the folder where PST files are saved and copy it to clipboard.
- Now, paste the copied PST file location and the SAS URL in the command given below and run it:
azcopy.exe copy "<Source location of PST files>" "<SAS URL>"
- After the PST file is uploaded to Azure Storage, create a CSV mapping file for the import process. This CSV mapping file will get submitted in the next step.
- Tick the I’m done uploading my files & I have access to the mapping file checkboxes and click on Next.
- Upload the CSV file and click on Validate.
- After the validation is successfully completed, click on Next to proceed.
- Verify all the given details and click on Submit.
- Keep a track on the Import page until the status displays completed.
Step 4: Import PST to Office 365
- Tick the new import job checkbox and click on the Import to Office 365 option.
- Choose the No, I want to import everything option and click Next.
- Verify all the details of provided and hit Submit.
- A message displaying Upload to the cloud succeeded will show on your screen after the upload process gets completed successfully.
- Once Microsoft processes the import request, the final process will start.
- Keep a track on the progress status in the Import section to see when the import process gets completed.
Import PST files to Office 365 with an Automated Method
The manual approach to import PST files to Office 365 is often difficult and slow, particularly for beginners. It offers no guarantee of success and may even cause data loss. Experts recommend using a specialized PST to Office 365 migration tool for a more secure transfer.
Kernel Import PST to Office 365 is the perfect tool for this purpose, offering a reliable method to upload multiple PST files to Office 365 with precision. Some characteristic features of this advanced tool are:
- Run multiple jobs to upload PST files to Office 365 mailboxes at once.
- Automatically map the source PST file and the destination mailbox without any error.
- Import your PST files to either the primary, shared, or archive mailboxes of Office 365 easily.
- Preserve the original formatting and folder hierarchy of your PST file during conversion.
- Easy UI makes this tool ideal for beginners looking to import their PST files to Office 365 easily.
Conclusion
While the manual method is capable of importing PST files to Office, it is a time taking process and may not guarantee success. Even a single mistake can lead to significant data loss and file corruption. For a safer alternative, using professional PST to Office 365 migration tools like Kernel Import PST to Office 365 is the best choice. This software is specifically developed to perform bulk migration while preserving the original data integrity.
About the Creator
Keep reading
More stories from Suhail Khan and writers in Lifehack and other communities.
3 Methods To Convert OST to PST Format
When you encounter difficulties with your Outlook mailbox and have an OST file, it can feel like you are stuck with a treasure chest full of essential emails, contacts, and calendar items, but you cannot unlock it. By converting the OST file into a PST file, you have created the perfect key that unlocks the data within your mailbox for easy backup, migration, and sharing.
By Suhail Khan5 months ago in Journal
The Power of Being Alone: Why Solitude Is Becoming the Secret Weapon of the Modern Mind
The modern world is loud. Notifications buzz, videos autoplay, conversations scroll endlessly across screens, and opinions arrive faster than most people can process them. Silence has become so rare that many now associate it with discomfort instead of peace. The moment there is nothing to listen to, watch, or respond to, the hand instinctively reaches for a phone. But beneath all this noise lies a forgotten skill — the ability to be alone without feeling lonely. Solitude is not the same as isolation. Isolation is being cut off from others against your will. Solitude is choosing to step away, even briefly, to reconnect with yourself. This difference is small in definition but massive in impact. Psychologists have found that moments of intentional solitude can improve creativity, emotional regulation, and problem-solving. When the brain is no longer reacting to external stimuli, it begins to wander inward. This is where ideas form, where feelings are processed, and where deeper understanding takes shape. Many of history’s most influential thinkers, artists, and leaders had one thing in common: they valued time alone. Writers walked long distances to think. Scientists sat quietly with unsolved problems. Philosophers spent hours in reflection. These weren’t escapes from reality — they were ways of understanding it more clearly. Today, however, solitude is often misunderstood. Being alone can be seen as antisocial or unproductive. In a culture that celebrates constant connection, stepping back can feel like falling behind. But in truth, the opposite is often happening. When people never pause, they don’t just lose time — they lose direction. Without moments of reflection, it becomes easy to live on autopilot. Goals are inherited instead of chosen. Opinions are adopted instead of examined. Emotions are suppressed instead of understood. Over time, this can create a quiet sense of dissatisfaction, even when life looks successful on the surface. Solitude acts as a mental mirror. In silence, you begin to notice what actually matters to you. You recognize patterns in your behavior. You become aware of the thoughts you normally drown out with distraction. This awareness can be uncomfortable, but it is also powerful. There is also a growing connection between solitude and focus. In an age of constant interruption, the ability to concentrate deeply has become a competitive advantage. People who can work without checking their phone every few minutes often produce better results in less time. This kind of focus doesn’t come from willpower alone — it comes from training the mind to be comfortable without stimulation. Even emotional resilience is shaped in quiet moments. When you sit alone with a difficult feeling instead of escaping it, you learn that discomfort doesn’t destroy you. You learn that emotions rise and fall like waves. This understanding builds inner stability that no external validation can replace. Of course, humans are social by nature. Connection, community, and relationships are essential for a healthy life. The power of solitude doesn’t come from replacing these things, but from balancing them. It’s in solitude that you figure out what you want to bring back to the world. Small practices can make a big difference. A short walk without headphones. A few minutes of journaling in the morning. Sitting quietly before starting the day. These moments don’t need to be dramatic. They just need to be intentional. Over time, something changes. The noise of the world becomes easier to navigate. Decisions feel clearer. Reactions become calmer. You begin to act from understanding instead of impulse. In a society that is constantly speaking, posting, and performing, choosing silence can feel radical. But that is exactly why it is so powerful. Because sometimes, the strongest voice you can listen to is your own.
By Hazrat Usman Usman2 days ago in Lifehack


Comments
There are no comments for this story
Be the first to respond and start the conversation.