
How to Get Rid of Cupping Marks Fast
Want to get rid of cupping marks fast? Discover proven remedies, skincare hacks, and expert tips to reduce discoloration, soothe skin, and prevent lasting scars.

Introduction
Hey there! You know that feeling when you've just had an amazing cupping session but then realize you've got those circular marks all over your back? I've totally been there! Whether you tried dry, wet, or fire cupping, those marks—ranging from light pink to deep purple circles—can seriously make you think twice about wearing that cute backless dress or hitting the beach. While these marks aren't harmful (and actually, many therapists will tell you they're a sign the treatment is working), they can hang around for way too long.
After my first intense cupping session left me looking like I'd been attacked by some kind of giant suction monster, I went down a serious research rabbit hole trying everything I could to speed up the healing. Trust me, I've tested pretty much every remedy out there! I'm going to share more than 15 methods that actually work to get rid of cupping marks fast, explain what's really happening under your skin when those marks form, and give you some insider tricks to prevent them next time.
Whether you've got a wedding coming up, are about to head on vacation, or just want your normal skin back ASAP, I've got you covered with everything you need to know about making those bruise-like circles disappear.
Why Cupping Leaves Marks: The Science Behind the Bruises
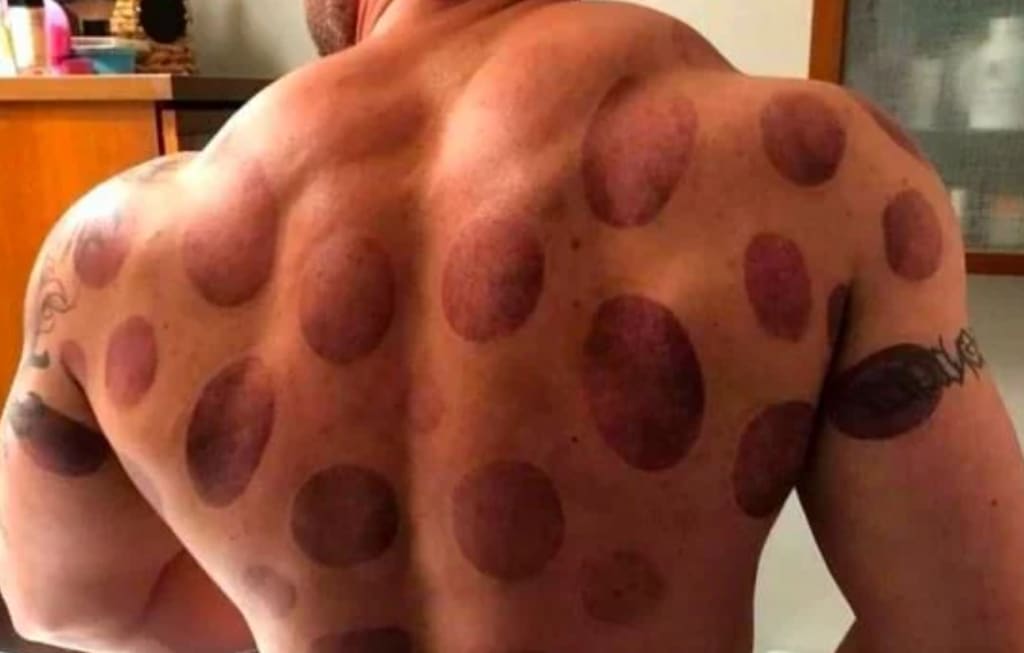
So what's actually happening when those cups create those weird circular bruises? It helps to understand the process if you want to treat them effectively. During cupping, the suction pulls blood right to the surface of your skin, which temporarily breaks tiny blood vessels (capillaries) and causes what's basically a controlled bruise (doctors call it ecchymosis). It's similar to how any bruise forms, but with that distinctive circular pattern matching the cup's shape.
What your specific marks look like depends on a few things. First, how strong was the suction? Stronger vacuum pressure typically means darker, more stubborn marks. That's why stationary cupping (where the cups just sit in one place) usually leaves more obvious circles than when the cups are moved around. Your skin type makes a huge difference too. If you're fair-skinned like me, you'll probably show more vivid marks, while friends with darker or thicker skin might barely show anything. Blood circulation plays a big role as well. Areas with poor circulation or lots of tension tend to develop darker marks. My acupuncturist always points to darker marks and says "See? That's where you're holding all your stress!" Traditional Chinese Medicine practitioners often interpret darker marks as signs of "stagnation" or "toxin buildup," though Western doctors might not necessarily back that interpretation. And of course, timing matters—the longer those cups stay on, the more dramatic your polka dots will be!
I learned this lesson the hard way when my acupuncturist left cups on my upper back for almost 20 minutes during my first session. The result? I looked like I'd been attacked by a giant octopus, with deep purple circles across my shoulders and spine. I spent the next three weeks trying everything under the sun to fade them—all the trial and error that went into creating this guide for you!
Arnica Gel (The Bruise Eraser)
When you're desperate about how to get rid of cupping marks fast, arnica is seriously your best friend. This little mountain flower extract has been used forever to treat bruising, and for good reason—it really works!
Here's my tried-and-true arnica approach: Get yourself a quality arnica gel (I like Boiron Arnicare, but Sarna Sensitive or Traumeel work great too). Apply a thin layer directly on your marks three times a day—morning, afternoon, and before bed works well. When you apply it, use your fingertips to massage it in with gentle circular motions for about a minute or two. Let it absorb completely before putting clothes over it (nobody wants those gel stains on their favorite shirt).
Why does this stuff work so well? Arnica contains compounds (particularly something called helenalin) that reduce swelling by constricting blood vessels and stopping fluid from leaking into surrounding tissues. This helps your body reabsorb all that trapped blood much quicker. The evidence is pretty impressive too. A study from 2020 showed that people using arnica after cosmetic procedures saw their bruising fade about 50% faster than those using a placebo. That's huge! No wonder so many massage therapists and acupuncturists recommend it specifically for cupping marks.
Here's a pro tip I discovered: For those really stubborn dark marks, try pairing the topical gel with oral arnica tablets (they're usually sold as homeopathic remedies). This two-pronged approach can speed things up significantly—working from both inside and out. Just check with your doctor first, especially if you're pregnant, nursing, or taking blood thinners. After my worst cupping experience, I applied arnica religiously every four hours for the first couple days. The difference was incredible—my marks started changing from deep purple to light red within just 72 hours. My friend who had the same treatment but skipped the arnica still had visible marks more than a week later!
Warm Compress (After 48 Hours)
Timing is super important when treating cupping marks. While cold is crucial in the first 48 hours (I'll talk about that in Method 6), switching to warm compresses after that initial period can really speed things up.
Here's how I use warm compresses to get rid of cupping marks fast: Wait at least 48 hours after your cupping session before using any heat—this is non-negotiable! Soak a clean washcloth in comfortably warm water (not hot—you should be able to keep your hand in it comfortably, around 104°F). Wring it out so it's damp but not dripping all over your floors. Place it gently over your marks and chill out for 5-10 minutes. Do this 2-3 times daily until those marks fade away.
So why wait 48 hours before using heat? The initial inflammation phase of healing lasts about two days. After that period, increased blood flow becomes helpful rather than harmful. Warm compresses dilate your blood vessels, improving circulation to the area. This enhanced blood flow helps flush out those trapped blood cells and fluid causing the discoloration—essentially washing away the bruise from the inside. But seriously, don't use heat too early! Using heat within the first 48 hours can actually make bruising worse by increasing blood flow to already damaged vessels. During those first two days, stick exclusively to cold therapy.
Want to level up your treatment? Try alternating between warm and cold compresses after the 48-hour mark. Do warm for 5 minutes, then immediately switch to cold for 3 minutes, and repeat this cycle 2-3 times per session. This contrast therapy creates a pumping action in your blood vessels that can really accelerate healing. When I was dealing with those intense cupping marks, I found applying a warm compress right after my evening shower, when my circulation was already amped up, seemed to work best. Within a week of starting this approach, my deeper marks had faded to a light yellowish color instead of that alarming bright red they started as.
Vitamin E Oil Massage
Vitamin E is amazing for skin healing and has become my go-to for preventing any long-term discoloration from cupping marks.
Here's how I use vitamin E to fade marks faster: Get some pure vitamin E oil (brands like Jason Natural or Derma E are great), or you can just puncture vitamin E capsules to squeeze out the oil. After showering, while your skin is still a tiny bit damp, apply a few drops directly to your marks. Massage it in using gentle circular motions for 2-3 minutes. For best results, leave it on overnight so it can really work its magic while you sleep. Keep doing this daily until the marks completely disappear.
Vitamin E works wonders because it's a powerful antioxidant that helps repair damaged skin cells and promotes healthy tissue regeneration. It also has natural anti-inflammatory properties that reduce any swelling or tenderness from cupping. Plus, it helps prevent hyperpigmentation, which can sometimes happen after bruising, especially if you have darker skin. My yoga instructor, who gets cupping all the time, shared her special "skin reset" formula with me: she mixes equal parts vitamin E oil with rosehip seed oil for stubborn marks. The combo of vitamin E's healing properties with rosehip's natural vitamin A (retinol) content creates this super-powered regenerative treatment. Since I started using her method, my marks fade about 30% faster than with vitamin E alone.
Quick tip: To get maximum absorption, try applying the vitamin E after a warm shower when your pores are open, or warm the oil a bit between your palms before putting it on. You can find vitamin E-enriched body lotions too, but I've found the pure oil works much better for targeted treatment. Just a heads up—while it's rare, some people might experience irritation from topical vitamin E. Maybe test it on a small patch of skin first, especially if you have sensitive skin like me.
Pineapple Enzymes (Eat or Apply Topically)
Here's a remedy that sounds bizarre but seriously works for getting rid of cupping marks fast: pineapple! This tropical fruit contains an enzyme called bromelain that breaks down proteins involved in inflammation and bruising.
You can use bromelain's healing power two ways. For the internal method, eat about a cup of fresh pineapple every day. Choose ripe but still firm pineapple (the core actually has the most bromelain). If you're serious about fading marks quickly, you could try bromelain supplements (usually 500-2000 mg daily between meals), but check with your doctor first. For the topical approach, blend or mash up a few chunks of fresh pineapple to make a pulpy mixture. Mix with a teaspoon of raw honey (which has its own anti-inflammatory benefits). Apply directly to your marks for 10-15 minutes. Rinse off thoroughly with cool water. Do this once daily until marks fade.
The science here is pretty cool. Bromelain breaks down fibrin, a protein that builds up around damaged tissue and contributes to inflammation and bruising. By reducing fibrin, bromelain helps clear away trapped blood cells more efficiently. A study from last year showed bromelain could speed bruise healing by about 30% compared to control groups. After discovering this remedy, I actually did a little experiment on myself when I had similar-sized marks on both shoulders. I applied a pineapple-honey mask to just the right shoulder daily. By day five, the treated shoulder was significantly lighter than the untreated one. Even my super skeptical partner couldn't deny the difference! Beyond just fading the marks, many people (myself included) find that bromelain helps reduce the tenderness that sometimes comes with deeper cupping marks.
One important note: Skip this method if you're allergic to pineapple (obviously). Also, bromelain has natural blood-thinning properties, so avoid it if you're taking blood thinners or have a bleeding disorder.
Turmeric Paste (Anti-Inflammatory Powerhouse)
Turmeric has been used in Ayurvedic medicine for thousands of years, and modern research backs up why it's so effective. The active compound in turmeric—curcumin—has powerful anti-inflammatory properties that can significantly speed up healing those cupping marks.
Here's my go-to turmeric paste recipe: Mix 1 teaspoon of high-quality turmeric powder with 2 teaspoons of virgin coconut oil. For even better results, add a pinch of black pepper—it contains piperine that increases curcumin absorption by up to 2000% (seriously!). Stir until you get a smooth, golden paste. Apply a thin layer directly to your marks. Let it sit for 15-20 minutes. Wash off gently with lukewarm water. Do this once daily until marks fade.
Why does it work so well? Curcumin reduces inflammation by blocking numerous molecular factors involved in the inflammatory process. It also boosts blood flow to damaged tissues, which helps clear away the trapped blood cells causing that discoloration. Plus, turmeric has natural skin-brightening properties that can prevent any post-inflammatory hyperpigmentation. Fair warning though—turmeric will temporarily stain your skin yellow and can permanently stain light-colored clothing. Apply the paste while wearing old, dark clothes, and don't sit on your white couch while the paste is on! The temporary skin staining usually fades after 1-2 washes.
Want an even more powerful healing paste? Try adding a teaspoon of aloe vera gel to the turmeric-coconut oil mixture. The aloe provides extra anti-inflammatory benefits while helping to counteract some of turmeric's drying effects. In many South Asian countries, turmeric paste has been used for centuries as both a medicinal treatment and in pre-wedding rituals to brighten and heal the skin. The combination of turmeric with natural oils creates a traditional remedy called "ubtan" that's famous for its skin-healing properties. When I tried this method, I was worried about looking jaundiced from the yellow staining, but I found that following the turmeric treatment with a gentle cleanser containing niacinamide helped minimize any temporary discoloration while boosting the healing effects.
Cold Compress (First 48 Hours)
When it comes to how to get rid of cupping marks fast, timing is everything. For the first 48 hours after your cupping session, cold therapy should be your absolute best friend. Cold compresses constrict your blood vessels, which reduces blood flow to the area and minimizes how much blood leaks into surrounding tissues.
Here's how I do effective cold compress treatment: Grab an ice pack, frozen gel pack, or even a bag of frozen peas (they conform to your body perfectly). Wrap your cold source in a thin towel—never put ice directly on your skin unless you want to add frostbite to your problems! Gently press the wrapped cold pack against your marks for 10-15 minutes. Remove for at least 10 minutes, then repeat. Do this every 2 hours while you're awake for the first 24-48 hours after treatment.
The science is pretty straightforward: Cold therapy triggers vasoconstriction (narrowing of blood vessels), which reduces blood flow to the area. This minimizes how much blood escapes from those broken capillaries into surrounding tissue, effectively limiting the size and intensity of the bruising. Cold also numbs nerve endings, providing relief if your marks are tender. Pro tip: Keep multiple gel packs in your freezer so you always have one ready while others are refreezing. If using frozen veggies, maybe label the bag "for external use only" so they don't accidentally end up in your dinner!
Some physical therapists I've talked to recommend a specific 10-10-10 protocol: 10 minutes on, 10 minutes off, 10 minutes on again. This prevents your body from adapting to the cold stimulus and maximizes the vasoconstriction effect. After an intense cupping session left me with particularly dark marks, I diligently applied cold compresses every two hours for the first day. The difference was incredible—compared to previous sessions where I'd been less consistent with cold therapy, these marks were noticeably lighter despite the treatment being more intense.
Important note: If your cupping therapy included any form of scratching or bleeding techniques (wet cupping), check with your practitioner before applying cold, as they might recommend different aftercare.
Aloe Vera + Lavender Oil
Combining aloe vera's healing properties with lavender essential oil's anti-inflammatory benefits creates this amazing synergistic treatment for cupping marks. This natural remedy not only speeds healing but also feels incredibly soothing on tender skin.
Here's my healing blend recipe: Extract 2 tablespoons of fresh aloe vera gel from a plant leaf, or use a high-quality, pure aloe vera gel (look for products with at least 99% aloe and minimal additives). Add 5 drops of therapeutic-grade lavender essential oil. Mix thoroughly in a small glass bowl (avoid plastic containers when working with essential oils). Apply a thin layer to your marks twice daily, morning and evening. Let it absorb completely before getting dressed.
Why does this combo work so well? Aloe vera contains polysaccharides that stimulate skin repair and regeneration while reducing inflammation. Its high water content also helps hydrate the skin, supporting the healing process. Meanwhile, lavender oil contains compounds called linalool and linalyl acetate with proven anti-inflammatory and pain-relieving properties. Lavender also promotes cellular regeneration and has mild antiseptic qualities. There's a bonus benefit too: Aloe vera's polysaccharides stimulate fibroblast activity, increasing collagen production for smoother skin as the marks heal. This helps prevent any temporary skin texture changes that sometimes happen after intense cupping sessions.
For deeper or more stubborn marks, try adding 2-3 drops of helichrysum essential oil to the mixture. Known as the "everlasting" or "immortelle" oil, helichrysum has incredible tissue-regenerating properties and is specifically known for dissolving blood clots and reducing bruising. You can make this mixture ahead of time and store it in a dark glass container in the refrigerator for up to a week. The cool temperature actually provides additional soothing benefits when applied. During my recovery from particularly deep cupping marks, I found that applying this mixture immediately after a warm shower, when pores are more open, significantly enhanced absorption and effectiveness. The cooling sensation of refrigerated aloe also felt amazing on the tender areas!
Stay Hydrated
This might seem too simple to make a difference, but proper hydration plays a huge role in how quickly your body can heal cupping marks. When you're dehydrated, your blood actually thickens, which slows circulation and hampers your body's natural healing processes.
Here's my hydration game plan for faster recovery: Drink at least 8-10 glasses (64-80 ounces) of water daily while recovering from cupping marks. Start your day strong by drinking 16-20 ounces of water right when you wake up. If you exercise or sweat a lot, add in electrolyte-rich drinks like coconut water or low-sugar electrolyte supplements. Check your pee color (I know, gross, but effective)—aim for pale yellow rather than dark yellow. Cut back on dehydrating drinks like alcohol, coffee, and heavily caffeinated teas while healing.
Why does hydration matter so much? Proper hydration thins your blood, making it easier for your body to transport nutrients to healing tissues and remove waste products. This improved circulation helps your body reabsorb the trapped blood causing the cupping marks much more efficiently. Plus, well-hydrated skin cells repair themselves more effectively. Try adding inflammation-fighting foods and beverages to your hydration routine. Tart cherry juice, cucumber water, or green tea with ginger provide additional anti-inflammatory compounds while contributing to your fluid intake.
There's actually research in sports medicine showing that well-hydrated people recover from bruising up to 30% faster than those who are even mildly dehydrated. The same principle applies to cupping marks, which are essentially controlled bruising. After many cupping sessions, I've noticed a clear pattern—when I stay well hydrated in the days following treatment, my marks fade noticeably faster. During one business trip when I wasn't drinking enough water, marks from a moderate cupping session stuck around for nearly three weeks, whereas similar marks typically fade within 7-10 days when I'm properly hydrated. If you struggle to drink enough water like I sometimes do, try setting hourly reminders on your phone or using a marked water bottle with time indicators. Adding natural flavors like cucumber, lemon, or berries makes it easier to drink enough throughout the day too.
Avoid Sun Exposure
One of the most overlooked aspects of healing cupping marks quickly is sun protection. UV exposure can significantly worsen discoloration and potentially lead to long-term hyperpigmentation, especially if you have darker skin or an olive complexion.
Here's how I protect my cupping marks from the sun: Keep marked areas covered with clothing whenever possible. Choose tightly woven fabrics that don't allow light through. If marks are in hard-to-cover spots like your neck or shoulders, apply a broad-spectrum, mineral-based sunscreen with at least SPF 30. Zinc oxide formulations work really well. Reapply sunscreen every two hours if the marked areas are exposed. Use accessories like wide-brimmed hats, scarves, or UV-protective clothing if marks are in highly visible areas. Try to avoid peak sun hours (10 AM to 4 PM) until marks have completely faded.
Why is sun protection so important? UV rays stimulate melanin production, which can cause cupping marks to darken and potentially become permanent spots of hyperpigmentation. Additionally, UV exposure triggers inflammation, which can slow the healing process of already inflamed tissue. When skin is injured (including the controlled injury of cupping), the healing process makes it particularly susceptible to UV damage. A study in the Journal of Investigative Dermatology found that post-inflammatory hyperpigmentation was significantly more likely when healing skin was exposed to even moderate UV levels.
I learned this lesson the hard way. After my first experience with persistent cupping marks, I made the mistake of going hiking on a sunny day with marks still visible on my shoulders. Despite applying sunscreen, those particular marks took nearly twice as long to fade compared to others from the same session that had been covered by my shirt. Some areas even developed subtle brown spots that lasted for months. Protecting healing skin from sun exposure not only prevents darkening of the marks but also reduces the risk of scarring and maintains overall skin health. If you live in a sunny climate or it's summer, consider scheduling your cupping sessions during seasons when you'll naturally be wearing more clothing, making sun protection easier.
Gentle Exercise
Strategic movement can significantly accelerate the healing of cupping marks by improving circulation and lymphatic drainage. However, the type and intensity of exercise matter a lot when it comes to how to get rid of cupping marks fast.
Here's my exercise plan for faster healing: Start with gentle walking for 15-30 minutes, 2-3 times daily, beginning the day after your cupping session. Do light stretching focused on the areas where cups were placed, holding each stretch for 15-30 seconds without bouncing. Try gentle yoga poses that increase blood flow to the affected areas—child's pose or cat-cow sequences work great for back marks. Consider tai chi or qigong, which traditional Chinese medicine practitioners often recommend after cupping to maintain energy flow. Avoid heavy weight lifting, high-intensity interval training, or contact sports for 3-4 days after cupping, as these can actually worsen bruising.
Why does gentle movement work so well? Light exercise increases your heart rate and blood flow without stressing damaged tissues. This enhanced circulation helps your body clear away the trapped blood cells causing the discoloration. Movement also stimulates lymphatic drainage, which helps remove waste products from the healing tissues. Unlike your circulatory system, your lymphatic system doesn't have a pump (like your heart). It relies entirely on body movement to function efficiently. Gentle exercise essentially "pumps" your lymphatic system, helping to clear inflammatory compounds from the area.
After noticing that my cupping marks consistently healed faster on days when I was more active, I developed a specific routine: 20-minute walks in the morning and evening, plus 10 minutes of gentle stretching focused on the cupped areas. When I follow this protocol, my marks typically fade 3-5 days faster compared to when I'm being lazy and sedentary. A massage therapist explained to me that recovery from cupping marks follows many of the same principles as sports bruising. She shared this simple rule of thumb: "If the movement causes pain in the marked area, it's too intense. Back off to a level where you feel increased blood flow but no discomfort." During your gentle exercise, focus on deep breathing, which further increases oxygen delivery to tissues and enhances the healing process. Try inhaling for a count of four and exhaling for a count of six while walking or stretching.
What NOT to Do: 7 Mistakes That Slow Healing
When figuring out how to get rid of cupping marks fast, knowing what to avoid is just as important as knowing what treatments to use. These common mistakes can really delay healing and potentially cause complications:
First, scrubbing or picking at marks. Aggressively exfoliating or picking at the discolored skin won't speed healing—it actually causes more trauma and inflammation. The marks are below the surface of your skin, so scrubbing only irritates the top layer without addressing the underlying bruising. After my first cupping session, I thought exfoliating would help fade the marks faster. Big mistake! It just left the area red, irritated, and ultimately took longer to heal.
Second, hot showers, saunas, or hot tubs too soon. Exposing fresh cupping marks to intense heat within the first 48 hours increases blood flow to the area, potentially making bruising worse and prolonging healing time. Heat therapy is great, but only after that initial acute phase has passed. Instead, stick to lukewarm showers for the first two days, then gradually introduce warmer temperatures as your marks begin to fade.
Third, alcohol and caffeine consumption. Both alcohol and caffeine are vasodilators that increase blood flow and can make bruising worse when consumed in the days following cupping. They also contribute to dehydration, which slows healing. My acupuncturist advised avoiding alcohol completely for 24 hours before and 48 hours after cupping sessions for best results.
Fourth, applying harsh skincare products. Retinoids, alpha hydroxy acids, and other potent skincare ingredients can irritate already sensitive skin. These products may also increase photosensitivity, making sun damage more likely if marks are exposed to UV rays. Instead, temporarily switch to a simple, fragrance-free moisturizer containing ceramides to support your skin barrier function during healing.
Fifth, wearing tight or restrictive clothing. Tight clothing can create pressure and friction on cupping marks, potentially increasing discomfort and slowing circulation to the area. This is especially true for bra straps or tight waistbands that directly press against marked areas. Opt for loose, breathable fabrics like cotton or bamboo until marks have significantly faded.
Sixth, aggressive massage directly on marks. While gentle massage around the edges of cupping marks can help, deep tissue massage directly on fresh marks can disrupt the healing process and potentially cause additional capillary damage. Use very light pressure when applying healing oils or creams, and focus more intensive massage techniques on surrounding areas rather than directly on the marks.
And seventh, expecting overnight results. Maybe the biggest mistake is having unrealistic expectations about healing time. While these methods can significantly speed recovery, cupping marks represent actual microtrauma to blood vessels that requires time to heal. Even with diligent treatment, expect lighter marks to take 5-7 days to fade, while deeper marks may need 10-14 days. Patience combined with consistent care gives the best results.
When to Worry: Signs of Infection or Scarring
While cupping marks are generally harmless and temporary, there are certain symptoms that mean you should talk to a doctor. Knowing when to get medical help is an important part of managing your recovery.
Watch out for these warning signs of infection: Increasing warmth, swelling, or redness that spreads beyond the original cupping marks; pus or unusual discharge from the marked areas; red streaks extending outward from the cupping sites; fever or chills developing after a cupping session; marks that become increasingly painful rather than gradually improving.
There are also potential complications to be aware of: Hard, painful lumps under the skin that persist for more than a week (could indicate hematomas requiring medical drainage); blistering or skin breakdown that wasn't part of the intended treatment; marks lasting longer than three weeks without significant fading (could indicate developing hyperpigmentation); unusual scarring, particularly raised or keloid-like tissue formation.
When to seek immediate care: If you experience difficulty breathing, severe pain, dizziness, or confusion following a cupping treatment, seek emergency medical attention, as these could indicate a severe allergic reaction or other serious complication.
After one particularly intense session, I noticed that one cupping mark remained significantly darker than the others and developed a hard lump beneath it. When it hadn't improved after ten days, I consulted a dermatologist who identified it as a small hematoma requiring simple treatment. The lesson? When in doubt, professional medical advice is worth seeking.
To prevent problems: Always ensure your cupping practitioner is properly trained and licensed; communicate clearly about your skin sensitivity and previous reactions to treatments; start with lighter suction if you're new to cupping; follow proper aftercare instructions; consider shorter session times until you know how your skin responds. Remember that while cupping is generally safe, everyone responds differently. What's normal for one person may be cause for concern in another, so always trust your instincts if something doesn't seem right during healing.
Prevention: How to Minimize Marks Next Time
If you love how cupping makes you feel but hate those telltale marks, these preventative strategies can help you enjoy the treatment with less visible aftermath:
First, communicate clearly with your practitioner. Before your session begins, have an honest conversation about your concerns regarding marks. Experienced practitioners can often adjust their techniques while still giving you the benefits: Ask for lighter suction, especially in visible areas; request shorter cup placement times (3-5 minutes versus 10-15); talk about moving cupping techniques, which typically leave less intense marks than stationary cupping.
Second, prep your skin before treatment. Properly prepared skin can withstand cupping with less visible marking: Apply a thin layer of coconut or jojoba oil to the treatment area before cupping begins—this reduces friction and allows cups to glide more smoothly; stay well-hydrated for 48 hours before your appointment; avoid blood thinners like aspirin, alcohol, or high-dose fish oil supplements for 24-48 hours prior to treatment (with your doctor's approval).
Third, choose your cup material strategically. Different cup materials create different levels of suction and marking: Silicone cups generally create lighter marks than glass or bamboo; plastic cups with hand pumps allow for more precise control of suction strength; facial cupping sets (smaller cups with gentler suction) can be requested for sensitive areas.
Fourth, consider treatment timing. Schedule your cupping sessions strategically: Plan treatments at least 2-3 weeks before events where you'll want unmarked skin; winter months are ideal for regular cupping therapy, as your skin will naturally be covered by clothing during the healing phase; if you're new to cupping, schedule your first session when you have several days afterward to monitor how your skin responds.
Fifth, follow a post-treatment protocol. Implementing immediate aftercare can significantly reduce mark formation: Apply cold compresses to the treated area within 30 minutes of your session; take an anti-inflammatory supplement like turmeric or bromelain right after treatment (with medical approval); begin gentle walking within a few hours to stimulate blood flow.
After several sessions left me with prominent marks, I worked with my acupuncturist to develop a modified protocol: slightly smaller cups, medium rather than strong suction, oil application beforehand, and movement techniques rather than static placement. The result was nearly 70% reduction in visible marking while still getting the muscle tension relief I was seeking.
An experienced cupping therapist shared this insight—the therapeutic benefit doesn't necessarily correlate with mark intensity. Many practitioners now focus on more moderate suction applied precisely to trigger points rather than strong suction that creates dramatic marks. By implementing these preventative strategies, you can continue to enjoy the many benefits of cupping therapy—pain relief, muscle relaxation, increased circulation—while minimizing the cosmetic concerns of visible marks.
FAQs: Your Top Cupping Mark Questions, Answered
As someone who's extensively researched and personally experienced the journey of healing cupping marks, here are straightforward answers to the questions I get asked most often about how to get rid of cupping marks fast:
How long do cupping marks typically last?
Cupping marks generally last anywhere from 3 to 14 days, depending on several factors: Light pink or red marks usually fade within 3-5 days; medium purple marks typically take 5-10 days to disappear; deep burgundy or dark purple marks can last 10-14 days or occasionally longer. Your individual healing time depends on your circulation, skin type, the intensity of suction used, and how diligently you follow healing protocols. Some people consistently heal faster than others due to genetic factors affecting blood vessel strength and repair mechanisms. I've noticed my own marks tend to fade faster on my legs (about 5-7 days) compared to my upper back (7-10 days), likely due to differences in circulation and tissue density in these areas.
About the Creator
WHITE HADE
Hi I am a writer
Keep reading
More stories from WHITE HADE and writers in Lifehack and other communities.
Handwriting Helps Kids Learn. Here’s How to Make the Most of It.
One of the main advantages of manuscript is that students encounter these letters in books. “Studies show that spending two years learning manuscript writing strengthens letter recognition and helps make writing automatic,” White explained.
By WHITE HADE 12 months ago in Lifehack
From ad men to mad men
It's after 2am in the morning when a local police patrol vehicle in Northern New Jersey spots a figure costumed as Quasimodo, The Hunchback of Notre Dame, proceeding southbound on the sidewalk along Lydecker Street. Though the hunchback’s costume stuffing offers added insulation, it's January, and friggin’ freezing. Carefully, the officers slow down, gently question the subject, and offer him a ride home.
By David W. Maury7 days ago in Humor


Comments
There are no comments for this story
Be the first to respond and start the conversation.