
Avoid These Common Mistakes When Using a Tufting Gun
Avoid These Common Mistakes When Using a Tufting Gun

The thrill of creating your own custom rug with a tufting gun is unmatched—watching colorful yarn transform into a plush, textured masterpiece beneath your hands ignites pure creative joy. Yet that excitement can quickly turn to frustration when loops refuse to hold, your gun jams repeatedly, or your finished piece falls apart after just a few weeks of use. These disappointments aren't inevitable consequences of being a beginner; they're the result of specific, avoidable mistakes that plague even enthusiastic crafters.
The main problem is deceptively simple: most people rush into tufting without understanding the critical foundation elements that separate successful projects from failed experiments. They underestimate the importance of frame stability, grab whatever yarn looks appealing without considering durability requirements, operate their tools without proper safety precautions, and skip essential finishing steps in their eagerness to display their work. The result? Wasted materials, potential injuries, and rugs that don't live up to their creative vision.
This guide cuts through the trial-and-error process by identifying the four most common tufting mistakes and providing clear, actionable solutions for each. From building a rock-solid frame to selecting appropriate yarn and mastering safe gun operation, you'll learn exactly what to do—and what to avoid—to ensure your tufting projects succeed from start to finish.
Mistake #1: Neglecting Your Tufting Frame Setup
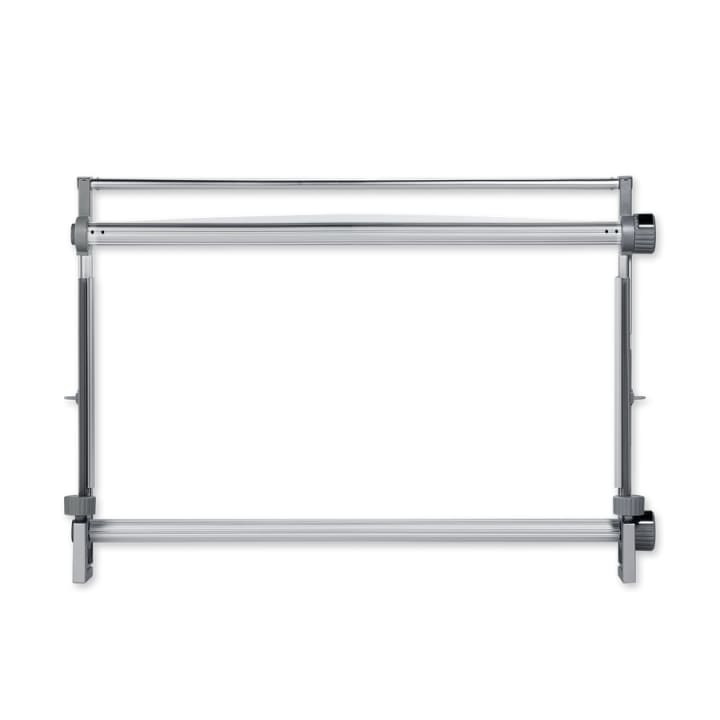
Your tufting frame isn't just a convenient holder for fabric—it's the structural foundation that determines whether your rug making project succeeds or fails. A wobbly, improperly constructed frame creates a cascade of problems that no amount of skill can overcome. When your frame shifts or flexes during tufting, the backing fabric loses its tension inconsistently across the surface, resulting in loops that vary wildly in height. Some areas become overly dense while others look sparse and patchy, destroying the uniform appearance you're working toward.
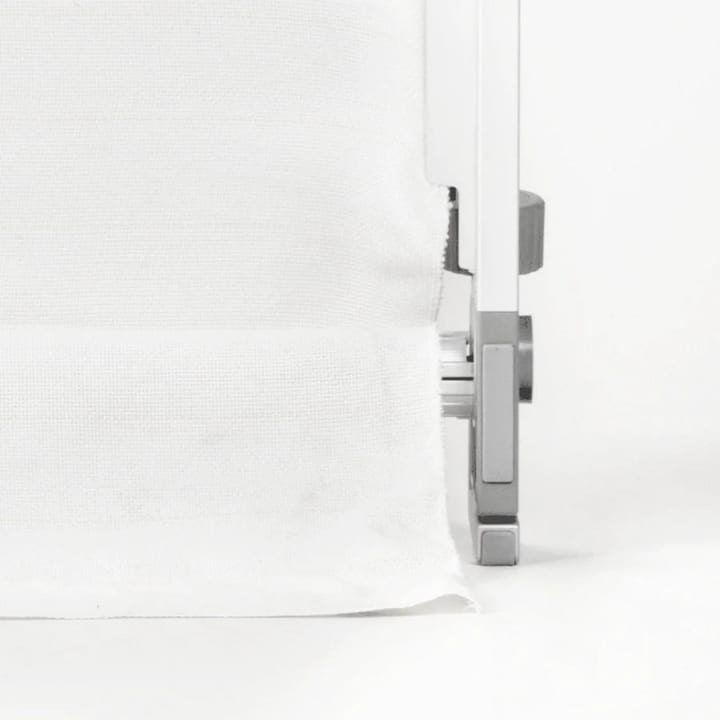
The most critical error involves fabric tension. Your primary backing must be stretched to what experienced tufters call "drum tight"—tight enough that tapping it produces a resonant sound. Loose fabric allows the tufting gun needle to push the material forward instead of penetrating cleanly, causing skipped stitches where no yarn anchors at all. This same looseness leads to frequent gun jams as the fabric bunches around the needle mechanism. Conversely, fabric stretched unevenly creates distortion that becomes permanently embedded in your finished rug.
To build a proper tufting frame diy setup, start with lumber that's completely straight and free from warps—inspect each piece carefully before assembly. Secure all joints with both wood glue and screws to eliminate any movement. When stretching your backing fabric, work systematically from the center outward on each side, using a staple gun or gripper strips to maintain equal tension. Test the tension by pressing firmly in the center; the fabric should barely give. If you can push it more than a quarter inch, re-stretch until you achieve that drum-tight resistance that ensures clean, consistent tufting throughout your entire project.
Mistake #2: Choosing the Wrong Yarn for Your Project
The Pitfalls of Inappropriate Yarn
The yarn you select determines not just the aesthetic appeal of your finished rug, but its structural integrity and longevity. Many beginners make purchasing decisions based purely on color or price, only to discover their mistake after hours of work. Thin yarn creates a disappointing result where you can see through to the backing fabric, producing a sparse, flimsy rug that looks unfinished no matter how carefully you tuft. The loops lack body and substance, failing to create the plush, professional appearance that makes tufted rugs so appealing.
Durability mismatches cause even more heartbreak. Using decorative yarn in high-traffic entryways or living rooms leads to rapid deterioration—the fibers pill, mat down, and lose their texture within weeks. Your beautiful creation transforms into a shabby remnant that embarrasses rather than impresses. Mixing incompatible yarn weights compounds these problems by creating an uneven surface with bumps and valleys. Thicker sections stand tall while thinner areas lay flat, destroying the smooth, consistent texture that defines quality rug making.
Selecting the Perfect Soft Tufting Yarn
Start by matching yarn weight to your project's purpose. For functional rugs that will see regular foot traffic, choose bulky weight durable carpet yarn in wool blends or high-quality acrylic. These materials resist compression and maintain their structure under pressure. Test your selection by tufting a small sample square—the loops should spring back when pressed and feel substantial between your fingers. For decorative wall hangings or bedroom pieces where softness matters more than durability, soft tufting yarn options like chenille or merino wool provide luxurious texture without the structural demands. Always purchase from the same dye lot to avoid color variations, and buy slightly more than your calculated need. Running a compatibility test before committing to your full design prevents the frustration of discovering midway through that your yarn doesn't perform as expected with your specific tufting gun and backing combination.
Mistake #3: Operating the Tufting Gun Incorrectly and Unsafely
Safety First: Non-Negotiable Practices
The tufting gun's rapidly moving needle poses genuine risks that many beginners dangerously underestimate. Operating at speeds that can punch through fabric hundreds of times per minute, the needle can easily penetrate skin, causing painful injuries that require medical attention. Yet countless crafters skip basic safety equipment, treating their tufting gun like a harmless craft tool rather than the powerful mechanism it actually is. Failing to wear cut-resistant gloves leaves your hands vulnerable during yarn threading and adjustment moments when your fingers come dangerously close to the needle path. Without safety glasses, flying yarn fibers and debris can irritate or scratch your eyes during extended tufting sessions.
Loose clothing, dangling jewelry, and unsecured long hair create entanglement hazards that can pull you toward the moving needle in a split second. A scarf end or necklace caught in the mechanism doesn't just damage your gun—it can cause serious injury. Poor posture compounds these risks by causing fatigue that leads to shaky hands and reduced reaction time. Standing hunched over your frame for hours strains your back and shoulders, making you more likely to lose control of the gun at critical moments. Always tie back hair securely, remove jewelry completely, and wear fitted clothing. Invest in proper cut-resistant gloves designed for craft work and clear safety glasses. Position your frame at a comfortable working height that allows you to maintain an upright posture with relaxed shoulders, and take regular breaks every thirty minutes to prevent the dangerous combination of fatigue and distraction.
Technique Errors That Damage Your Gun and Project
Beyond safety concerns, improper technique destroys both your equipment and your creative work. The most damaging mistake involves forcing the gun when it encounters resistance, either by pushing harder or running it too slowly. This "stalling" behavior strains the motor, overheats internal components, and can strip gears that require expensive repairs. When you feel resistance, the solution is never more force—it's stopping to identify why the gun isn't penetrating smoothly. Usually the culprit is loose fabric tension or yarn tangled in the feed mechanism.
Inconsistent gun angle creates visible defects across your rug surface. Holding the gun at varying distances from the backing or tilting it at different angles produces loops of dramatically different heights, creating an amateurish, splotchy appearance. The gun must remain perpendicular to your fabric at all times, with the base plate flush against the backing. Maintain steady forward motion at a moderate, consistent speed—neither racing across the fabric nor crawling along. Whether you're using a Clawlab tufting gun or another brand, starting and stopping technique matters enormously; abruptly lifting the gun mid-line leaves loose yarn tails on the front and creates gaps in your pattern. Instead, release the trigger a split second before reaching your stopping point, allowing the final loop to form completely. When starting a new line, position the needle precisely where you want the first loop, trigger the gun, then begin your forward motion. This deliberate sequencing prevents the yarn snags and backing holes that mar otherwise beautiful work and ensures every loop anchors securely for lasting durability.

Mistake #4: Rushing the Finishing Process
The finishing stage separates amateur attempts from professional-quality rugs, yet this is precisely where exhausted crafters make their most devastating mistakes. After investing hours into tufting intricate patterns, many people rush through the final steps, eager to flip their creation and admire the finished product. This impatience destroys all their careful work. Applying adhesive before thoroughly trimming loose yarn ends and cleaning debris from the backing traps imperfections permanently into your rug's foundation. Those stray fibers create lumps and bumps that remain visible and tactile flaws forever.
Adhesive selection and application errors prove equally destructive. Using craft glue or inappropriate adhesives results in a stiff, cardboard-like rug that cracks with use or fails to hold loops securely, causing them to pull out during cleaning. Applying too little adhesive leaves sections vulnerable to unraveling, while excessive amounts seep through to the front, matting down your carefully crafted pile and creating hard, discolored spots. Skipping secondary backing entirely or attaching it poorly leaves edges that curl, fray, and deteriorate rapidly under normal use.
To finish properly, start by trimming all yarn tails flush with the backing using sharp scissors, then vacuum the back surface thoroughly to remove lint and fiber fragments. Select latex rug adhesive specifically formulated for tufted projects—it remains flexible when dry while providing strong hold. Apply a thin, even layer using a notched trowel or spreader, working in sections to maintain consistent coverage without over-saturating. Before the adhesive sets, position your secondary backing fabric (canvas or felt) carefully, smoothing from center outward to eliminate air bubbles. Weight the entire piece flat and allow it to cure for the full recommended time, typically 24-48 hours. Once dry, trim edges cleanly, leaving a quarter-inch border. This methodical approach transforms your tufted piece into a durable, professional rug that withstands years of use while maintaining its beauty.
Master Your Tufting Craft
Success in rug making with a tufting gun fundamentally depends on mastering four critical elements: constructing a stable tufting frame DIY setup with drum-tight fabric tension, selecting appropriate soft tufting yarn or durable carpet yarn matched to your project's purpose, operating your equipment safely with proper technique and protective gear, and executing meticulous finishing with correct adhesive application and secondary backing. Each element builds upon the others—a perfect frame means nothing if you've chosen inappropriate yarn, and flawless tufting becomes worthless when you rush through the finishing process.
Avoiding these common mistakes saves you the frustration of unraveling loops, the expense of replacing damaged equipment, and the disappointment of rugs that fail to meet your creative vision. More importantly, it transforms tufting from a stressful gamble into a supremely satisfying craft where your time and effort consistently produce beautiful, durable results. Every rug you complete teaches valuable lessons about tension, yarn behavior, and technique refinement. Embrace each project as an opportunity to strengthen your skills, viewing even occasional errors not as failures but as stepping stones toward mastery. Your growing confidence in your tufting frame DIY journey will show in every loop, every pattern, and every finished piece that reflects your expanding expertise and artistic vision.
About the Creator
The Wheat Paradox
Wheat is one of humanity’s oldest cultivated crops and remains a cornerstone of the global food system. From bread and pasta to flatbreads and noodles, it provides nearly 20 percent of the world’s daily calories. Yet despite record levels of production in many years and advanced agricultural technologies, wheat has become a symbol of contradiction in the modern world. This contradiction — often referred to as the “wheat paradox” — lies in the fact that while global wheat supplies are broadly sufficient, access to affordable wheat-based food is becoming more fragile for millions of people.
By Salaar Jamali3 days ago in Journal
🅼🅸🅳🅽🅸🅶🅷🆃 🆂🅽🅰🅲🅺🆂
"It's 10 in Tuscon! We all know what that means... It's Time for Midnight Snacks with your man, Gerald Gee! Ready to spend the night together? Me too! I'm full of snacks and can't wait to regurgitate them all back into your hungry ears. Crack a brew! Pop some corn! Anything to get ready for one hell of a show where the talk maybe cheap but the words cut deep...
By Lamar Wiggins6 days ago in Fiction


Comments
There are no comments for this story
Be the first to respond and start the conversation.