
CHKDSK Stuck on Stage 4? Here's What You Should Do
Is your CHKDSK process stuck on Stage 4? Follow our step-by-step guide to quickly resolve the issue and keep your data safe.


Have you ever had CHKDSK stuck while performing a disk scan? The scenario is common among those who diagnose hard drive issues, where the utility freezes, and the situation becomes more complicated. In many cases, this problem is related to bad sectors or hardware degradation. Through countless examples, you can see that the tool, though useful, can struggle when faced with certain underlying disk problems. In this article, we will break down these challenges and provide expert advice on how to resolve the issue.
How Does CHKDSK Work and When It Can Cause Problems
CHKDSK, or Check Disk, serves as a fundamental Windows utility designed to diagnose and repair drive-related issues, including file system errors and bad sectors. It’s often one of the first suggestions made by IT professionals and technical support forums when users face hard drive problems. However, despite its utility, CHKDSK is not without limitations. Users frequently report that the tool becomes stuck, freezes, or even worsens their issues, particularly at stage 4, where data clusters are verified.
Here’s how CHKDSK operates across its five stages:
- CHKDSK checks the file system structure, looking for any inconsistencies or corruptions.
- File link verification checks if file links and directories are correctly structured.
- This step verifies the security attributes of files and folders on the drive.
- CHKDSK checks the actual data clusters on the disk to verify the integrity of file data, often the stage where it gets stuck.
- Finally, it scans free space to make sure that it is properly allocated and that no bad sectors are found within the unallocated portions of the disk.

Stage 4 is where most users encounter problems. CHKDSK can freeze when it attempts to read or repair bad sectors, especially if the drive is heavily fragmented or damaged. The tool may take hours—or even days—to move past this stage, leading many users to wonder if it’s safe to stop the process. CHKDSK’s struggles often stem from the nature of the drive it’s working on. Bad sectors, heavy fragmentation, or failing hardware can make it difficult for the utility to complete its scan. If CHKDSK encounters bad sectors, it will repeatedly try to read the data, which can take an extremely long time or even lead to a complete stall. Users who attempt to let CHKDSK run without monitoring often face long wait times without resolution.
Additionally, if the drive is physically damaged or failing, CHKDSK can exacerbate the problem by stressing the drive. This can result in more sectors becoming unreadable, increasing the risk of data loss. That's why it's important to act quickly and prioritize data recovery before you attempt further repairs. In the next section, we will discuss how to use data recovery software to protect your files when facing these types of disk issues.
How to Recover Data Before Further Repairs
When CHKDSK stalls and you risk losing important data, you must take immediate steps to recover your files. Disk Drill specializes in data recovery and provides an excellent solution to recover files from drives with errors. It recovers files from drives that may be partially inaccessible or damaged, which makes it useful in scenarios where CHKDSK stalls or freezes. Disk Drill’s deep scanning capabilities enable it to locate and recover lost or corrupted data that standard repair utilities cannot reach.
⚠️ Importantly, Disk Drill can also recover files that CHKDSK might have deleted during its attempts to repair bad sectors.
Here is how to recover files using Disk Drill:
1. Go to the official Disk Drill website, download the installer, and follow the prompts to set up the software. Follow the installation prompts, make sure that the software is installed on a drive separate from the one experiencing issues.
2. In the Disk Drill interface, you will see a list of all available drives. Select the drive that is stuck. Click the Search for lost data button to begin the scan. Disk Drill will automatically start scanning the drive for recoverable files. This process can take some time, depending on the size of the drive and the extent of its issues.

3. Depending on the size of your drive and the amount of data on it, the process could take anywhere from a few minutes to several hours. Allow Disk Drill to complete the scan fully to maximize the amount of recoverable data it finds. Disk Drill allows you to preview most files before recovery. Simply click on the file in the results list to open a preview. This is especially useful for checking the integrity of files like documents, photos, and videos before recovering them.

4. Once you’ve previewed the files and are satisfied with their condition, select them for recovery. You can choose to recover all found files or manually select specific ones based on your needs. Choose a separate external hard drive, USB drive, or another reliable storage device as the recovery destination. Click Next. Disk Drill will save the selected files to the destination you specified. This process may take a few moments, depending on the amount of data being recovered.

Once the recovery process is complete, navigate to the destination drive where your recovered files are stored. Open a few files to check if they are intact and usable. One of the key advantages of Disk Drill is its ability to recover up to 500 MB of data for free. This feature makes Disk Drill a convenient choice for users who need to retrieve essential files quickly without upfront costs. For users who require more extensive recovery, Disk Drill offers a Pro version with advanced features and unlimited data recovery.
If you want to know more about Disk Drill before trying, check out a detailed Disk Drill review, which covers its features, performance, and how it compares with other recovery tools.
How to Fix CHKDSK Stuck at Stage 4
In this section, we will discuss several proven methods to resolve CHKDSK when it stalls at stage 4. The fixes include waiting and monitoring the progress, performing system cleanups, and diagnosing potential hardware issues. Each fix addresses different underlying causes that may halt the process. Follow these steps to determine the best approach to safely move past this issue and restore your system to optimal performance.
Fix 1: Wait and Monitor the Process
Consider this case where a user ran CHKDSK on a Windows Vista 64-bit system to fix performance issues caused by bad blocks on their hard drive. The process seemed to proceed well until stage 4, where it stalled at 12% for several hours. Naturally, the user panicked, fearing that stopping the process might cause more damage. In this situation, waiting turned out to be the best course of action. The system did not truly freeze; it struggled with damaged sectors that required an extended time to process.
For larger drives, particularly those over 1TB, CHKDSK may take longer than expected. Users often report delays ranging from five to ten hours for drives of this size. This slow progress often occurs with larger drives that have heavy fragmentation or numerous small files. In such cases, it is important not to interrupt the process prematurely. Forcing a shutdown might seem tempting, but it could exacerbate the problem by causing more corruption or even leading to data loss.
However, waiting indefinitely is not always the best approach. If, after an extended period, CHKDSK shows no visible progress—no increase in percentage, no disk activity—it may indeed be stuck. In these rare cases, the issue might exceed what CHKDSK can handle, possibly due to severe hardware damage or corrupted sectors that software alone cannot repair.
Fix 2: Diagnose Hardware Issues
When CHKDSK becomes stuck at stage 4 and remains unresponsive after an extended period, it's important to investigate the underlying cause. Often, this issue arises from deeper hardware problems that CHKDSK alone cannot resolve. One of the best ways to identify potential hardware issues is by diagnosing the health of the drive using tools designed for this purpose.
One of the first steps recommended is to run a S.M.A.R.T. (Self-Monitoring, Analysis, and Reporting Technology) check using tools like CrystalDiskInfo or the drive manufacturer’s diagnostic utility. This will give you an immediate overview of the drive’s health, including information about reallocated sectors, uncorrectable errors, and pending sectors. S.M.A.R.T. data helps identify whether the issue is related to impending drive failure or if it can be managed with software solutions.
Here’s how to diagnose your drive:
- Use CrystalDiskInfo or the drive manufacturer’s diagnostic tool to assess the health of the drive.
- Look for reallocated sectors, uncorrectable errors, or other warning signs that may indicate hardware failure. If the tool shows significant issues, consider replacing the drive after you recover your data.
If you’ve waited for hours or even overnight and your CHKDSK is still stuck, it's time to intervene. Manually power off your computer by holding down the power button. Once it's off, wait a few seconds and power it back on. Upon restarting, if CHKDSK tries to run again, quickly press Esc or Enter to stop it from initiating the scan. This will let you boot into Windows without being delayed by CHKDSK.
Fix 3: Run Disk Cleanup to Remove Junk Files
In many cases, excessive junk files can slow down CHKDSK. Running the Disk Cleanup utility may clear out unnecessary files and improve system performance.
1. Press Windows + S and type "Disk Cleanup."
2. Select the drive you want to clean, typically your system drive (C:).
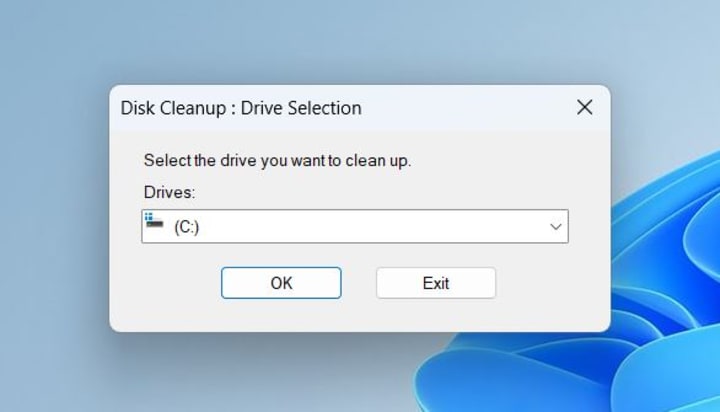
3. Disk Cleanup will calculate the amount of space you can free up.
4. Select the file types you want to delete, such as Temporary files, System cache, and Recycle Bin contents.
5. Click OK to start the cleanup process.

Fix 4: Use SFC Scan to Repair System Files
System file corruption is another common culprit behind CHKDSK becoming stuck. When Windows system files are corrupted or missing, CHKDSK may struggle to complete its operations, leading to freezes, particularly during the verification of file data in stage 4. As part of my troubleshooting process in such cases, it’s recommended to run SFC (System File Checker) scan to repair damaged system files before you attempt to run CHKDSK again.
- Open Command Prompt as an administrator and type sfc /scannow.
- Press Enter, and the system will begin scanning for corrupted or missing system files. This process can take some time, depending on the size of your system, but it’s an important step. Once the scan is completed, restart your computer. Make sure to exit CHKDSK again during boot.
This method has proven reliable in several cases where system corruption was at fault. One user’s system was experiencing recurring crashes and CHKDSK freezes due to damaged system files. After running the SFC, CHKDSK completed without further issues, and the system regained stability.
Fix 5: Defragment Hard Drive
If CHKDSK becomes stuck or runs very slowly, fragmentation on the hard drive could be a potential cause. Over time, as files are written and deleted, the drive may fragment, causing files to spread across different sections of the disk. This fragmentation leads to slower read and write speeds, making utilities like CHKDSK struggle when scanning the disk. Defragmenting the hard drive reorganizes fragmented data, places related file pieces closer together improves performance, and reduces the time needed for scans.
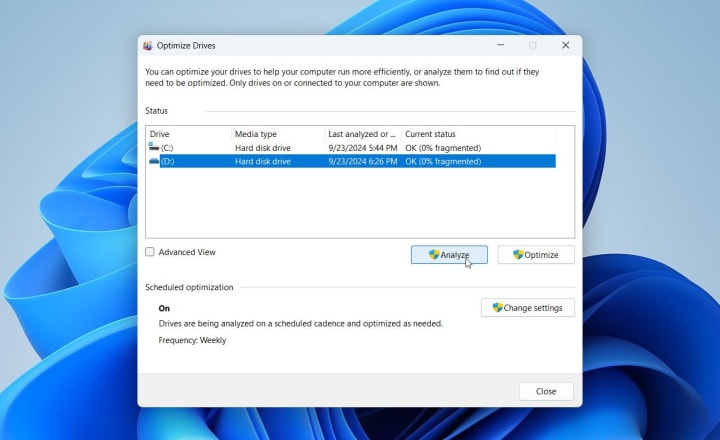
1. Press the Windows key and type Defragment and Optimize Drives into the search bar.
2. Select the Defragment and Optimize Drives option from the list of results.
3. Select the problematic drive and click Analyze. The tool will check how much of the drive is fragmented. Once the analysis is complete, the tool will show you the percentage of fragmentation on the drive. If the percentage is high, defragmentation could significantly improve performance.
4. Select the drive and click Optimize to start the defragmentation. This process can take some time, depending on the size and fragmentation level of the drive, so be patient and allow it to finish.
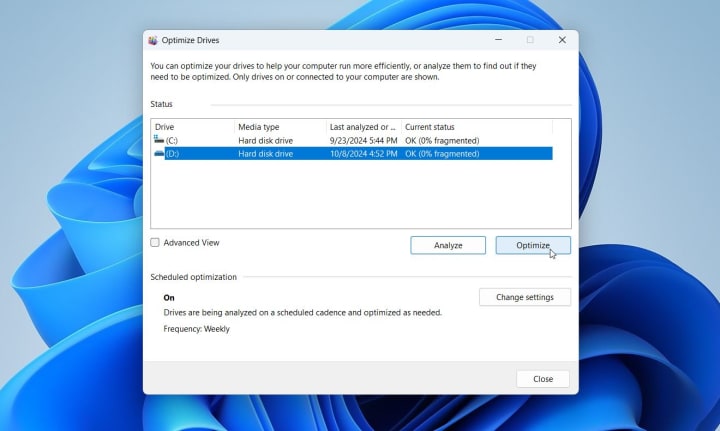
Once defragmentation is complete, reboot your computer and run CHKDSK again. Defragmenting the drive may reduce the time CHKDSK takes to complete and help it move past any areas where it previously got stuck.
FAQ
What Should I Do If CHKDSK Is Stuck on Stage 2?
If CHKDSK stalls at stage 2 (checking file links), it indicates an issue with the drive’s file structure or the links between files and directories. First, allow CHKDSK additional time to make progress, especially if the drive is large or heavily fragmented. If no progress occurs after several hours, run a S.M.A.R.T. diagnostic tool to check for underlying hardware issues or use data recovery software to secure important files before attempting further repairs. In some cases, defragment the drive after recovering your data to help CHKDSK complete more efficiently.
Why Is CHKDSK Stuck at 100% Completion?
When CHKDSK reaches 100%, it usually means the process has completed, but the system has not yet moved to the next step. This situation can occur if residual issues with the drive exist, such as damaged sectors or corrupted system files. If CHKDSK seems frozen at 100%, wait for some time as it may still process internal tasks. If CHKDSK remains stuck for an extended period, restart the system manually and run SFC or DISM scans to repair system files before running CHKDSK again.
How Long Should I Wait If CHKDSK Is Stuck?
CHKDSK duration depends on the drive size, fragmentation level, and the number of errors it encounters. For larger drives, especially those over 1TB, CHKDSK can take several hours, particularly with bad sectors or heavily fragmented data. If CHKDSK shows no progress after eight to ten hours or if disk activity ceases completely, the process may be stuck. In such cases, perform manual intervention by restarting the system and running diagnostic tools
About the Creator
Handy Recovery Advisor
Since 2017, we have empowered everyday users with comprehensive solutions for data recovery, loss prevention, and data management. Our passionate team has crafted over 500 guides to make complex data challenges approachable for everyone.
Keep reading
More stories from Handy Recovery Advisor and writers in Geeks and other communities.
Is Recuva Safe?
In this article, we provide an unbiased analysis of Recuva, with a view on its safety for users who seek data recovery solutions. We evaluate its reliability, potential for malware, and privacy policies to determine if Recuva, developed by Piriform and now a part of Gen Digital Inc., is secure, virus-free, and serves as a legitimate tool to recover lost or deleted files.
By Handy Recovery Advisorabout a year ago in Geeks
Marvel Zombie
The last entry into our 2025 superhero projects catalogue is Marvel Zombies. This was a show that was anticipated by absolutely no one and it disappeared from the public consciousness as quickly as it was released. There was nothing special about the project that made it a must see, or a must remember. In fact if anything it's a must forget.
By Alexandrea Callaghan19 days ago in Geeks
People We Meet on Vacation Movie
Some love stories arrive with fireworks. Others arrive quietly, like a familiar song playing in the background of your life. People We Meet on Vacation belongs firmly in the second category. As the highly anticipated film adaptation of Emily Henry’s bestselling novel moves closer to the screen, audiences are preparing for a story that doesn’t rely on dramatic twists or sweeping declarations, but instead finds its power in shared moments, missed chances, and the slow realization that love has been there all along.
By David Cooka day ago in Geeks


Comments
There are no comments for this story
Be the first to respond and start the conversation.