
How to Change Mouse Polling Rate – Step-by-Step Guide
Learn how to change mouse polling rate in simple steps. Improve your gaming and PC experience with our easy guide, tips, and FAQs for beginners.

How to Change Mouse Polling Rate in 2025
How to change mouse polling rate is a question many gamers and PC users ask when they want smoother and faster mouse performance. The mouse polling rate tells your computer how often your mouse sends data about its position and clicks. A higher polling rate means your mouse updates more often, which can make movements feel smoother and more accurate.
In this guide, we will explain what mouse polling rate is, why it matters, and how you can change it on Windows, macOS, and even gaming consoles. We will also share tips for choosing the right polling rate for your needs.
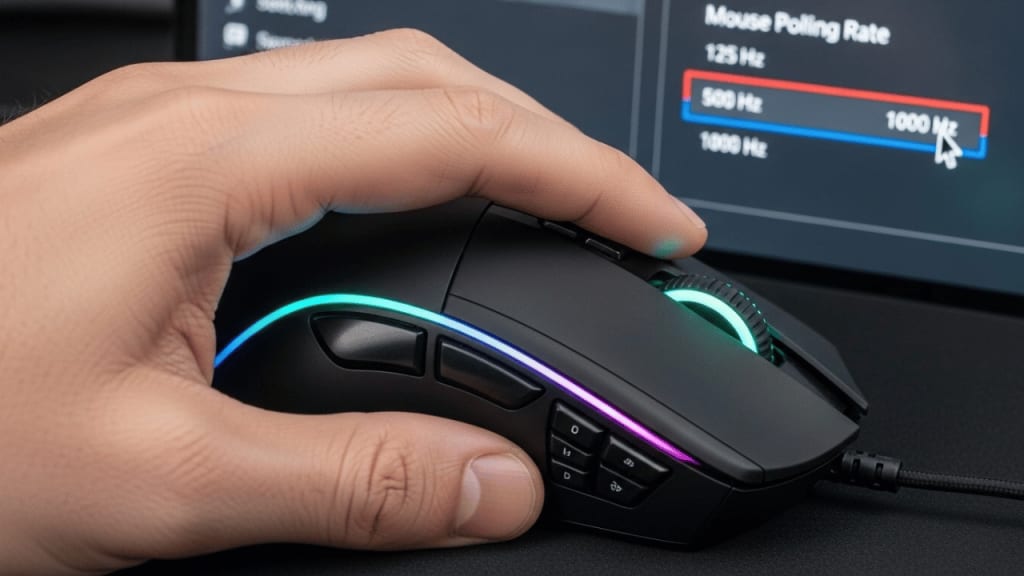
🖱 What is Mouse Polling Rate?
The mouse polling rate is measured in Hertz (Hz). It shows how many times per second your mouse reports its position to your computer.
- 125 Hz → Mouse updates 125 times per second (every 8 ms)
- 500 Hz → Mouse updates 500 times per second (every 2 ms)
- 1000 Hz → Mouse updates 1000 times per second (every 1 ms)
Example: If you are playing a fast-paced game like Counter-Strike 2 or Valorant, a higher polling rate can make your aim feel more responsive.
⚡ Why Change Mouse Polling Rate?
Changing your mouse polling rate can:
Improve gaming performance – Faster updates mean smoother aim.
Reduce input lag – Your actions register quicker.
Match your system’s capability – Some PCs can’t handle very high polling rates without lag.
Save battery life – Lower polling rates can help wireless mice last longer.
Tip: If you are a casual user, you might not notice much difference. But for competitive gamers, every millisecond counts.
🛠 How to Change Mouse Polling Rate in Windows
Changing the polling rate in Windows is simple. Here are the main methods:
1. Using Mouse Software (Best Method)
Most gaming mice from brands like Logitech, Razer, Corsair, SteelSeries, and ASUS have their own software.
Steps:
- Download and install your mouse’s official software (e.g., Logitech G HUB, Razer Synapse).
- Open the software and find the Polling Rate or Report Rate setting.
- Select your desired rate (125 Hz, 500 Hz, or 1000 Hz).
- Save changes and test your mouse.
2. Using Mouse Button Shortcuts
Some gaming mice let you change polling rate directly with button combinations.
Example:
- Hold DPI button + side button for 3 seconds to switch between preset rates.
- Check your mouse manual for the exact shortcut.
3. Using Windows Device Manager (Advanced)
If your mouse doesn’t have software:
- Right-click Start → Select Device Manager.
- Expand Mice and other pointing devices.
- Right-click your mouse → Properties.
- Go to the Advanced tab (if available).
- Change the Polling Rate setting.
🍏 How to Change Mouse Polling Rate on macOS
macOS doesn’t have a built-in polling rate setting, but you can use third-party tools like SteerMouse or USB Overdrive.
Steps:
- Download and install SteerMouse.
- Open the app and select your mouse.
- Adjust the Report Rate slider.
- Save and test your mouse.
🎮 How to Change Mouse Polling Rate on Gaming Consoles
Some consoles like PlayStation 5 and Xbox Series X support higher polling rates for USB mice.
Steps:
- Plug your mouse into the console.
- If your mouse has onboard memory, set the polling rate on a PC first.
- The console will use the saved setting.
📊 Best Mouse Polling Rate for Different Uses

🔍 How to Test Your Mouse Polling Rate
You can check your current polling rate using free online tools like Zowie Mouse Rate Checker or MouseTester.
Steps:
- Visit the tool’s website.
- Move your mouse in circles.
- The tool will show your average polling rate.
⚠ Common Problems When Changing Mouse Polling Rate
- Mouse feels laggy → Your PC might not handle high polling rates well.
- Battery drains fast → Lower the polling rate for wireless mice.
- No change in performance → Some older mice are locked to a fixed rate.
💡 Tips for Optimizing Mouse Performance
- Keep your mouse drivers updated.
- Use a good mouse pad for smoother tracking.
- Match your DPI and polling rate for the best feel.
- Test different settings to find your comfort zone.
📚 Conclusion
Learning how to change mouse polling rate can help you get the most out of your mouse, whether you are gaming, designing, or just browsing. A higher polling rate can make your mouse feel faster and more responsive, while a lower rate can save battery life and reduce CPU usage. The best setting depends on your needs, your hardware, and your personal comfort.
By following the steps in this guide, you can easily adjust your mouse polling rate on Windows, macOS, and even gaming consoles. Remember to test your settings and choose what feels best for you.
❓ FAQ – How to Change Mouse Polling Rate
Q1: What is the highest mouse polling rate? Most modern gaming mice support up to 1000 Hz, but some go as high as 8000 Hz.
Q2: Does higher polling rate use more CPU? Yes, slightly. Higher rates send more data, which can use more CPU power.
Q3: Can I change polling rate on any mouse? Not always. Some basic mice have fixed polling rates.
Q4: Is 1000 Hz always better? Not for everyone. Some people prefer 500 Hz for smoother cursor movement.
Q5: Will changing polling rate improve aim in games? It can make aiming feel more responsive, but skill and practice matter more.
About the Creator
Perfect Tech Views
Welcome to Perfect Tech Views—your go-to source for clear, unbiased, and insightful tech knowledge. Whether you're a pro, a beginner, or just exploring gadgets, we've got you covered with expert guidance!
Keep reading
More stories from Perfect Tech Views and writers in Gamers and other communities.
How to Let People Control Mouse on Steam Control Play (Easy Step-by-Step Guide)
How to Let People Control Mouse on Steam Control Play in 2025 How to let people control mouse on Steam Control Play is a question many gamers ask when they want to share their PC gaming experience with friends online. Steam, developed by Valve Corporation, offers a feature called Remote Play Together. This allows you to invite friends to join your game, even if they don’t own it. But here’s the cool part — you can also give them control of your mouse and keyboard.
By Perfect Tech Views3 months ago in Gamers
Twilight Ranger and Necromancer: Why This Duo is the 2026 Meta King
High-ladder play in Rush Royale has shifted. If you have logged into the competitive circuit lately, you have likely seen it. A specific, shadowy pairing is crushing the leaderboards and leaving traditional "Twins" or "Inquisitor" builds in the dust.
By Richard Baileyabout 21 hours ago in Gamers
I Am Future Review 2026
Post-apocalyptic games are usually filled with danger, despair, and constant combat. I Am Future: Cozy Apocalypse Survival takes a very different approach. Instead of focusing on fear and destruction, it presents the end of the world as a quiet opportunity to rebuild, relax, and rediscover joy in small, meaningful activities. Developed by Mandragora and published by tinyBuild, I Am Future blends survival mechanics with cozy life-sim elements, creating a unique experience that stands apart from traditional survival games.
By Games Mode On3 days ago in Gamers


Comments