
Outdoor Lighting Installation Do’s and Don’ts Every Homeowner Needs to Know
Learn the critical do’s and don’ts of outdoor lighting installation to ensure safety, avoid common errors, and achieve a beautiful, long-lasting setup.

When twilight settles, your yard glows softly, bringing safety and warmth to every path. Thoughtful fixtures cast a welcoming ambiance that extends living spaces beyond the walls. It can turn simple corners into inviting spots where evenings feel truly special.
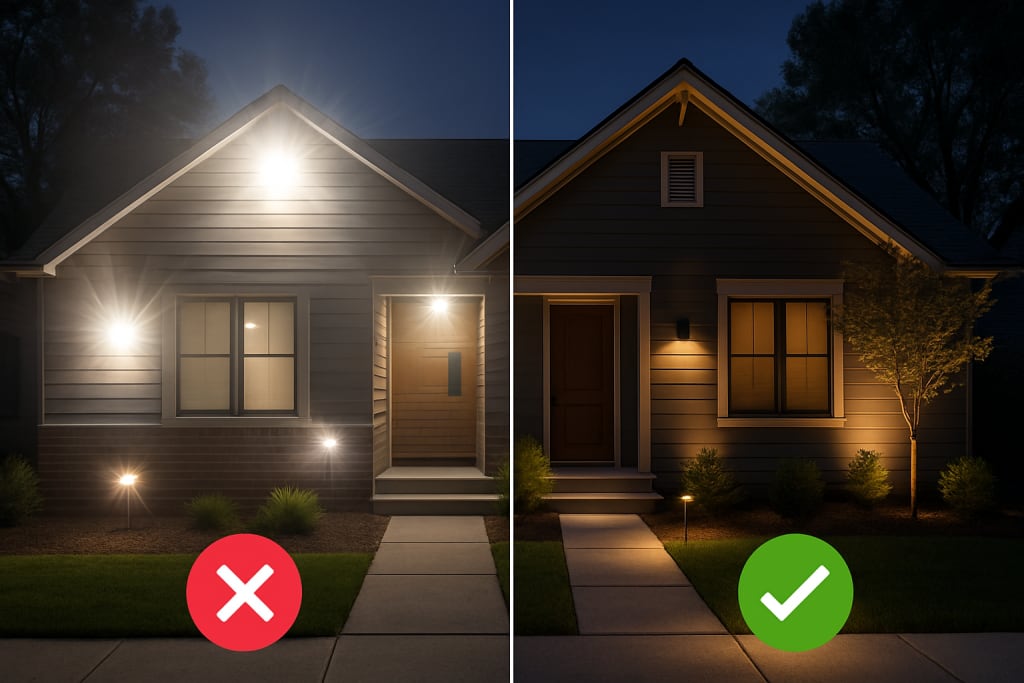
The time when lights sit too low, shadows swallow steps, leaving surprises in the dark. Harsh glare from misplaced bulbs makes guests squint and spoils the relaxed mood you hoped for. Leaving lamps on all night wastes power and may even create hazards that dampen late‑night enjoyment.
Well, you don’t need to worry about these setbacks. In the next sections, you’ll find the key do's and don’ts for every stage of installation. Follow these tips and watch your yard shine exactly as you have pictured.
DO’s to Take Care Of
1. Plan for Layered Illumination
Consider every area of your yard as a separate stage. Next, use a mix of different lights to create depth and warmth. Aim for uplights at trees to add drama during nighttime and use path lights to keep walkways safe and inviting.
Use soft lights to make parts of your home pop. Aim them just right so it’s never too bright. Layering lights this way helps your eyes move from one spot to the next and makes your yard feel calm and balanced.
2. Emphasize Quality over Quantity
A lot of us feel like setting up lights in every corner of the yard. However, a handful of well‑placed fixtures creates a more aesthetic look than dozens of random bulbs. Seek out solutions that work well with outdoor conditions, have thick‑gauge wiring, and offer a warranty you can trust.
Opt for quality materials that are rated to withstand sun, rain, and wind so you spend less time fixing connections or replacing corroded parts. This will result in a long-lasting lighting glow and far fewer surprises on warm summer nights.
3. Highlight Your Best Features
The right fixtures can elevate both function and style in your outdoor space. Pair sleek stainless steel units with contemporary patios and choose lantern‑style posts for classic garden charm.
Warm‑tone bulbs around seating areas foster an inviting atmosphere while cooler hues near water features accentuate reflective surfaces. When each light aligns with its setting and mood, your yard feels both polished and purposeful.
4. Consider Your Power Source
Map out how each light will connect to your power supply before you dig trenches or drive stakes. Low-voltage systems reduce fire risk and cut energy costs; they do demand precise cable runs to maintain brightness.
Put cables close to the ground and clip them down. Place solar panels where they get lots of sun at midday. Doing these steps early keeps wires neat, stops power drops, and makes your lights shine every night.
5. Focus on Safety and Comfort
Aim fixtures so beams fall where you intend, never shining directly into eyes or spilling onto neighboring yards. Use shields or adjustable heads to control glare. Keep all wiring at least six inches below ground level and house it in conduit when possible.
Ground fault circuit interrupters(GFCIs) add extra protection against moisture. By prioritizing safety standards, you’ll eliminate tripping hazards and avoid harsh glare that can ruin the tranquil mood of your outdoor retreat.
6. Plan for Easy Upkeep
Design your layout so bulbs and fixtures can be reached without ladders or heavy lifting. Group lights with similar maintenance needs together and leave enough space to service each one.
Use twist-and-lock sockets or quick-release fixtures that allow tool-free bulb swaps. Label cables at the transformer end so you can trace any issue quickly. A system set up for simple access rewards you with fewer weekend chores and more time spent enjoying the glow.
7. Hire Professionals
Often, bringing in experts is the smartest move to create a well-lit environment. Outdoor lighting setup professionals specialize in installations, understand wiring codes, and aesthetic principles. They can assess your site, recommend optimal fixture locations, and handle local permits or inspections.
A professional setup ensures you're getting the best wiring options and the right size of transformers. It also frees you from guesswork so you can enjoy a stunning setup backed by skilled hands and solid guarantees.
Don’ts of Lighting
1. Place Too Many Fixtures at Once
Spreading lights all over the yard might sound like an easy way to light up every corner of the yard. However, it often ends in a cluttered look and wasted power. Too many lamps can compete for attention, making it hard to highlight the features you love. Keep fixtures focused on your best trees, seating areas, or walkway edges. A restrained approach makes each light matter rather than letting them fight for the spotlight.
2. Skip Voltage and Load Checks
Plugging in dozens of lamps without checking amp loads or cable capacity can cause flicker or complete outages. Low-voltage runs demand precise calculations to maintain steady brightness. Skipping this step may lead to dim bulbs or even blown circuits at peak times. Take the time to measure current draw and choose cables sized to match; it prevents frustrating failures on a calm evening when you most want that welcoming glow.
3. Overlook Ground Level Safety
Burying cables too close to the surface leaves them vulnerable to nicks from shovels and trimmers. Wiring left without proper conduit or at an unsafe depth may shift over time, causing shorts or exposed wires. Always aim to recess cables at least six inches below soil or cement steps. It protects against accidental cuts and keeps your setup safe for kids, pets, and any late-night gardening tasks.
4. Aim Lights into Eyes or Neighboring Yards
A beam that shines sharply into guests’ faces can spoil the relaxed mood you wanted. It can also annoy neighbors whose windows suddenly catch harsh glare late at night. Never point fixtures directly at seating areas, walkways, or beyond your property line. Instead, tilt heads to graze surfaces or add shields that soften the beam. Controlled light makes evenings feel calm and keeps everyone comfortable.
5. Choose Fixtures Without Weather Ratings
Indoor models or units rated only for mild conditions will corrode fast under rain, frost, or heat. Rusted housings, cracked seals, and invite moisture into your wiring. Avoid bulbs with unclear outdoor approval or low ingress protection ratings. Select fixtures tested for the elements and backed by clear manufacturer data. Proper rating means less corrosion-related maintenance and a system that stands strong through every season.
Conclusion
Smart lighting brings safety, beauty, and lasting value to your yard. You can create an inviting setting by layering light types, picking quality fixtures, and managing power that stands the test of time. Hiring skilled outdoor lighting services adds expert knowledge of code compliance and a tidy finish that lets you relax. Avoiding overloaded circuits, exposed wiring, or blinding glare saves headaches and keeps the evening calm and comfortable. With these do’s and don’ts, you hold the path to a yard that shines with consistency and charm every night.
About the Creator
Stan
Interior Designer & Trend Lover
Passionate about transforming spaces. I share the latest interior design trends, tips, and inspiration to help you create a home that’s stylish, functional, and uniquely yours.
Keep reading
More stories from writers in FYI and other communities.
The Fall of the Iranian Regime Will Destroy Russia
A lot has been happening in the world of geopolitics lately. We’re not even three weeks into 2026, and we’ve already seen wars, bombings, regime changes, capitulations, and escalating unrest across multiple regions. The year has opened at full throttle, and one of the next countries that appears to be teetering on the edge is Iran.
By Lawrence Leasea day ago in FYI
Wild Card Weekend Recap: What Happens Now?
I think I figured out why I love Wild Card Weekend so much. It's because it's the first playoff anything of the calendar year. The NFL season starts in the fall, and once upon a time, the champion was crowned either on or slightly before New Year's. The evolution of the NFL schedule has resulted in the playoffs starting just into the New Year, and currently, the final week of the season falls on the first weekend of the New Year, with Wild Card Weekend coming a week after that. So yes, chronologically, the NFL's Wild Card Weekend serves as the first playoff anything of the calendar year.
By Clyde E. Dawkins6 days ago in Unbalanced


Comments
There are no comments for this story
Be the first to respond and start the conversation.