
Homebaked Happiness
A guide to beautiful and delicious holiday sugar cookies that are a gift in themselves
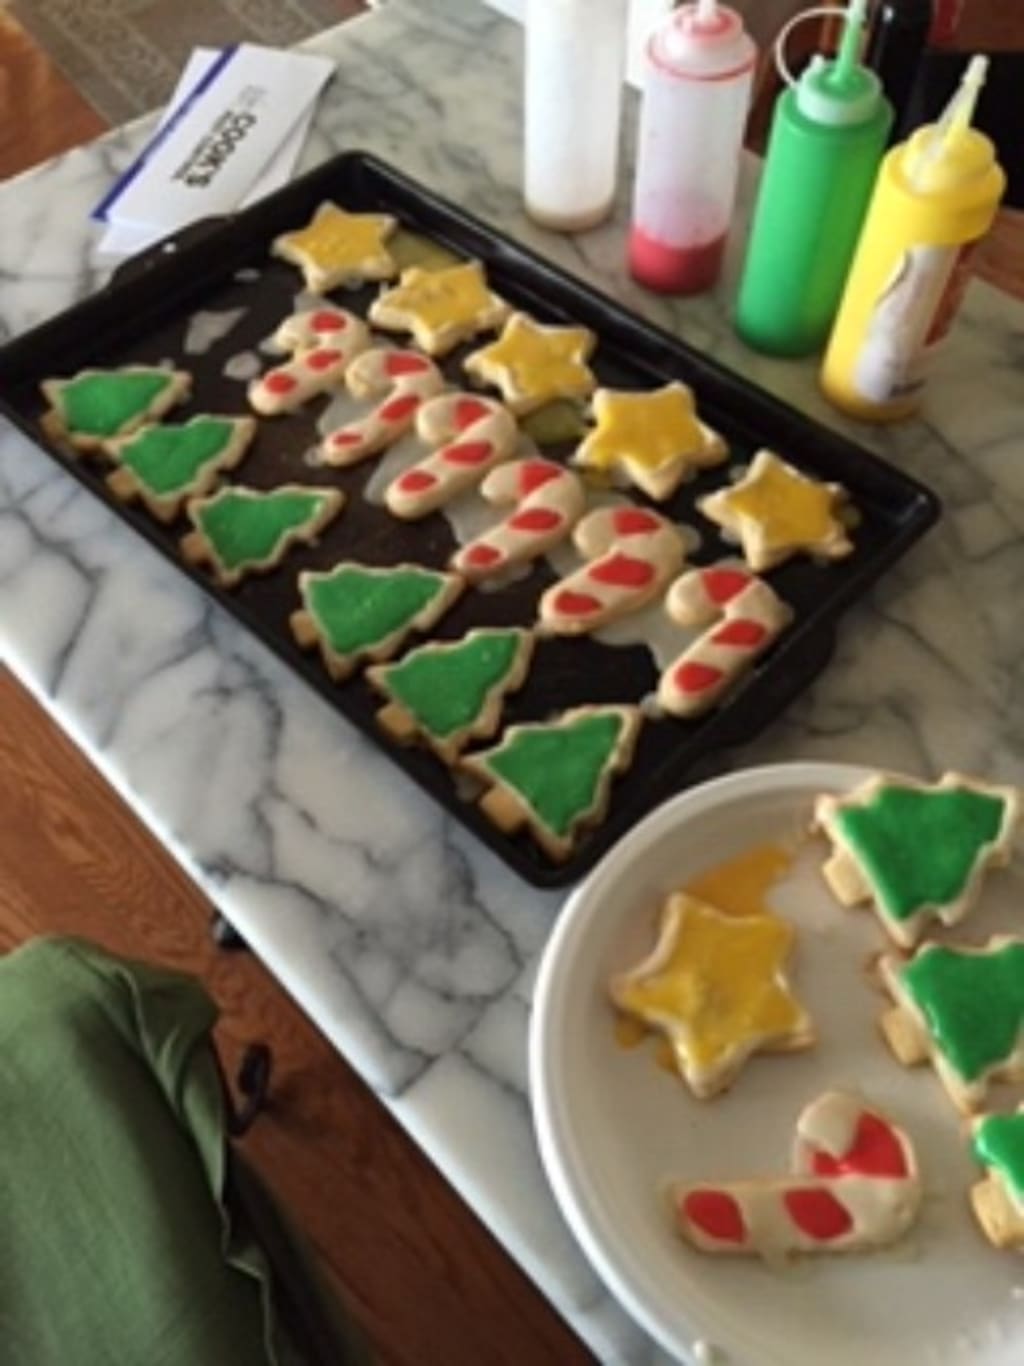
There are a lot of really special places, scents, and sights during the holidays. Christmas tree farms, crisp winter air, hot chocolate, apple cider, and peppermint everything. But unmistakably, the most comforting scent and place during the holidays is the heart of the home: the kitchen. Everything happens in the kitchen during the holidays - countless meals, fellowship, love, and laughs. My favorite kitchen activity in December? Baking homemade sugar cookies to decorate with royal flood icing. There have been several times (this year is one of them) where I have had to be, ahem, creative with gift giving. Those are the really special years where I go hog wild, pig crazy in the kitchen with endless cookie tins. I mean, I bake for days. The rest of the house rolls their eyes at me just a little bit...until I share some of the delicious goods, that is. By the end of the baking session, both myself and the kitchen are covered in flour and royal icing but there are some beautiful and scrumptious cookies to share with friends and family!
My go to recipe is one that I got from Food Network several years ago (2015, I believe). The recipe is incredibly easy to follow and also easy to increase the yield. For the cookies themselves, there are only seven necessary ingredients. Around $20.00 will get you approximately 60 cookies! They are:
- 2 1/2 cups cake flour (not self-rising, that's of the utmost importance), plus a small amount for dusting
- 1 teaspoon baking powder
- 1/4 teaspoon salt
- 2 sticks unsalted butter
- 3/4 cup sugar
- 1 large egg
- 1 teaspoon pure vanilla extract
To begin, you need to sift the cake flour, baking powder, and salt onto a piece of parchment paper or into a medium bowl. (I prefer to use the bowl as it is less messy and I am notorious for a messy kitchen even with the best tips.) Set the mixture aside. Beat the butter and sugar in a large bowl with a mixer on medium-high speed until light and fluffy, for about 5 minutes. Add the egg and vanilla and beat until incorporated. Reduce the mixer speed to low and beat in the flour mixture in 2 batches until just completely incorporated. Divide the dough between 2 pieces of plastic wrap and shape into disks. Wrap and refrigerate until firm, usually at least 1 hour. Next, you will line 2 baking sheets with parchment paper so that your cookies can be removed easily without leaving half the cookie behind. Working with 1 disk of dough at a time, roll it out on a floured surface, dusting with flour as needed, until approximately 1/8 of an inch thick. Cut out shapes with 2-4 inch cookie cutters. (I like to visit Hobby Lobby and Michael's for the cookie cutters - they are usually on sale for all of November and December and they have just about every holiday image you can imagine.) Arrange the cookies 2 inches apart on the prepared baking sheets. If the dough is too flimsy, return to the refrigerator. Chill the cutouts for at least 30 minutes. Finally, to cook them, you will position racks in the upper and lower thirds of the oven and preheat it to 350 degrees F. Bake, switching the pans halfway through, until the cookies are slightly puffed and just barely golden, usually about 13-15 minutes, but keep a close eye on the oven. Let cool 10 minutes on the baking sheets before transferring to a decorating station. Once transferred, let the cookies cool for at least 45 minutes before icing. This is crucial or your cookies will come out a messy glob of goop!
Next is the fun part! Decorating! You will need to make a large batch of royal icing. The recipe provided yields approximately 3 cups of icing. The only necessary ingredients are:
- 1 1lb box confectioner's sugar
- 2 tablespoons meringue powder
- 5-6 tablespoons water
- any necessary food coloring
You will begin by whisking the confectioner's sugar and meringue powder in a large bowl. Add 5 tablespoons water and beat with a mixer on medium-high speed until soft glossy peaks form. This stiffer icing will be used to outline the cookies. You will need to set some of this aside into squeeze bottles of each appropriate color. With the remaining icing, add the remaining tablespoon of water to thin out the icing that will be used to "flood" the cookies. After mixing with the food coloring, assemble in squeeze bottles for easy application. Use the stiffer icing to trace the outline of the cookie in the colors that you will fill in with the thinner icing. Use the flood icing to fill in the remaining dough until the cookie is fully decorated. Return cookies to the refrigerator to set the icing for approximately 20 minutes. Finally, use any sanding sugar, nonpareils, sprinkles, or other decorations to officially finish your cookies.
Package your cookies in festive containers such as cookie tins, cookie boxes, or treat bags (make sure the icing is fully set!) and add a handcrafted card with a heartfelt message to accompany this wonderful gift. This is really great to give as a hostess gift when attending the many holiday parties of the season and is also great as a take-away for parties that you host for your friends and family. Enjoy baking and happy holidays!
About the Creator
Keep reading
More stories from Jennifer Fox and writers in Feast and other communities.
"Tastefully Done" Foodie Gift Basket
Everyone loves a kitchen at the holidays. Bakers get to bake their hearts out and there are many savory dinners with friends. Even those who don't love to cook, love to be in the kitchen, and love to eat the delicious goodies that come out of them! This suggestion for a great gift is geared towards satisfying those among us who do not enjoy cooking and baking but DO enjoy eating, quite a bit. It also satisfies every bit of gift-giving pleasure for those who do in fact love to cook and bake for hours. When given the opportunity, I love to make a basket of many different goodies for my closest friends and also something that I love to scale down for hostess gifts at the holidays as well. Please enjoy this collection of recipes and use them to delight at your future holiday gatherings!
By Jennifer Fox5 years ago in Feast
Astragalus: An Ornamental, Supportive, and Culinary Herb
Astragalus Root/Milkvetch Astragalus is a popular remedy for various ailments today. Commonly found in health food stores and herbal shops in the form of tinctures, grounded encapsulated powders, or as part of an herbal infusion, or sometimes added to teas, astragalus usually makes the list for its purported immune-system and energy-supporting benefits.
By J. Chauncey6 days ago in Feast


Comments
There are no comments for this story
Be the first to respond and start the conversation.