
Converting Point Cloud to Revit
Step-by-Step Process


The architecture, engineering, and construction (AEC) industry is rapidly adopting digital tools to streamline processes and improve accuracy. One of the most transformative workflows in recent years is the conversion of point cloud data to Revit models. This process enables professionals to turn scanned environments into detailed Building Information Models (BIM), ideal for renovation, retrofit, and facility management projects.
In this guide, we’ll walk you through the entire step-by-step process of converting point cloud data into Revit models, discussing tools, techniques, challenges, and best practices along the way.
What is a Point Cloud?

A point cloud is a collection of millions (sometimes billions) of 3D data points that represent the external surfaces of a structure or object. These data sets are typically captured using 3D laser scanners such as the Leica RTC360, FARO Focus, or Trimble X7. The result is a spatially accurate digital representation of a physical space.
Each point contains XYZ coordinates and may also include RGB color or intensity data. However, a point cloud is not a model—it is raw spatial data that needs to be processed and interpreted in CAD or BIM software.
Why Convert Point Cloud to Revit?
Revit is one of the most widely used BIM platforms for creating architectural, structural, and MEP models. Converting point cloud data into Revit is essential when:
- Renovating or retrofitting existing buildings
- Creating as-built documentation in revit
- Performing clash detection or coordination
- Facilitating facility management through accurate BIM data
- Digitizing historical or irregularly shaped structures
Tools Required for the Process
Before diving into the process, make sure you have access to the following:
Hardware
- A high-resolution 3D laser scanner (e.g., Leica, FARO, or Trimble)
- A computer with high processing power, GPU support, and sufficient RAM (32GB or more is ideal)
Software
- Revit (2021 or later versions recommended)
- Autodesk Recap (for point cloud processing)
Optional: Navisworks, CloudCompare, or Leica Cyclone for advanced editing and cleanup
Step-by-Step Process: Converting Point Cloud to Revit
Step 1: Capture the Environment Using a 3D Laser Scanner
The first step is to scan the building or environment using a 3D laser scanner. The scan captures millions of data points from different angles to create a full 3D representation.
Tips for successful scanning:
- Plan scan positions in advance
- Ensure overlap between scan stations for proper registration
- Minimize movement and obstructions
- Use high-resolution settings for detailed environments
Scans are usually saved in proprietary formats like .e57, .pts, or .rcs.
Step 2: Register and Clean the Point Cloud
Once the scans are complete, they need to be stitched together—a process known as registration.
Registration involves:
- Aligning multiple scans using reference points or cloud-to-cloud matching
- Removing noise or unwanted elements (e.g., moving people, vehicles)
- Ensuring the point cloud is geo-referenced (if required)
Use software like Autodesk ReCap, Cyclone REGISTER 360, or FARO Scene to process and clean the point cloud. The output should be a single, unified point cloud ready for modeling.
Best practice: Export the cleaned cloud into a format that Revit supports—.rcp (Recap Project) or .rcs (Recap Scan).
Step 3: Import the Point Cloud into Revit
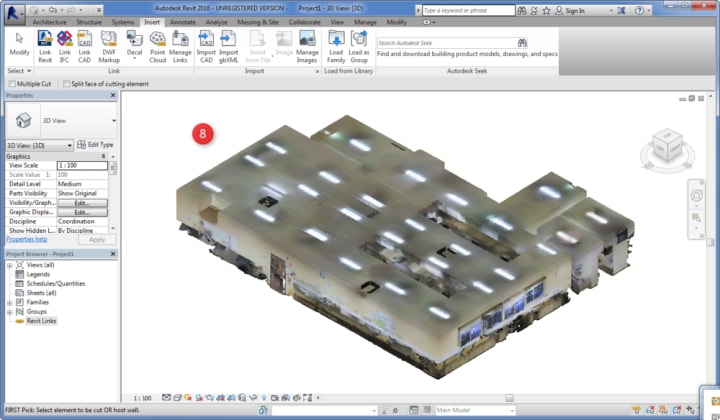
Open Revit and set up a new project file or use a predefined template based on the project type (architecture, structure, or MEP).
To import the point cloud:
- Go to the “Insert” tab
- Click on “Point Cloud”
- Select the .rcp or .rcs file
- Specify the placement (e.g., Auto-Origin to Origin or Manual)
Revit will now display the point cloud in your 3D workspace. You can view it in different orthographic or perspective views to begin modeling.
Step 4: Adjust Views and Work Planes
Before modeling, it’s critical to set appropriate views and work planes to accurately trace over the point cloud.
- Use Section Boxes to isolate parts of the point cloud
- Create levels and grids to align with the existing structure
- Set up reference planes for more complex elements
This step ensures that your modeling process is efficient and error-free.
Step 5: Begin Modeling in Revit
Modeling from a point cloud requires patience and attention to detail. It’s best to model systematically, breaking the project into zones or disciplines.
Architectural Modeling
Start by modeling architectural elements such as:
- Walls: Use the “Wall by Face” or “Wall” tool and trace along the point cloud in plan view.
- Floors and Ceilings: Create levels and extrude based on scan data.
- Doors and Windows: Use Revit families to place accurately based on point cloud slices.
Structural Modeling
Use the structural tab to model beams, columns, slabs, and other load-bearing elements. Always validate measurements by checking multiple cross-sections.
MEP Modeling
For mechanical, electrical, and plumbing:
- Use MEP Revit families for ducts, pipes, and conduits
- Leverage section and 3D views to trace accurately
- Consider software like EdgeWise or Scan to BIM for semi-automated modeling
Step 6: Validate Model Accuracy
Once the initial modeling is complete, validate your model for accuracy.
Validation techniques:
- Overlay the model on the point cloud and inspect gaps
- Measure key dimensions and compare with on-site measurements
- Use tools like “Measure Between Two References” in Revit
Make corrections as needed before finalizing the model.
Step 7: Add Metadata and Parameters
To fully leverage the benefits of BIM, enrich your Revit model with relevant data:
- Material specifications
- Load capacities
- Fire ratings
- Manufacturer information
- Maintenance schedules
This step is especially important for facilities management and long-term lifecycle operations.
Step 8: Export or Share the BIM Model
Once your model is finalized:
- Save and archive the Revit file
- Export it to other formats like IFC, DWG, or NWC, depending on project needs
- Share via platforms like BIM 360 or Autodesk Construction Cloud for collaboration
You can also create as-built documentation or detailed construction drawings from the Revit model.
Challenges in Converting Point Cloud to Revit
- Data Overload: Large point clouds can slow down Revit; segment files when necessary.
- Noise and Artifacts: Clean scan data is vital for accurate modeling.
- Modeling Irregular Shapes: Organic or historic structures may require mesh modeling tools.
- Software Compatibility: Ensure formats are supported across your workflow.
Best Practices and Tips
- Work in Sections: Use cropped regions or levels to stay focused.
- Use Snap Settings: Turn on "Snap to Point Cloud" for easier tracing.
- Keyboard Shortcuts: Speed up modeling with custom shortcuts.
- Color Coding: Use different materials or phases to differentiate systems.
- Documentation: Maintain scan-to-model logs for transparency.
Popular Plugins and Automation Tools
Several third-party tools can enhance your scan-to-BIM workflow:
- ClearEdge3D EdgeWise: Automates extraction of pipes and walls
- Scan to BIM by IMAGINiT: Adds automated modeling features in Revit
- Verity by ClearEdge: Compares point cloud with the Revit model for QA/QC
- Undet for Revit: Simplifies working with large point clouds
These tools help reduce manual work and improve modeling precision.
Applications Across Industries
- Renovation Projects: Accurately model existing conditions
- Heritage Preservation: Digitally archive historical structures
- MEP Coordination: Detect clashes before fieldwork
- Facility Management: Enable digital twins and intelligent building systems
- Industrial Sites: Model complex piping and equipment in refineries or plants
Conclusion
Converting point cloud data into Revit models is a powerful process that brings the physical and digital worlds together. It enhances precision, speeds up decision-making, and enables collaboration across disciplines. Whether you're an architect, contractor, or engineer, mastering this workflow is essential for modern BIM projects.
By following the step-by-step process outlined above, you can transform raw laser scan data into rich, actionable 3D models that serve a variety of design, construction, and facility management purposes.
Further Reading
About the Creator
Matt Sharon
A professional content writer. Having years of experience in Technology, health, finance, and construction and real estate field. Writing is my passion and I love to play with words Confidently.
Keep reading
More stories from Matt Sharon and writers in Education and other communities.
Why BIM: The Key to Digital Transformation in Construction
The construction industry is going through a big change because of digital technology. This change is focused on improving efficiency, saving money, and promoting green practices. Building Information Modeling (BIM) plays a key role in this shift. BIM allows people to work together using data on construction projects. This teamwork helps achieve better results.
By Matt Sharonabout a year ago in Education
Pearl
1980 something. we all hung out at Pearl and you and i were nothing special, or so i thought. i mean we all danced, drenched in our own sweat, our own saline solution of fear, too many beers, shots, laughter, tears, fucks in the bathroom and i don't know when we began to be afraid. do you?
By ROCK aka Andrea Polla (Simmons)6 days ago in Fiction


Comments
There are no comments for this story
Be the first to respond and start the conversation.