
Mastering HTML Structure
Forms, Inputs, Lists & Tables Demystified

Almost every website or web application involves user interaction. Whether it’s signing up for a newsletter, submitting a comment, logging into an account, or buying a product—forms are how websites gather information from users.
If you’ve ever filled out a contact form, signed into a service, or placed an order online, you’ve interacted with a form. As a fullstack developer, understanding how HTML forms work is critical. Today, we’ll dig into the most commonly used form elements: <form>, <input>, and <button>.
By the end of this lesson, you’ll be able to:
- Build basic HTML forms
- Understand different input types
- Submit form data
- Use form attributes for accessibility and validation
What is an HTML Form?
A form in HTML is a container used to collect user input and submit it to a server or backend process. Forms are used to handle everything from login authentication to survey submissions.
Syntax of a Form:
```html
<form action="submit.php" method="POST">
<!-- form elements here -->
</form>
```
Explanation:
- action: URL where form data is sent
- method: HTTP method used (usually GET or POST)
- name: Optional name to identify the form
- autocomplete: Controls browser autocomplete (on or off)
While action and method are required for form submission to a server, modern applications like those using React and Firebase may handle forms using JavaScript without ever needing to send the form to a traditional endpoint.
The <input> Element
The <input> tag is used to create interactive fields that collect user data. It’s one of the most powerful tags in HTML because it comes in many different types.
Basic Input Syntax:
```html
<input type="text" name="username" placeholder="Enter your name">
```
Key Attributes of <input>:
- type: Defines the kind of input (text, password, email, etc.)
- name: The name of the input (used when sending form data)
- placeholder: Text displayed inside the input as a hint
- value: Default value of the input
- required: Makes the input mandatory
- disabled: Disables the input
- readonly: Makes input uneditable
- maxlength: Limits number of characters
- min, max: Sets minimum or maximum value for numeric inputs
Common Input Types
1. text – Basic text input
```html
<input type="text" name="firstName" placeholder="First Name">
```
Used for general text input like names and addresses.
2. email – Email address input
```html
<input type="email" name="email" placeholder="Email" required>
```
Automatically validates that the input contains an “@” and a domain. Good for contact or sign-up forms.
3. password – Secure hidden input
```html
<input type="password" name="password" placeholder="Enter Password">
```
Input is obscured with dots or asterisks for privacy.
4. number – Numeric input
```html
<input type="number" name="age" min="1" max="99">
```
Only allows numeric input and can enforce minimum/maximum values.
5. radio – Choose one option
```html
<input type="radio" name="gender" value="male"> Male
<input type="radio" name="gender" value="female"> Female
```
Radio buttons let users pick only one option within a group (note: they must share the same name).
6. checkbox – Choose multiple options
```html
<input type="checkbox" name="interests" value="coding"> Coding
<input type="checkbox" name="interests" value="reading"> Reading
```
Checkboxes let users select multiple items.
7. date, time, datetime-local
```html
<input type="date" name="dob">
<input type="time" name="appointmentTime">
<input type="datetime-local" name="eventTime">
```
Useful for calendars, event booking, and scheduling apps.
8. file – Upload files
```html
<input type="file" name="resume" accept=".pdf,.docx">
Allows users to upload documents or images.
The <button> Element
HTML buttons are used to submit forms or trigger actions via JavaScript.
Syntax:
```html
<button type="submit">Submit</button>
Types of Button:
- submit: Submits the form to the server or triggers JavaScript
- reset: Resets all form fields to default values
- button: A generic button used for JS actions
Example:
```html
<form>
<input type="text" placeholder="Name">
<button type="submit">Send</button>
</form>
```
You can also use <input type="submit"> but using <button> is more flexible as it can contain HTML or icons.
```html
<button type="submit">
<img src="icon.png" alt="send"> Send Form
</button>
```
Complete Form Example
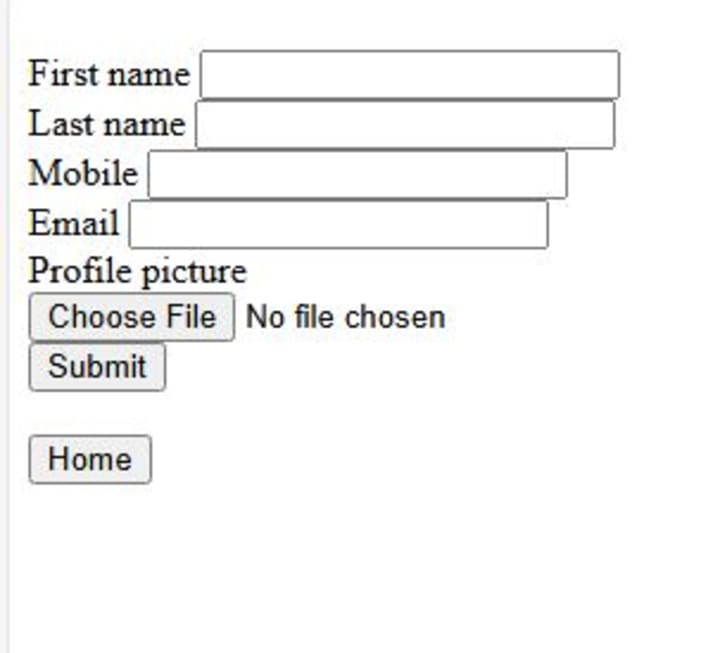
Let’s look at a realistic example—a user registration form.
```html
<form action="/signup" method="POST">
<label for="username">Username:</label><br>
<input type="text" id="username" name="username" required><br><br>
<label for="email">Email:</label><br>
<input type="email" id="email" name="email" required><br><br>
<label for="password">Password:</label><br>
<input type="password" id="password" name="password" required><br><br>
<label for="gender">Gender:</label><br>
<input type="radio" id="male" name="gender" value="male">
<label for="male">Male</label>
<input type="radio" id="female" name="gender" value="female">
<label for="female">Female</label><br><br>
<label for="interests">Interests:</label><br>
<input type="checkbox" name="interests" value="coding">Coding
<input type="checkbox" name="interests" value="music">Music<br><br>
<label for="dob">Date of Birth:</label><br>
<input type="date" id="dob" name="dob"><br><br>
<button type="submit">Register</button>
</form>
```
How Form Data is Sent
When a user submits a form:
- GET method: Appends the form data to the URL (e.g., /search?q=javascript)
- POST method: Sends the data in the request body (more secure, used for login or saving sensitive data)
Example: GET
```html
<form action="/search" method="GET">
<input type="text" name="q" placeholder="Search...">
<button type="submit">Search</button>
</form>
```
Submitting this will send the user to /search?q=something.
Input Validation in HTML
HTML allows for client-side validation using built-in attributes.
Examples:
- required: Field must be filled
- pattern: Regular expression pattern to match
- minlength / maxlength: Character limits
- type="email": Must be a valid email
Example with Validation:
```html
<form>
<input type="email" required placeholder="Enter a valid email">
<input type="password" minlength="6" required placeholder="Minimum 6 characters">
<button type="submit">Submit</button>
</form>
```
This helps catch simple errors before data reaches the server.
Accessibility and Labels
Use <label> elements to associate text with form fields. This helps users with screen readers.
Example:
```html
label for="email">Email Address:</label>
<input type="email" id="email" name="email">
```
Here, for="email" matches id="email", creating an accessible relationship between the label and the input.
Styling Forms with CSS (Brief Overview)
HTML forms are functional by default but don’t look appealing. You can style them using CSS.
Example:
```html
<style>
input, button {
padding: 10px;
margin: 5px 0;
width: 100%;
}
form {
max-width: 400px;
margin: auto;
}
</style>
Though this blog focuses on HTML, know that CSS and JavaScript will help make your forms more interactive and visually appealing as your skills grow.
Forms in Modern Web Development
In modern applications (e.g., using React), form submissions are often handled by JavaScript instead of submitting to a server directly.
Here’s what you might see in a React component:
```jsx
function ContactForm() {
const handleSubmit = (e) => {
e.preventDefault(); // prevent page refresh
// Process data here
};
return (
<form onSubmit={handleSubmit}>
<input type="text" name="name" placeholder="Your name" required />
<input type="email" name="email" placeholder="Email" required />
<button type="submit">Send</button>
</form>
);
}
```
Firebase can be used to store this data securely in the cloud, but understanding HTML forms is the first step.
Common Mistakes to Avoid
- Forgetting name attributes: Data won’t be sent on submission
- Using incorrect input type: Breaks validation (e.g., type="emial" instead of email)
- Omitting label elements: Breaks accessibility
- Missing required fields: Causes incomplete data collection
- Nesting form tags: Invalid HTML (a form cannot be inside another form)
Lists and Tables
The internet is a place filled with information, and as developers, one of our core responsibilities is organizing that information in a clear, structured, and user-friendly way. HTML gives us powerful tools for this—especially lists and tables.
Whether you’re writing a grocery checklist, building a product feature list, or displaying data in a spreadsheet-like format, HTML lists and tables are your go-to building blocks.
Even in more advanced frameworks like React or full-stack systems using Firebase, understanding these basic structures is crucial. Tables and lists often appear in admin dashboards, shopping carts, form summaries, and reports. If you know how to structure them well in HTML, you’ll have no trouble styling and scripting them later with CSS and JavaScript.
Understanding HTML Lists
Lists in HTML are used to group related items together. They provide structure and hierarchy to your content.
There are three main types of HTML lists:
- Unordered List (<ul>)
- Ordered List (<ol>)
- Definition List (<dl>)
1. Unordered Lists (<ul>)
An unordered list is used when the order of items doesn’t matter—like a shopping list, a navigation menu, or a list of hobbies.
Basic Syntax:
```html
<ul>
<li>Apples</li>
<li>Oranges</li>
<li>Bananas</li>
</ul>
<ul> stands for unordered list.
```
<li> stands for list item.
The default browser rendering will show these items with bullet points.
Real Example: Navigation Bar
```html
<ul>
<li><a href="#home">Home</a></li>
<li><a href="#about">About</a></li>
<li><a href="#contact">Contact</a></li>
</ul>
```
This is often used for nav menus. With some CSS, it can be styled into a horizontal navigation bar.
2. Ordered Lists (<ol>)
An ordered list is used when the order matters—like a set of instructions, ranking list, or steps in a recipe.
Basic Syntax:
```html
<ol>
<li>Preheat the oven.</li>
<li>Mix ingredients.</li>
<li>Bake for 30 minutes.</li>
</ol>
```
This will display as a numbered list:
- Preheat the oven.
- Mix ingredients.
- Bake for 30 minutes.
Attributes:
- type: Changes the number format (e.g., "A", "a", "I", "i", "1")
```html
<ol type="A">
<li>First</li>
<li>Second</li>
</ol>
```
This will be displayed as:
A. First
B. Second
- start: Specifies the starting value of the list
```html
<ol start="5">
<li>Step 5</li>
<li>Step 6</li>
</ol>
```
5. Step 5
6. Step 6
3. Definition Lists (<dl>)
Definition lists are used to pair terms with descriptions, like in a glossary or FAQ.
Syntax:
```html
<dl>
<dt>HTML</dt>
<dd>A markup language for structuring web content.</dd>
<dt>CSS</dt>
<dd>A language for styling HTML content.</dd>
</dl>
```
- <dt> is the definition term.
- <dd> is the definition description.
This type of list is semantically useful when building dictionaries, glossaries, or data pairs.
Nesting Lists
Lists can be nested inside each other to represent hierarchy or subgroups.
Example: Nested List in a To-Do List
```html
<ul>
<li>Work Tasks
<ul>
<li>Reply to emails</li>
<li>Finish report</li>
</ul>
</li>
<li>Personal Tasks
<ul>
<li>Buy groceries</li>
<li>Walk the dog</li>
</ul>
</li>
</ul>
```
Nesting is very helpful in applications like:
- Task management tools
- Nested menu systems
- Forums with threaded replies
- Styling Lists with CSS (Overview)
Though we won’t go deep into CSS here, it’s worth mentioning that you can:
- Remove bullets using list-style: none;
- Change numbering formats
- Create custom icons or images as bullets
- Convert vertical nav menus to horizontal layouts
```css
ul {
list-style: none;
display: flex;
gap: 10px;
}
```
This CSS turns a basic <ul> into a horizontal navbar.
Use Cases of Lists in Fullstack Apps
- Navigation menu: <ul>
- Step-by-step wizard: <ol>
- Glossary or key-value list: <dl>
- Settings menu: <ul> or <ol>
- Comments or replies: Nested <ul>
Lists play a big role in structuring layout in components and rendering repeated data in frameworks like React (using .map() over arrays).
Understanding HTML Tables
Tables allow you to display tabular data—data that’s structured in rows and columns, similar to spreadsheets.
Tables are essential in:
- Admin dashboards
- Product catalogs
- Comparison charts
- Reports
- Calendars and schedules
- Basic Table Structure
```html
<table>
<tr>
<th>Name</th>
<th>Age</th>
<th>Occupation</th>
</tr>
<tr>
<td>Alice</td>
<td>28</td>
<td>Engineer</td>
</tr>
<tr>
<td>Bob</td>
<td>34</td>
<td>Designer</td>
</tr>
</table>
```
Explanation:
- <table>: Wraps the entire table
- <tr>: Table row
- <th>: Table header cell
- <td>: Table data cell
Rowspan and Colspan
- rowspan merges cells vertically
- colspan merges cells horizontally
Example: Merged Header
```html
<table>
<tr>
<th colspan="2">Personal Info</th>
</tr>
<tr>
<td>Name</td>
<td>Charlie</td>
</tr>
</table>
```
This produces a header that spans two columns.
Table Head, Body, and Footer
For better structure and accessibility, use semantic tags:
```html
<table>
<thead>
<tr>
<th>Product</th>
<th>Price</th>
</tr>
</thead>
<tbody>
<tr>
<td>Laptop</td>
<td>$1200</td>
</tr>
<tr>
<td>Phone</td>
<td>$800</td>
</tr>
</tbody>
<tfoot>
<tr>
<td>Total</td>
<td>$2000</td>
</tr>
</tfoot>
</table>
```
Using <thead>, <tbody>, and <tfoot> improves readability and allows for easier JavaScript or CSS manipulation.
Common Table Attributes
- border: Adds border (deprecated, use CSS instead)
- cellpadding: Padding inside cells
- cellspacing: Space between cells
- width, height: Sets size of table or cells
- align: Aligns content (deprecated)
Best practice today is to use CSS for all styling.
CSS Styling for Tables (Quick Overview)
```css
table {
border-collapse: collapse;
width: 100%;
}
th, td {
border: 1px solid #ddd;
padding: 10px;
text-align: left;
}
th {
background-color: #f5f5f5;
}
```
This CSS transforms a basic table into a clean, readable format.
Table Use Cases in Fullstack Apps
Tables aren’t just for static data—they're everywhere in real applications.
- E-commerce: Product lists, pricing tables
- Admin panels: User lists, logs, analytics
- CMS platforms: Post management, tag lists
- Finance tools: Transaction history, invoices
- Education portals: Grades, attendance sheets
With React or Firebase, tables are often populated dynamically. You still define the HTML structure—just with code rendering logic.
Building a Responsive Table
Tables don’t adapt easily to small screens by default. You can make them responsive using:
```css
.table-container {
overflow-x: auto;
}
html
Copy code
<div class="table-container">
<table>
<!-- table contents -->
</table>
</div>
```
This approach allows horizontal scrolling on mobile devices.
Combining Lists and Tables
Lists and tables are often used together.
Example: A List of Tables
```html
<h2>Team Members</h2>
<ul>
<li>Engineering
<table>
<tr><th>Name</th><th>Role</th></tr>
<tr><td>Alex</td><td>Frontend</td></tr>
<tr><td>Sara</td><td>Backend</td></tr>
</table>
</li>
<li>Marketing
<table>
<tr><th>Name</th><th>Role</th></tr>
<tr><td>Tom</td><td>SEO</td></tr>
<tr><td>Emma</td><td>Content</td></tr>
</table>
</li>
</ul>
```
Common Mistakes to Avoid
- Using <br> to create lists: Breaks semantic meaning
- Mixing up <th> and <td>: Misrepresents header data
- Forgetting to close <li> or <td>: Causes layout issues
- Not using <thead>, <tbody>: Harder to style and manage
- Using <table> for layout: Not recommended—use CSS Grid or Flexbox instead
Real World React + Firebase Application
In a React project, you might render dynamic lists or tables from a database like Firebase:
```jsx
<ul>
{tasks.map(task => (
<li key={task.id}>{task.title}</li>
))}
</ul>
```
Or a dynamic table:
```jsx
<table>
<thead>
<tr><th>Name</th><th>Age</th></tr>
</thead>
<tbody>
{users.map(user => (
<tr key={user.id}>
<td>{user.name}</td>
<td>{user.age}</td>
</tr>
))}
</tbody>
</table>
```
Understanding static HTML lists and tables prepares you to build these components dynamically in future fullstack projects.
Conclusion
Understanding HTML forms, lists, and tables is essential for any web developer. Forms enable user interaction by collecting and submitting data, while lists and tables organize and display information clearly. Mastering these elements ensures you can build accessible, functional, and user-friendly interfaces.
As modern applications increasingly rely on JavaScript frameworks and backend services, having a strong foundation in HTML structure is crucial. It allows for easier integration with dynamic data and enhances overall application reliability.
By avoiding common mistakes and focusing on semantic, accessible mark-up, you set yourself up for success in full-stack development. These core skills are the building blocks for creating effective and interactive web applications.
Read Previous Post on HTML Basic Structure
About the Creator
CodeBloom
CodeBloom is a beginner coder sharing her journey, lessons, and small wins—growing and building through curiosity, one project at a time.


Comments
There are no comments for this story
Be the first to respond and start the conversation.