
How to Recover Data From Your SSD on Windows
A Practical Guide to Getting Your SSD Data Back on Windows


If you lost data on your SSD, this guide will help you understand what you can still recover. SSD data recovery on Windows depends on fast response and the method you choose because solid-state drives reuse free blocks quickly. Below, we explain how to restore files using software, backups, or professional services, and outline what limits recovery and what remains possible after your data disappears.
Key Factors That Influence Your Recovery Success
SSD recovery does not follow the same rules as traditional hard drive recovery. When data disappears, the drive immediately begins managing its free space in ways that can either preserve recoverable blocks or eliminate them entirely.
Windows also interacts with SSDs through features that accelerate performance but reduce the lifespan of deleted data. Several technical factors determine how much information remains on the drive and which method has the best chance of restoring it.
The most important factors include the following:
- TRIM activity. Windows uses the TRIM command to clear unused blocks on internal SSDs. Once TRIM processes a deleted file’s blocks, no software can reconstruct that data because the physical cells no longer store meaningful information. The good news is that TRIM does not always activate, and external SSDs connected through a USB Type-A or Type-C hub often do not receive the TRIM command, which increases recovery potential.
- Type of data loss. Accidental deletion or quick formatting leaves raw data untouched until TRIM or new writes remove it. When it comes to formatting, a quick format only resets the file system and leaves the underlying data intact, giving you high recovery chances, while a full format overwrites every sector, permanently destroys the original data, and leaves no possibility of recovering your photos.
- Amount of drive activity since deletion. Internal SSDs handle constant background operations: indexing, caching, browser data, and system logs. These processes overwrite free space quickly. The less the system uses the SSD after the incident, the more data you retain for recovery.
- File system condition. NTFS corruption, damaged partition tables, or incomplete writes may hide intact data. Recovery software often reads around faulty metadata and accesses raw storage areas. Severe corruption, however, limits how much software can interpret without deeper analysis or professional intervention.
- The type of file system also influences recovery outcomes, because some formats behave differently. For example, if your drive uses exFAT, TRIM won’t run, which preserves more recoverable data on the SSD.
Enabled backups and restore points also increase the number of locations where data may still exist. In contrast, aggressive optimization or scheduled maintenance may reduce recoverable traces. These factors combine to determine how much data you can restore from an SSD. Early intervention, minimal activity, and knowledge of how your SSD handles TRIM and block management all play a decisive role in the final outcome.
How to Recover Data from an SSD Drive
Windows offers multiple SSD hard drive data recovery paths, but each one works under different conditions. The three methods we recommend are listed below and cover every realistic scenario: software-based recovery for deleted or formatted data, backup-based restoration for users who enabled Windows protection features, and professional services for severe SSD failures.
Method 1: Recover Data from SSD Hard Drive With Data Recovery Software
Recovery software can scan the physical storage area, locate file remnants that Windows no longer references, and rebuild recoverable items when the underlying blocks still exist. This method works well in cases of accidental deletion, corrupted partitions, or a quick format that removed the file table but left raw data intact.
There are many tools available in the market and from our experience, while they have the same core principle, the data recovery capabilities vary. Disk Drill stands out because it detects a wider range of file signatures, handles damaged partitions more reliably, and offers a clear preview system that helps confirm which files still hold usable data before restoration.
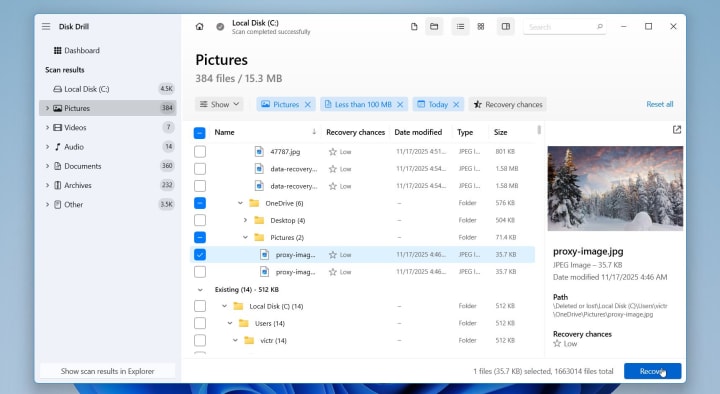
Here is an easy guide on how to recover files on an SSD using Disk Drill:
1. Download Disk Drill and install it on a different (not affected) disk to prevent overwriting the data you want to recover.
2. Launch the program. On the main screen, find your SSD in the list of available devices and select it. Disk Drill identifies the drive by model, size, and interface.
3. Click Search for lost data. Disk Drill begins analyzing the SSD and checks for deleted files and raw file signatures.

4. After the scan completes, click Review found items. Disk Drill groups results by file type and shows previews. This step helps confirm which files remain intact and which appear partially damaged.

5. Use filters, search, and preview options to identify your files and select the files you want to recover.
6. Click Recover and select a different disk as the destination, never save recovered files to the same SSD.
Disk Drill remains one of the strongest solutions for SSD recovery, especially when the drive still contains untouched data blocks and TRIM has not cleared them. The tool also supports byte-to-byte disk imaging, which protects the SSD from further damage during advanced scans.
Method 2: Restore Data From Backups or System Images
Backups offer the safest and most reliable path to full data restoration because they do not rely on the SSD’s remaining data blocks. Instead, they draw from earlier copies of your files or complete system states stored on external drives or cloud accounts.
Windows provides multiple backup options, but File History remains the most accessible feature for restoring personal folders such as Documents, Pictures, Videos, and Desktop items.
Here is how to recover files if you had File History enabled:
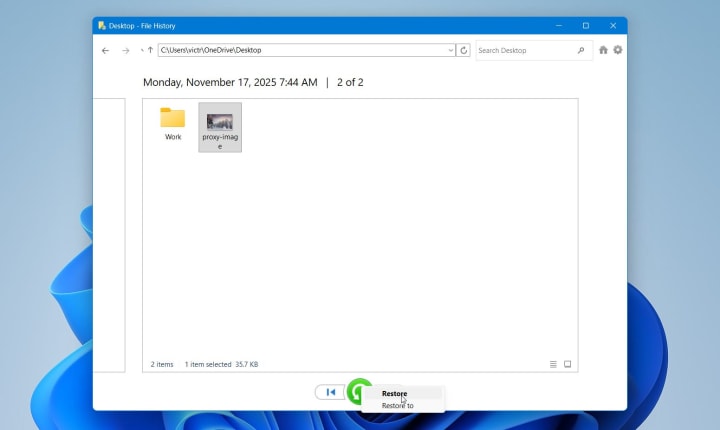
1. Press Win + S, type File History, and select Restore your files with File History. Windows opens the interface that stores your available snapshots.

2. File History displays a timeline of backups. Browse through the snapshots to locate the version that existed before the data loss. Use the left and right arrows to move between backup dates.

3. Open the relevant folder and search for the file version you need. File History shows thumbnails and preview options to confirm that you selected the correct item.
4. Click the green Restore button to place the selected file back in its original folder. If a file with the same name exists, Windows presents options to compare or keep both versions. If you prefer a safer approach, right-click the Restore button and choose Restore to, then pick another drive or folder. This avoids overwriting existing files on the SSD.
Although File History is the most common option, Windows provides several additional restoration paths that help recover data when direct recovery fails. Previous Versions may store earlier file states inside system restore points, allowing access to older copies. The Backup and Restore utility (Windows 7) retrieves full collections of files from scheduled backups saved on external drives. Cloud platforms such as OneDrive or Google Drive also maintain online version histories that often preserve intact copies of files long after the SSD removes them.
Method 3: Use Professional SSD Data Recovery Services
When software and backups cannot recover your data, professional labs remain the final option. SSDs store information in flash memory chips managed by a complex controller, and failures inside this system require specialized tools that consumer software cannot access. Professional recovery becomes necessary in cases that involve unreadable partitions, controller failure, firmware malfunction, or physical damage to the SSD.
Specialists diagnose the drive with advanced equipment, analyze the controller’s translation layer, and extract data directly from the memory chips when necessary. They rebuild corrupted structures, decode raw flash dumps, and recover files from devices that Windows no longer detects at all. This process takes more time and often comes with a higher cost, but it provides the best chance of restoring irreplaceable data once other methods fail.
When Recovery Fails and What You Can Still Do
When every recovery attempt fails, the remaining options become limited. At that point, you can only evaluate what partial results remain and decide if any additional steps are worth the cost and effort. Here are a few things you can try:
- Try more recovery tools before giving up. Recovery results vary between software tools because each one uses different scanning algorithms, signature databases, and reconstruction methods. A file that does not appear in one tool may still show up in another. However, you must proceed carefully. Avoid writing anything to the SSD, and do not run tools that modify file system structures. To protect the remaining data, create a full disk image or a backup before additional scans if possible.
- Check partially recovered files. Even if deep scans did not return complete results, some files may appear in fragments. These fragments sometimes hold enough usable information, especially for research notes, spreadsheets, documents or photos. Specialized repair utilities can rebuild headers, reassemble fragments, or restore readable portions of images and videos. A damaged video file can sometimes be re-encoded in HandBrake or repaired through Clever Online Video Repair. The results vary, but partial recovery may still help you salvage important content.
- Consider forensic-level recovery services. Beyond standard recovery software, forensic toolkits allow deeper low-level analysis of SSDs. These tools look for fragments dispersed across the drive and reconstruct file structures manually. They require expert knowledge and long processing times, and they often rely on hardware interfaces unavailable to consumers. Because of that, forensic recovery is expensive and only makes sense when the SSD contains extremely valuable or irreplaceable data.
If the SSD shows unstable behavior or intermittent detection, any further use increases the risk of additional data loss. At this point, you can create a full disk image of the drive, store it for later analysis or archive, or replace the SSD entirely. Failed recovery attempts highlight the importance of data loss protection. Regular backups through File History or cloud platforms, system image creation, and S.M.A.R.T. monitoring help avoid complete loss in later incidents
Final Thoughts
Data recovery from an SSD on Windows remains possible when you act quickly and choose a method that matches the situation. Software tools restore many cases of accidental deletion, corruption, or quick formatting when TRIM has not cleared the blocks. Backups provide a direct path to full restoration and do not depend on the SSD’s condition. And when the drive shows hardware faults or software tools return little or no data, a professional recovery team offers the strongest chance to return what remains accessible on the device.
FAQ
Can software recover files from a corrupted SSD partition?
Yes. Recovery software can often extract files from a corrupted SSD partition, even when Windows fails to mount it. Most tools bypass damaged metadata and scan the raw storage area for intact data blocks. This approach works when the corruption affects the file system but not the underlying flash memory. However, software cannot restore files if TRIM has already cleared the relevant blocks or if the SSD faces controller-level damage.
How long does SSD recovery take?
Recovery time depends on the SSD’s capacity, interface, condition, and level of corruption. A small, healthy SATA SSD may take only 20–40 minutes to scan, while larger NVMe drives with heavy fragmentation may require several hours. Deep scans take longer because they analyze every accessible block. If the SSD shows unstable behavior or weak detection, recovery may slow down. Professional recovery takes more time, often several days, because engineers run detailed diagnostics before extraction.
Does recovery work for NVMe drives the same way as SATA SSDs?
Yes, but with important differences. NVMe drives use faster controllers and process TRIM commands more aggressively. As a result, deleted data on NVMe SSDs disappears sooner than on SATA drives, which reduces recovery chances. File system corruption and partition loss still allow recovery on both types, but NVMe drives often leave smaller recoverable traces. External NVMe drives inside USB enclosures may retain deleted data longer because TRIM rarely activates through USB bridges.
How do I recover data from an SSD that Windows no longer detects?
First, check basic connection points: power cables, SATA or NVMe slots, and USB ports if the SSD is external. If the drive still fails to appear, open Disk Management to see if Windows detects it without assigning a file system. A missing entry usually indicates controller failure or severe firmware issues. Software won’t help in this situation because the system cannot access the device at all. The safest option is to stop all attempts, avoid power-cycling the SSD repeatedly, and contact a professional recovery lab that can access the drive through specialized hardware interfaces.
About the Creator
7 Data Recovery Experts
7 Data Recovery Experts is a consulting team of experienced tech professionals delivering tested recovery advice, expert software reviews, and step-by-step guides to help you safely restore lost data - no advanced skills needed.
Keep reading
More stories from 7 Data Recovery Experts and writers in 01 and other communities.
How to Format an SD Card the Right Way on Windows
You’ve probably been there: you pop an SD card into your camera or laptop, ready to review your latest shots, and suddenly a message pops up: “This card needs to be formatted before use.” At first, it feels like the card is broken or something’s gone wrong. But really, formatting is just Windows’ way of saying, “Let’s reset this card so it can work properly again.” That’s why learning how to format an SD card is a key skill for anyone who uses memory cards regularly, and we will show you several methods you can use to do it on Windows, from the quick and simple approach to more advanced options.
By 7 Data Recovery Experts3 months ago in 01
What Makes James Kodrowski a Respected Entrepreneur, Business Leader & Investor?
In today’s fast-evolving business environment, respect is earned not just through success, but through consistency, leadership mindset, and long-term impact. James Kodrowski stands out as a respected Entrepreneur, Business Leader & Investor because of his ability to combine strategic thinking with disciplined execution. His professional journey reflects a deep understanding of how modern businesses grow, adapt, and sustain value in competitive markets.
By James Kodrowski7 days ago in 01
United States Cryptocurrency Market Size and Forecast 2025–2033
United States Cryptocurrency Market Outlook The United States Cryptocurrency Market is expected to reach US$ 4.51 billion by 2033, rising from US$ 1.75 billion in 2024, at a Compound Annual Growth Rate (CAGR) of 11.11% from 2025 to 2033, according to Renub Research. This steady expansion reflects the growing integration of digital assets into the financial ecosystem, driven by rising institutional participation, advancements in blockchain infrastructure, and increasing consumer acceptance of decentralized financial systems.
By Aaina Oberoi5 days ago in 01


Comments
There are no comments for this story
Be the first to respond and start the conversation.