
How to Format an SD Card the Right Way on Windows
A clean slate for your memory card: how to format your SD card correctly so it stays fast, reliable, and free of errors.


You’ve probably been there: you pop an SD card into your camera or laptop, ready to review your latest shots, and suddenly a message pops up: “This card needs to be formatted before use.” At first, it feels like the card is broken or something’s gone wrong. But really, formatting is just Windows’ way of saying, “Let’s reset this card so it can work properly again.” That’s why learning how to format an SD card is a key skill for anyone who uses memory cards regularly, and we will show you several methods you can use to do it on Windows, from the quick and simple approach to more advanced options.
Why You Should Reformat an SD Card Instead of Just Deleting Files
In reality, formatting is a routine part of working with memory cards. Photographers format their cards after they transfer images to keep performance smooth. Filmmakers format before every shoot to make sure their camera records without hiccups. Even hobbyists who use SD cards for Raspberry Pi projects or storing music know that a quick format gets rid of clutter and prevents weird glitches.
A freshly formatted SD card is faster, more reliable, and less likely to surprise you with corrupted files when you least expect it.
Before You Start
Before we continue with the actual steps, it’s worth to pause and talk about what formatting really does. It clears the file system on your SD card, making it ready for reuse. But not all formats work the same way.

- A Quick Format erases the file system records so the card looks empty, but it doesn’t fully overwrite the data. The card is ready within seconds, and in many cases, recovery software can still bring files back afterward. This option is fast and usually enough if the card works fine and you just want to clear it.
- A Full Format takes longer because Windows checks every sector of the card and writes over its contents. It’s slower but more thorough, and it can reveal bad sectors. After a full format, it’s impossible to recover old files.
No matter which method you choose, formatting will erase everything. If the files on the card matter to you, it’s always better to recover them or create a backup copy in advance to format SD card without losing data. We’ve seen many cases where users formatted first and regretted it later, especially with photos or project files that weren’t stored anywhere else.
How to Format an SD Card on Windows
With that in mind, let’s go through the most reliable ways to format an SD card in Windows 11.
Method 1: File Explorer
The first method is quite easy, since many users are already familiar with the File Explorer interface. Many use it for everyday file management, but it also gives you a quick way to format an SD card. Here are the steps you need to follow:
1. Insert your SD card into the card reader slot or connect it with an external USB adapter. Open File Explorer, press Win + E or click the folder icon on the taskbar.
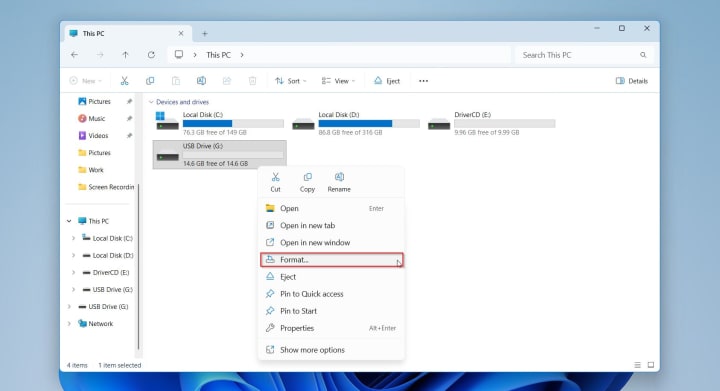
2. Locate the SD card in the left-hand panel under “This PC.” It usually appears under Devices and Drives.
3. Right-click the SD card and select Format… from the dropdown menu.
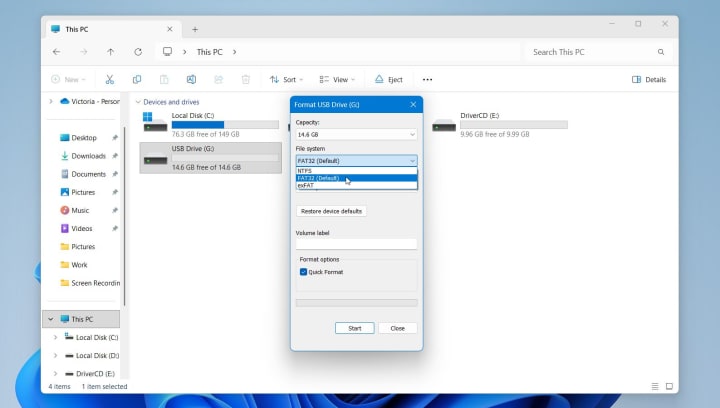
4. In the format window, choose the file system (FAT32 for cards up to 32GB, exFAT for larger ones, or NTFS for specific use cases).
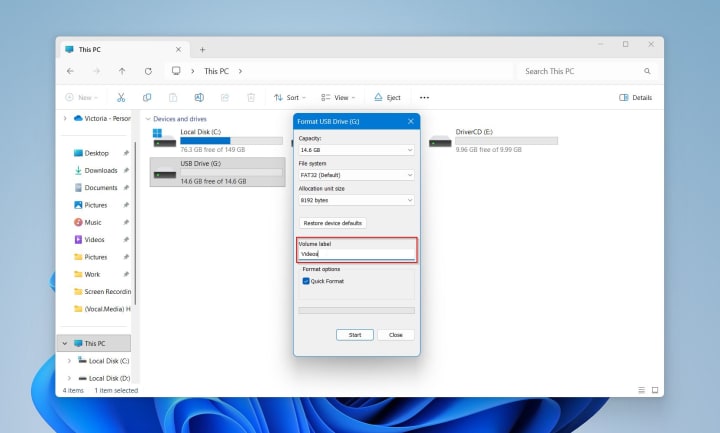
5. (Optional) Change the Volume Label to give your card a custom name.
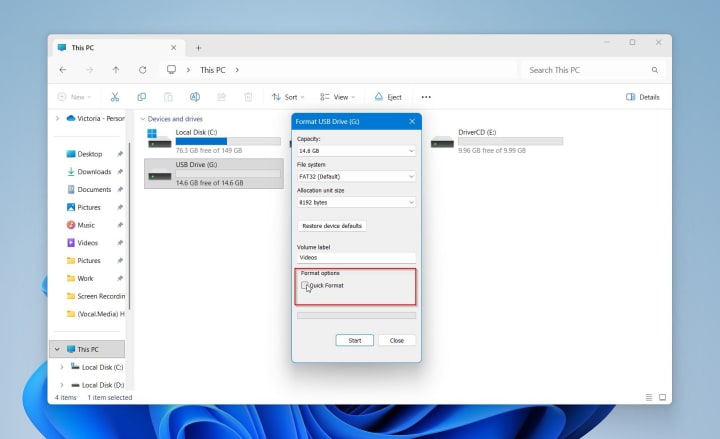
6. (Optional) Uncheck “Quick Format” if you want a deeper, more thorough erase (takes longer but checks for bad sectors).
7. Click Start, then confirm the warning that all files will be erased.
Within a few moments, your SD card will be formatted and ready to use. This method is ideal for quick setups or refreshing an old card before reuse.
Method 2: Disk Management
Disk Management is a built-in Windows utility that gives you more control over storage devices than File Explorer. It’s especially useful if your SD card doesn’t appear in File Explorer or if you need to adjust partitions. Although the interface looks a bit more technical, the process isn’t that complicated once you know where to click. Here are the steps:
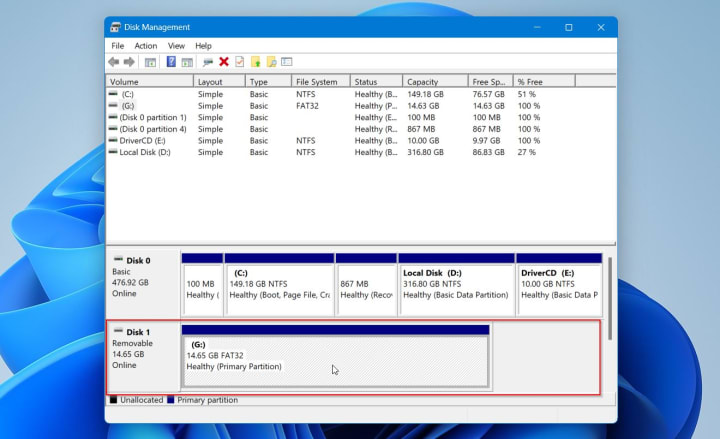
1. Insert the SD card into your computer’s card slot or connect it through a card reader.
2. Right-click the Start button and select Disk Management from the list. You can also type diskmgmt.msc into the Run dialog (Win + R) and press Enter.
3. In the Disk Management window, locate your SD card in the lower section. It will usually be listed as Removable with its size displayed. Be very careful here to select the correct drive. If you choose the wrong one, it could erase your system data.
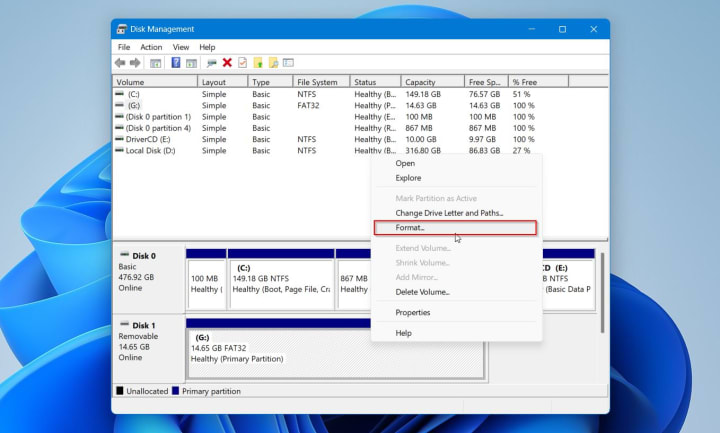
4. Right-click on the SD card partition and choose Format. If the card has multiple partitions, you can also delete them first, then create a new single partition before formatting.
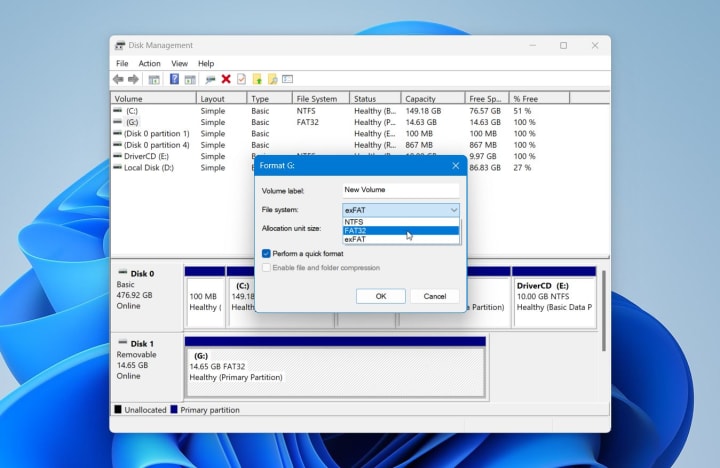
5. In the format dialog, select the desired file system (FAT32 for cards up to 32GB, exFAT for larger ones, or NTFS for specific use cases).
6. (Optional) Enter a Volume Label if you want to rename the card.
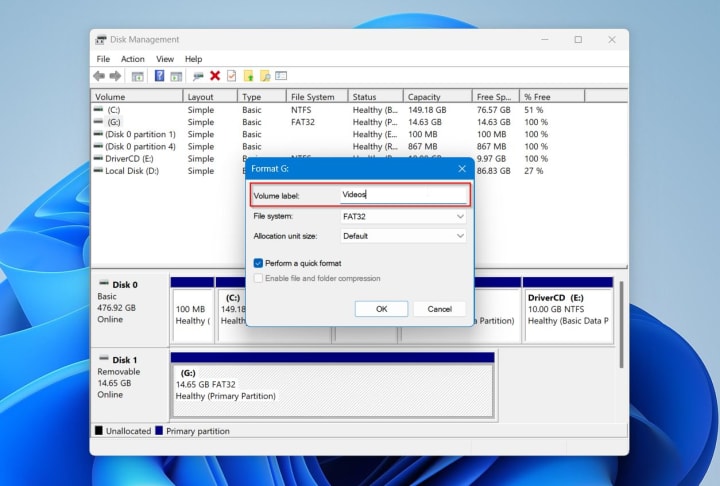
7. Choose between Quick Format (fast but less thorough) and a full format (slower but scans for bad sectors).

8. Click OK to start. Confirm the warning that all data will be erased.
Once the process finishes, your SD card will appear as a healthy partition, ready for use.
Method 3. Command Prompt
For users who want more control or need to fix stubborn SD cards that don’t respond to the usual tools, the Command Prompt with DiskPart is the most powerful method. It might seem quite complex, but it’s also the most reliable way to completely wipe and reinitialize an SD card.
1. Connect the SD card to your computer through a card reader or SD slot.
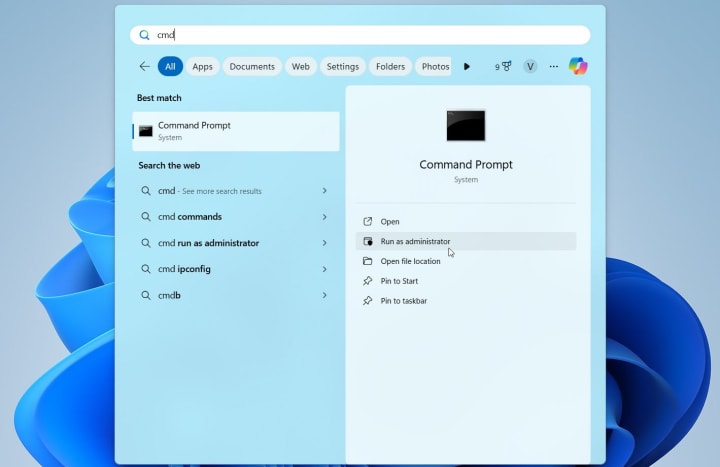
2. Press Win + S, type cmd, then right-click Command Prompt and select Run as administrator.
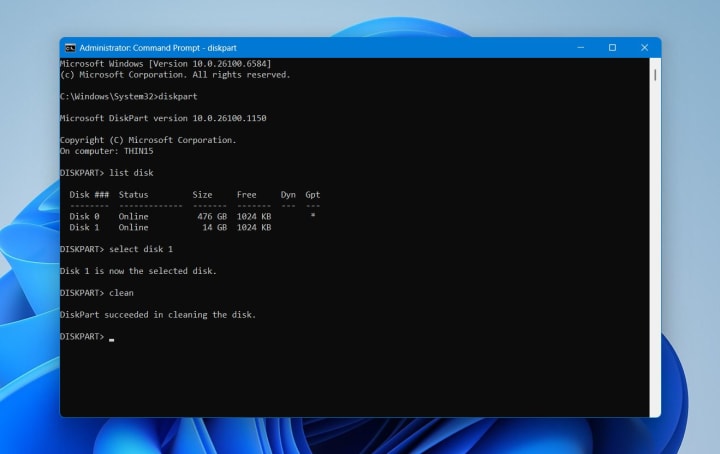
3. In the Command Prompt, type diskpart and press Enter. This launches the DiskPart utility.
4. Enter the command list disk and press Enter. You’ll see a list of all connected drives. Carefully identify your SD card based on its size.
5. Type select disk X (replace X with the number of your SD card) and press Enter.
6. Run the command clean to wipe the card completely. This removes all partitions and data.
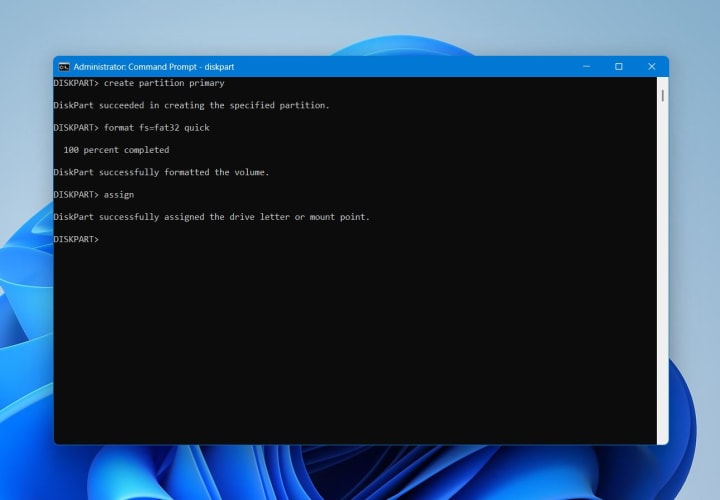
7. Type create partition primary to set up a fresh primary partition.
8. Next, type format fs=fat32 quick (or replace fat32 with exfat or ntfs depending on your needs) and press Enter. The quick parameter speeds up the process. If you want a thorough check, omit it, but the format will take longer.
9. Finally, type assign to give the SD card a drive letter, making it visible in File Explorer.
10. Type exit to close DiskPart, then close the Command Prompt.
With DiskPart, you can basically rebuild the SD card from scratch. This method is particularly useful for fixing corrupted cards where other tools fail. If you need to format SD card in Windows 10, you can follow the same steps.
Common Issues and Fixes
Over the years, we’ve seen countless users come in with stories about SD cards that refuse to cooperate. One case stood out: a photographer had just returned from a trip, eager to reuse his SD card for another shoot. He plugged it into his laptop, ready to format it, but nothing appeared in File Explorer. Was the card dead? He came to our site, 7 Data Recovery Experts, for advice, where we guided him through a set of troubleshooting steps that eventually brought the card back to life.
Here are some most common issues users face when they try formatting SD cards and how to fix them.
Issue 1. SD Card Not Showing in File Explorer
When you insert an SD card and it doesn’t appear in File Explorer, it doesn’t always mean the card is dead. In many cases, Windows still detects it in Disk Management. That’s the first sign you can fix it. Here is how to fix the SD card not showing in File Explorer:
1. Open Disk Management by right-clicking the Start button.
2. Find your SD card in the list of drives.
3. Right-click it and choose Change Drive Letter and Paths.
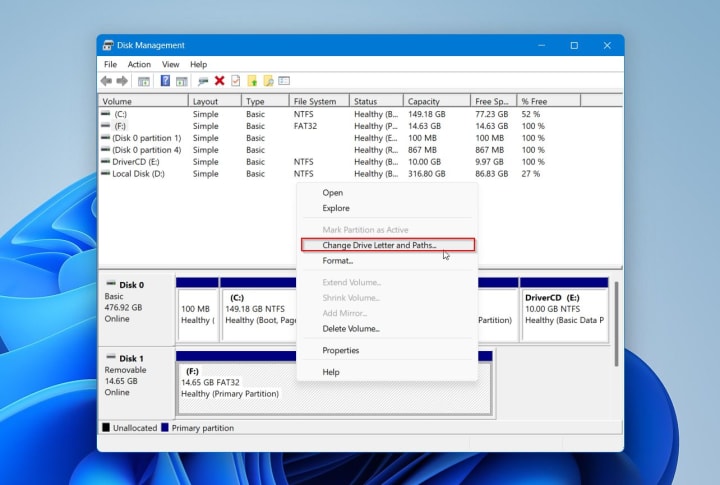
4. Assign a new drive letter and confirm.
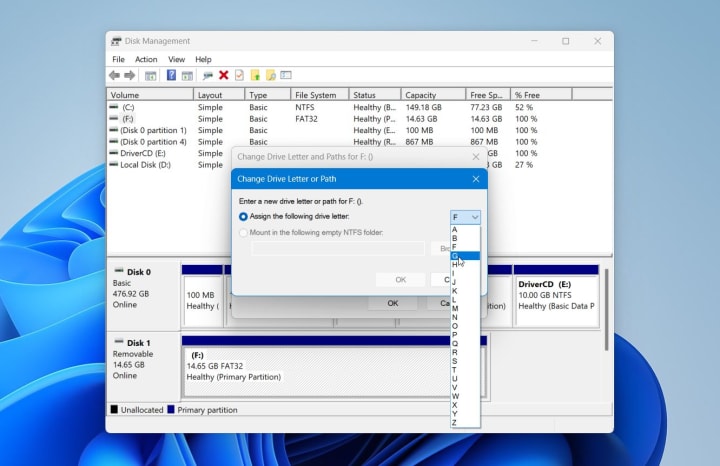
After this, the SD card usually appears in File Explorer. If needed, you can format it as normal now.
Issue 2. Write-Protected SD Card
When you try to format an SD card and see the message “The disk is write-protected,” it often comes down to either a hardware lock or software restriction. Here is how to remove SD card write protection:
1. Check the lock slider on the side of the SD card. If it’s set to “Lock,” switch it back.
2. If the slider isn’t the issue, open Command Prompt as administrator.
3. Type diskpart, then list disk and select disk X (replace X with your card’s number).
4. Run the command attributes disk clear readonly.
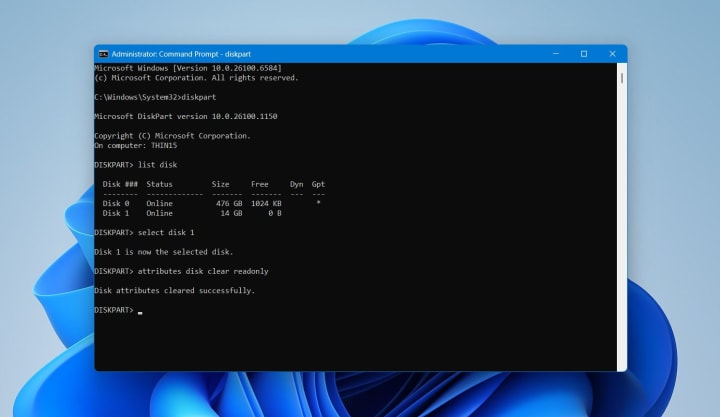
This command removes software-level write protection so the card can be formatted.
Final Thoughts
When you understand how to format an SD card on Windows, the process feels simple and routine. File Explorer offers the quickest path, Disk Management helps when the card does not appear correctly, and Command Prompt works best for stubborn issues. No matter which method you choose, always back up or recover important files before you erase them.
Here are also a couple more tips that, in our experience, can help extend the life of your card:
- Always eject it safely.
- Leave some free space instead of filling it completely.
- Format it regularly instead of just deleting files.
- Store it in a clean, dry case.
These simple habits prevent damage and keep the card ready for use whenever you need it. For more practical advice, explore expert-backed tutorials on 7 Data Recovery Experts. You’ll find all kinds of SD card guides and step-by-step recovery tips there.
About the Creator
7 Data Recovery Experts
7 Data Recovery Experts is a consulting team of experienced tech professionals delivering tested recovery advice, expert software reviews, and step-by-step guides to help you safely restore lost data - no advanced skills needed.
Keep reading
More stories from 7 Data Recovery Experts and writers in 01 and other communities.
What is Data Recovery in Practice?
Data loss is something most people experience at least once, whether it’s a lost photo or an important document. Data recovery may seem too complicated, almost like magic, but it actually relies on clear methods and reliable technology. When files disappear, recovery tools and specialists work to bring them back.
By 7 Data Recovery Experts4 months ago in 01
Japan Smart Doorbell Market Size and Forecast 2025–2033
Market Snapshot The Japan Smart Doorbell Market is expected to reach US$ 736.05 million by 2033, up from US$ 212.53 million in 2024, expanding at a robust CAGR of 14.8% from 2025 to 2033. Rapid urbanization, increasing adoption of smart home technologies, and rising demand for home security systems are driving market growth. Advancements in AI, video analytics, and wireless connectivity are further strengthening consumer demand for smart doorbell systems.
By jaiklin Fanandishabout 16 hours ago in 01
Data Anonymization Techniques to Ensure Privacy in Modern Enterprises
Enterprises today work with massive volumes of data coming from customers, users, employees, and digital systems. This data is critical for analytics, reporting, artificial intelligence, and strategic decision making. However, much of it contains sensitive or personal information that cannot be exposed or misused. With strict data privacy regulations and growing awareness around data protection, organizations must find a way to use data responsibly.
By Vinod Vasava4 days ago in 01


Comments
There are no comments for this story
Be the first to respond and start the conversation.