
How to Create a Website from Scratch
Learn how to create your professional-looking website quickly and easily without any prior knowledge of coding step by step.


In the past, building a website from scratch was difficult. It required knowledge of languages like HTML, CSS, JavaScript, and PHP, etc.

Today, with the help of various tools, it is neither complicated nor expensive.
Technically, all that is needed is a domain name and a hosting service.
In addition to this, web hosting services today are offering various tools and options that help you build your website quickly, such as Website Builders, and CMSs like WordPress and Joomla, etc.
If you are asking what are these,
A website Builder is a tool by which you can create websites visually by a simple drag and drop of elements like pictures, text areas, forms, etc.
It is suitable for complete beginners who do not see any need for complicated functionalities in their websites.
A CMS, on the other hand, stands for Content Management System and WordPress is one of them.
WordPress helps you make a professional website in a short time without any coding knowledge.
We highly recommend this solution and this guide is going to be centered around it.

1. PLAN A WEBSITE

Before starting an online business, the question that should be answered is to what category does my website belong?
The answer to this question is very important in that it will help a lot in finding a profitable niche.
There are many types, but here's a list of the most important ones:
1. Types of Websites
- A Personal Website: Personal websites are as the name suggests, centered on a person, their information, pictures, hobbies, families, etc.
- A Business Website: is a website that showcases your business. It usually contains only a few pages detailing your business information.
- Online Storefront Website: Websites can also be used to sell products or provide services in return for a specified amount of money. The operation is known as E-commerce, short for electronic commerce.
- Content Publishing Website: blogs and magazines are a typical example of this category. Websites that publish information, update and create a relationship with readers can be categorized as content publishing websites.
Let's suppose, the website you want to build is an online storefront website, the next question will be how to choose a niche for an online storefront (e-commerce) website?
B. How to Choose a Niche for an E-Commerce Website?
A niche is a specialized interest, that is limited to a specific area.
For an e-commerce website, it means a specialized market that contains specific products like car parts, athletic shoes, wedding rings, etc.
This is by contrast to a general store that gathers all sorts of categories of products within it like AliExpress, Amazon, eBay…etc.
Why it is not advised for a starter to choose a general store?
The biggest disadvantage of this is that it is difficult to control and master.
By choosing a general market, it's going to be difficult for your website to compete with established e-commerce stores that are in business for many years.
Let's say you are interested in Electronics (a general market) and you want to sell all types of electronics…
Your first difficulty is going to be with filling, selling, and maintaining hundreds of products, let alone marketing and customer service..
Unless you have plenty of time and a big budget to hire people to do it for you.
The problem: a website with many categories and hundreds/thousands of products will not be an easy business to maintain.
The Solution: It's wise then to start with a specific interest and then grow up as needed.
In the following steps, you will learn how to come up with a profitable niche.
1. Know the Categories
For a storefront website, It's easy to know what is general and what is particular.
You can simply visit any well-known e-commerce website like eBay or AliExpress and then check the different categories available there.
2. Narrow it Down
Now that you know the categories, select a general one - let's say "Electronics", and narrow it down until it becomes controllable.
In the case of "Electronics", let's go for "Smartwatches" or a more specific keyword like "Chinese smartwatches".
3. Competition Level
In this step, you need to check the level of competition in the specified niche.
Keyword Planner by Google Adword is a free tool that gives you an idea of how much difficult it is to advertise in the selected niche.
The goal here is to aim for a low to medium competition level niche, with a high search volume per month.
4. Keyword Tunning
What if the competition is high, what should I do?
A solution to this is to tune the keyword a little bit by reversing the words and adding other keywords such as "Smartwatches Made in China" or "Android Smartwatches Made in China", etc.
Okay and what if the competition is always high? What should I do?
5. Make a Whole New Category

If you narrowed down your niche at a point that you're able to master and control your business, but you always find that the competition is high, that doesn't mean you will not succeed, but only that it's going to be difficult to compete with others running ads and you need to spend more money to stand out.
For a low competitive business, you can make a whole new category for a set of products that have common features but aren't gathered together by giant stores like Amazon, Aliexpress, and eBay.
What's this entail is that creativity and good observation qualities are needed here.
As of now, if you look at AliExpress and eBay, it looks like there's no category for products that turn an ordinary house into a smart house.
You can seize the opportunity now and start a niche with the keywords ''Smart Houses'' or ''Smart Homes''.
As of now, the keyword "Smart House" has low competition and a high search volume.
It's a good niche for a new business.
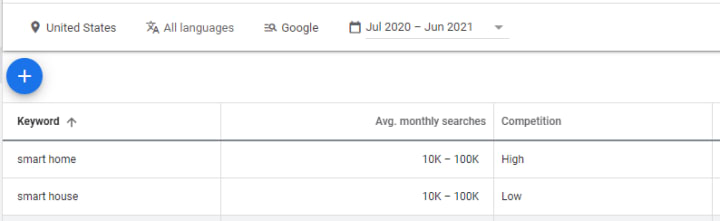
Let's go for Smart House then!

2. GET A DOMAIN NAME

Every website has a unique name that identifies it on the World Wide Web.
They allow visitors to access their favorite websites whenever they want to by typing the website's name dot extension which can be a .com .net or .org… such as google.com, facebook.com, etc.
In short, a domain name is the name of your website followed by an extension like .com, .net, .co.uk…, etc.
1. About Domain Registration
Domain names are obtainable from accredited companies called domain registrars.
A domain name is not a one-time purchase product, it can be registered for a period of time ranging from 1 and 10 years for an average price of $10 each.
After the period of registration, it expires and becomes available to others.
That's why it's important to never forget to renew the registration before the date of expiration.
To register a domain name, I recommend the following:
- Always choose established companies with which registration is fast, easy, and secure. And who knows, if anything wrong happens, you'll find a responsive 24/7 customer service available to take care of your problem.
- You'd better register your domain name with a .com extension: Unusual extensions are not what visitors like.
- To get a free domain name given with a hosting package and avoid configurations hassle to linking them together, I recommend the tool we made, it will help you search for a free .com domain name, and then redirects you to the host we strongly recommend, Bluehost.
Notice: If you can't see the search bar, that means that an AdBlock extension has prevented it from appearing, be sure to deactivate it and try again. Also, by choosing to register a free domain name with a host, the chapter about web hosting services becomes informative, you can skip it.
2. Registering a Domain Name

Registration is straightforward, on the search bar of the tool, you can check for the availability of domain names, if they are not taken, click on next, and then follow the instructions.
Before starting, bear in mind that good domain names are the ones that are:
- Short
- Catchy
- Easy to remember
Registering a domain name is one of the most important steps toward a successful business.
Don't rush, have a cup of coffee, take your time, and think about some words related to your website's content and then try multiple times, multiple combinations, until you come up with a good name.
Here are some creative ideas used by the biggest brands online:
- Putting words together: like Facebook, YouTube.
- Writing short phrases: like MySpace, SecondLife, StumbleUpon.
- Slogans: like justdoit.com(Nike).
- Combining parts of words: Microsoft, Wikipedia.
- Misspelling words: like Flickr, Digg.
- Change or add letters to words: like iPhone, iTunes.
- Invent new words: like Clevious, Etsy.
- Words from other languages: like Joomla.
3. A Quick Example
For this guide, we first tried the name "smarthouse". We found that it is already taken.
One of the ways to resolve the problem is by adding suffixes, prefixes, or even words.

By adding the word "future", our domain name is now available and ready for purchase.

3. CHOOSE A WEB HOSTING SERVICE

A web host is where your website's files are stored.
A web host is like a computer that is connected to the internet 24/7.
Each time a user asks to view your website, the host responds to their request by sending them your website pages to their browser.
Buying a web host is like buying a computer: It has speed, storage size, pre-installed apps, etc.
1. What You Should Look for When Choosing a Host
The following list will assist you in choosing a good web hosting service:
- It must be capable of running PHP and MySQL in order to run WordPress.
- It should contain a one-click-install for WordPress for a quick easy installation.
- It must offer 24/7 technical support.
- It must have a great uptime record of 99–100% of the time, which means that your site will always be available on the World Wide Web.
On top of these, you should also look for the following:
- It should provide a big storage space: so that your site can grow and can support a big number of images if needed.
- FTP support: it allows you to upload your files through FTP using FileZilla.
- Unlimited bandwidth: You can receive thousands of visitors monthly without limits.
- Unlimited databases: You may need to install more than one WordPress website on the same host.
- Supports email addresses: to create a custom email address such as: yourname@yourwebsite'sname.com
To make it short, one should go for a serious and very well-known company.
Also, be aware of free web hosting services, they may delete all of your data without any reason, or add sneaky advertisements without your consent.
If you are looking for a cheap, professional, and reliable host, we recommend you our top 3 hosting services for 2021:
#1: Bluehost | Free domain name for 1st Year ✓ | Easy WordPress Installation ✓ | Website Builder ✓ | $̶8̶.̶9̶9̶ $2.95 Monthly ✓ | Purchase >
#2 InterServer | $0.01 First Month ✓ | Easy WordPress Installation ✓ | Unlimited bandwidth & storage ✓ | $̶7̶.̶1̶4̶ $2.50 Monthly ✓ | Purchase >
#3 WHP | Free domain name for 1st Year ✓| Easy WordPress Installation ✓| Unlimited bandwidth&storage ✓ | $̶4̶.̶4̶9̶$1.99 Monthly ✓| Purchase >
2. Link the Domain Name With the Host
If you used the suggested tool above or chose one of the hostings we recommend, there's no need for these extra steps.
By getting a domain name with a web hosting from the same place, they get automatically linked.
If you still want to get the host and the domain name from different places for some reason,
you should know that the configuration differs from one website to another, but the general steps to be taken are common.
They can be summarized as follow:
1) Find the nameservers of your hosting. They look like the following:
- ns1.nameserver.com
- ns2.nameserver.com
2) Copy the name servers and search for DNS settings in your domain name.
3) Paste your name servers into the "name server fields" of your domain name.
You may probably need to do more configurations depending on your hosting and domain name service providers.

4. INSTALL AND CUSTOMIZE WORDPRESS

WordPress is a free tool that can be used by anyone to create and maintain websites very easily.
Many web hosting services including Bluehost, provide a way to install it and configure it easily using an App Installer.
For instance, Softaculous is a cPanel App Installer that makes installing WordPress an easy task.
1. Install WordPress
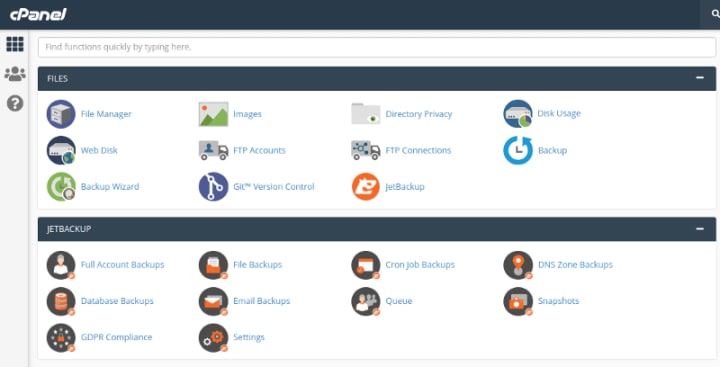
To install WordPress, locate Softaculous in your cPanel.
Your cPanel will look like this:
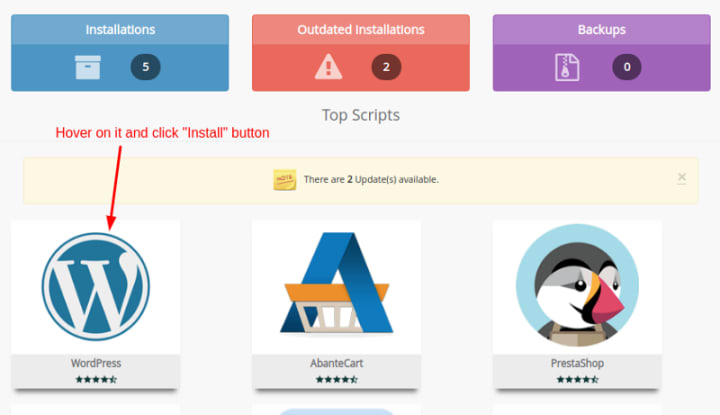
Click on the Search bar and type: Softaculous. As you are writing, it will appear under the software tab, click on it:

After that you have clicked on Softaculous Apps Installer, you will see a list of applications, choose WordPress:
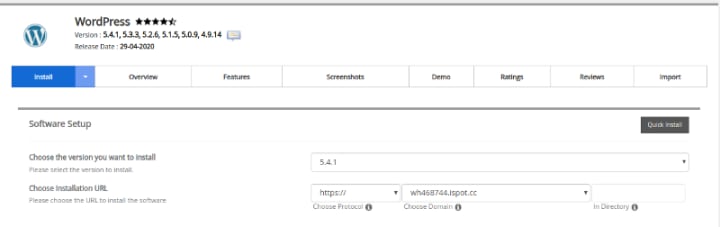
On the page that will appear, there will be fields and sections to fill.
The first section Software Setup will be used to choose the version of WordPress to install, the URL of your website, and the folder where your installation will be. You can leave them as default.
The second, third, and fourth sections are very important.
– Under Site Settings, you can set your website's name and description.
– Under Admin Account, choose the username and the password you want to use to log into your WordPress Dashboard.
– And be sure, to add your email to receive updates on your WordPress installation.
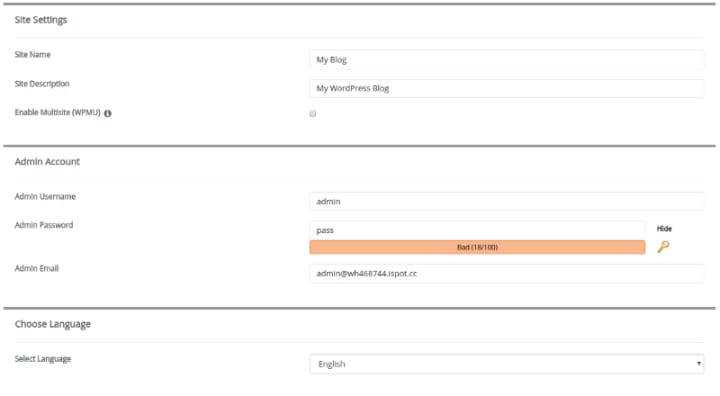
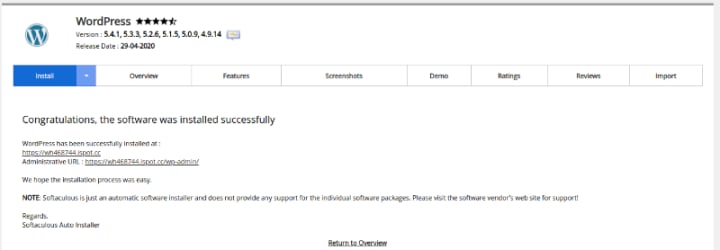
Click on install and wait for a moment for the installation to complete…
After a few minutes you will get:
Installation Complete
You can now visit your website and start customizing it by following the Administrative URL and logging into your website's dashboard.
2. Customize WordPress
In WordPress, you don't have to learn programming languages, nor spend a long time coding your website's appearance.
All you have to do is searching, and activating the right theme and there you are!
In the following lines, I'll show you how to install and customize your WordPress website.
1. Install a WordPress Theme
1. On WordPress Dashboard, point your cursor to Appearance, then click on Themes.
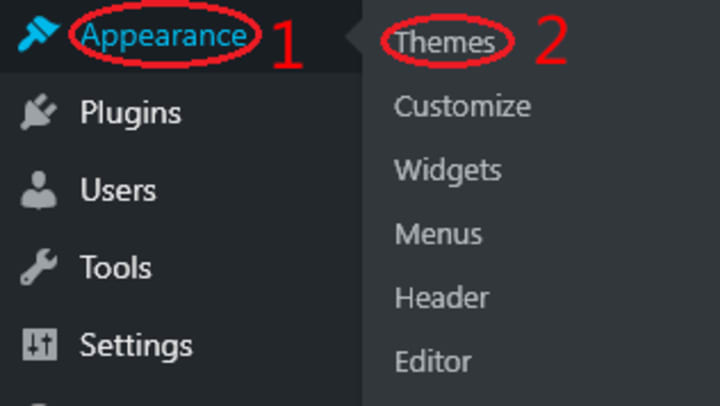
2. To view a list of the available themes, click on Add New.
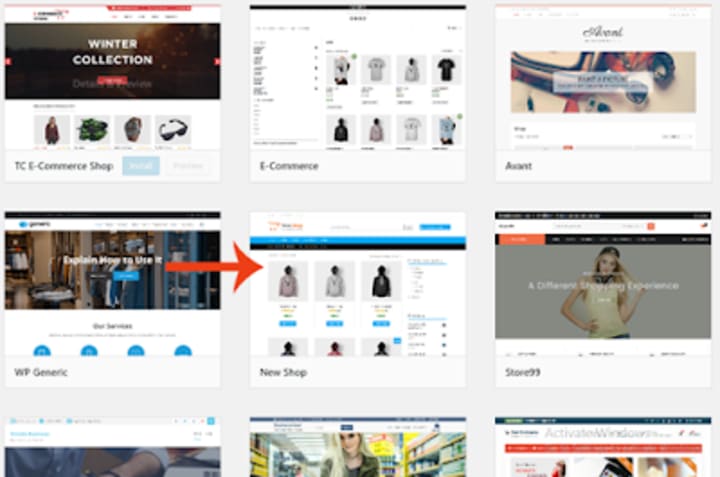
3. In the search bar let's try e-commerce.
4. In the list of themes, the theme of New Shop seems to be good, let's try it.
5. We can install it by clicking on Install and then waiting until it finishes.
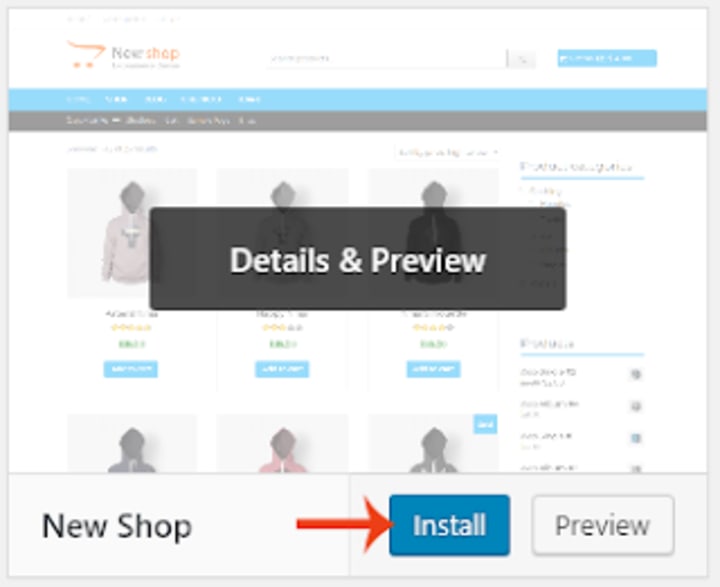
6. Once installed, it must be activated, click on Activate.
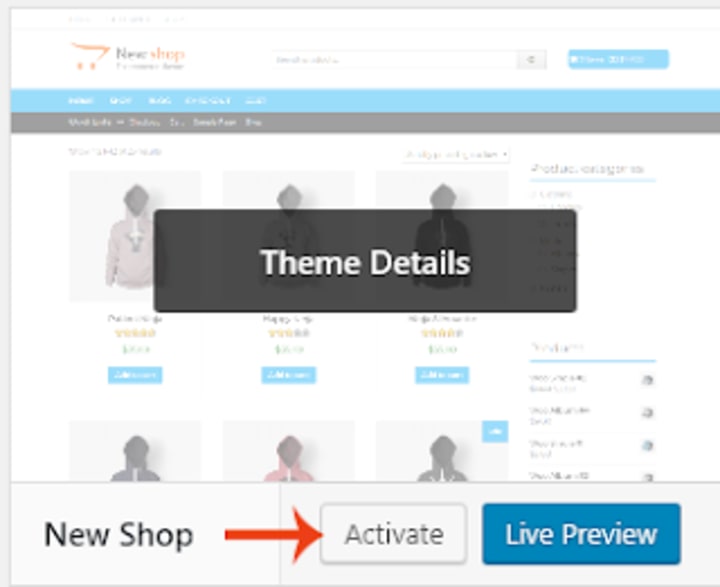
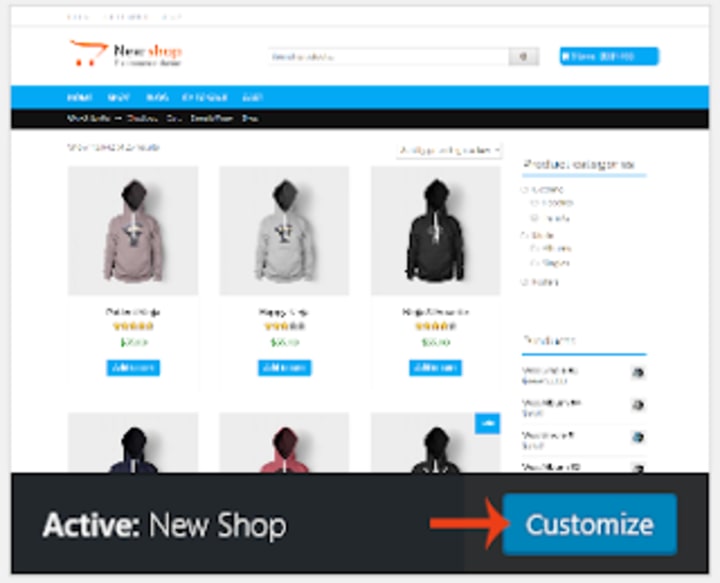
7. It's possible now to start customizing the site by clicking on Customize.
2. Customize a WordPress Theme
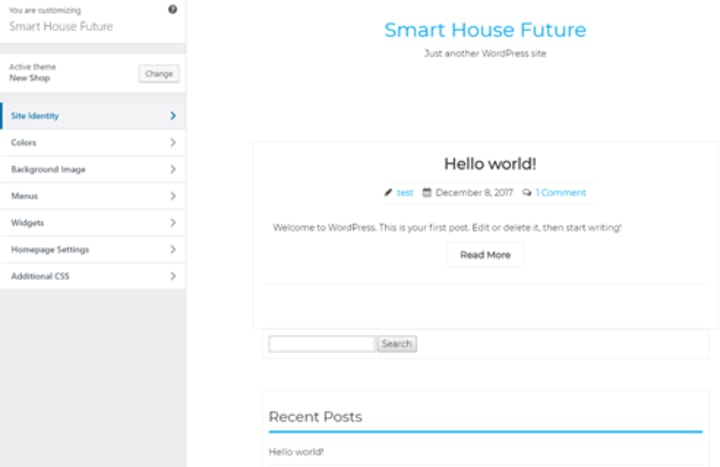
Go to Appearance > Customize. A live preview will open up; the website will look empty and very basic.
On the left side, there's a sidebar, we can use to customize our website.
1. Upload a Logo
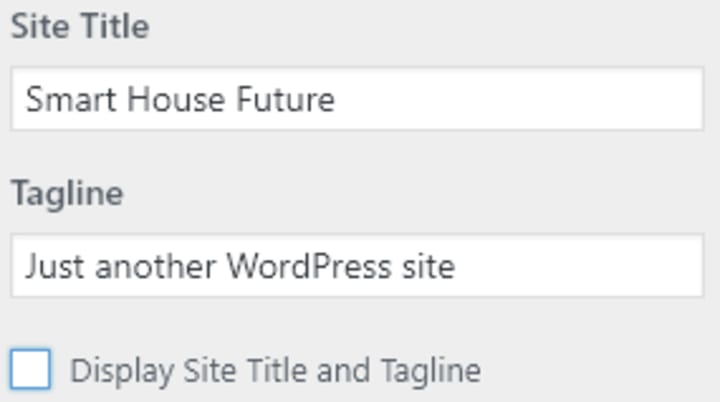
Let's start by uploading a logo image by clicking on Site Identity > Select Logo > Select Files.
The following image shows you how it looks on the site.

As you can see, there's a tagline and a title under the logo. Let's delete them by unchecking the boxes Display Site Title and Tagline.
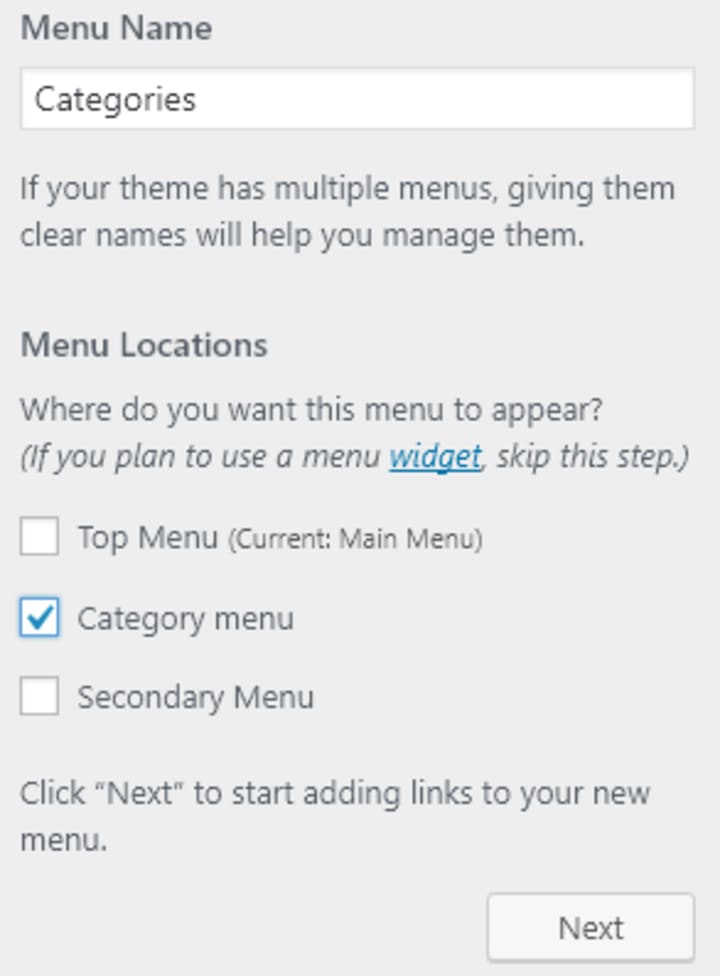
2. Create a Menu
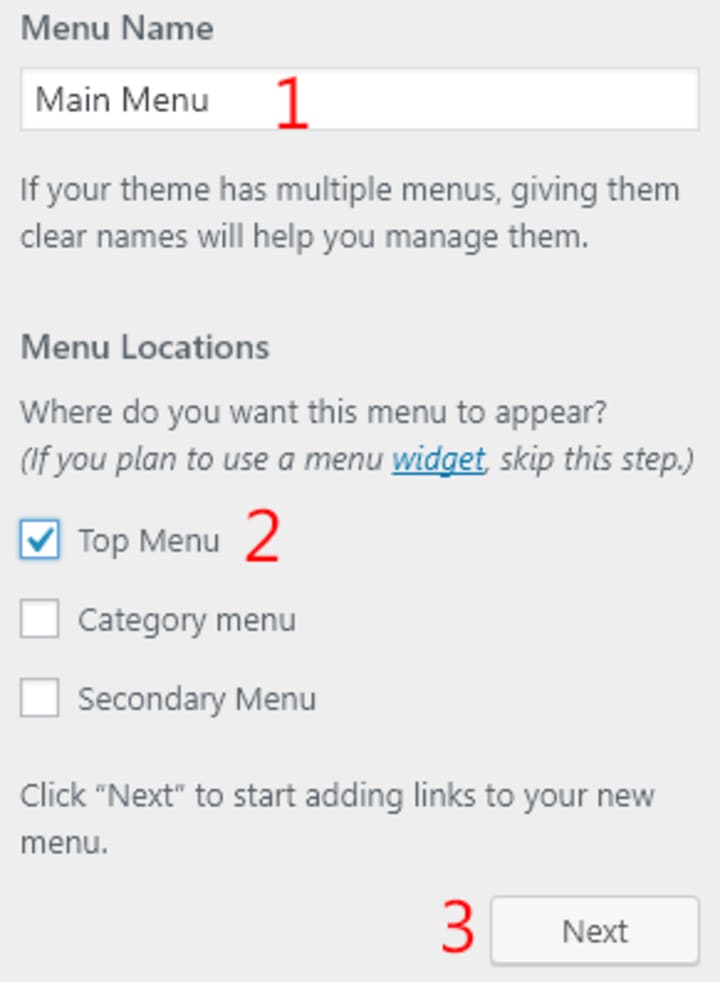
Let's add a menu to our site by clicking on Menus, then Create New Menu.
Under Menu Name, enter the name of the new menu, let's name it Main Menu. Let's also check the box Top Menu, and then click on Next.
This theme supports three types of menus: Top Menu, Category menu, and Secondary Menu.
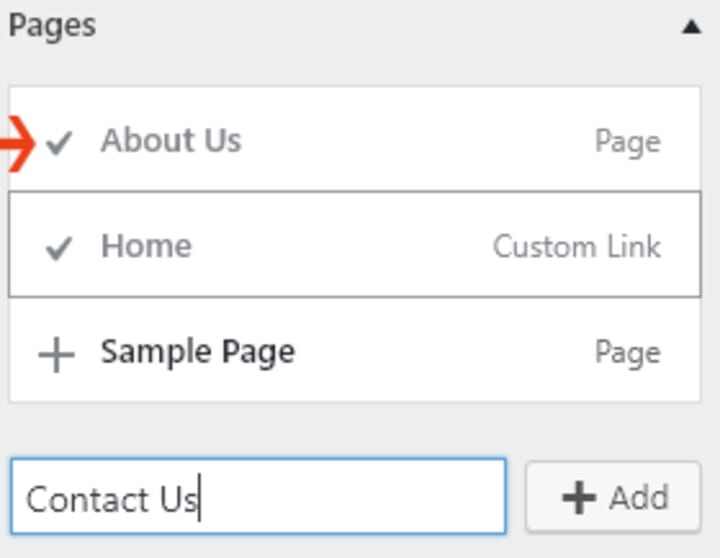
Let's add Home, About Us, and Contact Us pages to the Top Menu. Click on Add Items, and under pages click on + sign next to them to add them. If they don't exist, type the name of the page in the empty field and click Add.
The top menu has been created successfully! Click on Publish to save the modifications.
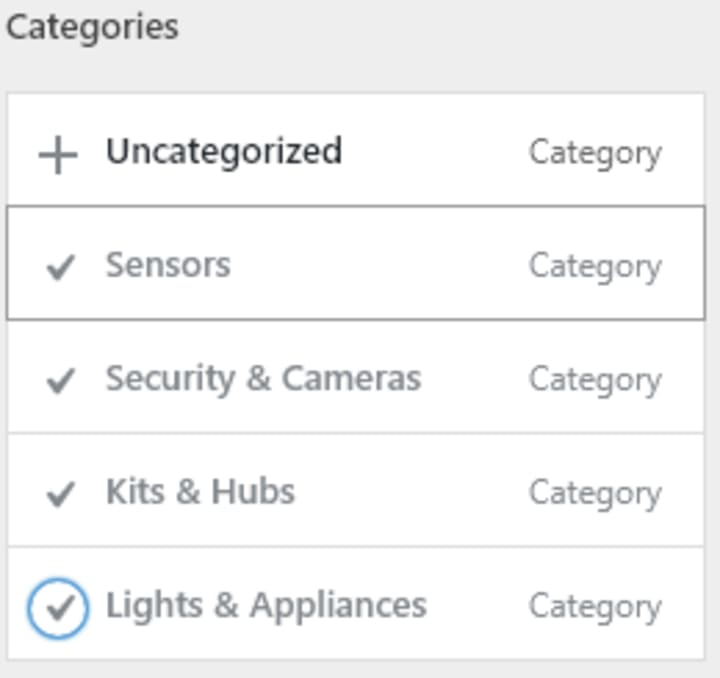
3. Create Categories
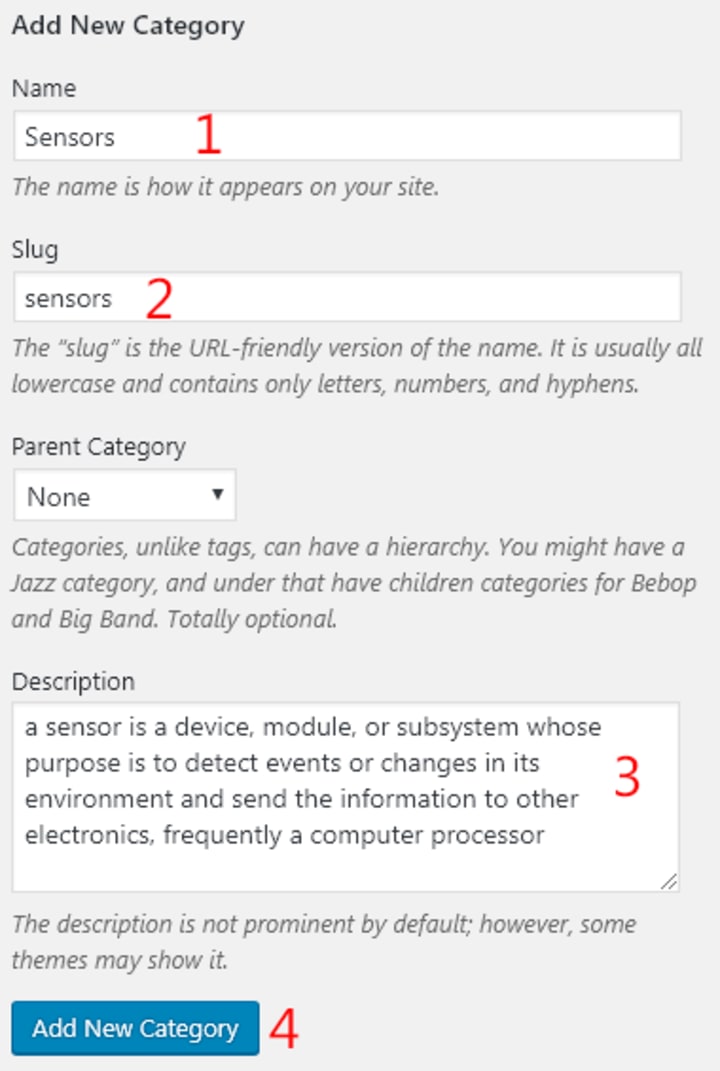
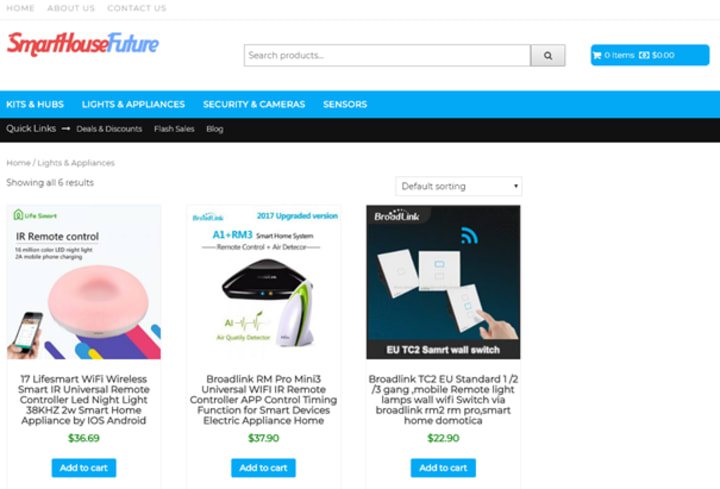
Let's create the following categories: Sensors, Security & Cameras, kits & hubs, and Lights & Appliances.
We can create categories by opening up a new WordPress Dashboard (don't close the first one and be sure to have clicked on Publish). Point your cursor to Posts and click categories.
Under Name, type the name of the category. Under Slug, type the name that should be in the URL: Slug is just that name appearing in the URL, it should be written in lower case without spaces.
For SEO purposes, it's recommended to write a description for each category.
4. Create a Menu for Categories
After creating the categories, come back to the first window and refresh it.
Follow the same procedure as before, but, this time, select the Category menu.
Click on Add Item > Categories and click on the + sign next to each category to add it to the new menu. Click on Publish to save the changes.
3. Turn the Website Into a Storefront Website
With the customization that we have done until now, the website is getting better, but it is still not ready to sell products yet.
To be able to sell products, we need to install an e-commerce plugin.
WooCommerce is a free and popular plugin, let's add it.
1. Click on Plugins > Add New, on the search bar type "WooCommerce".
2. Install it and activate it.
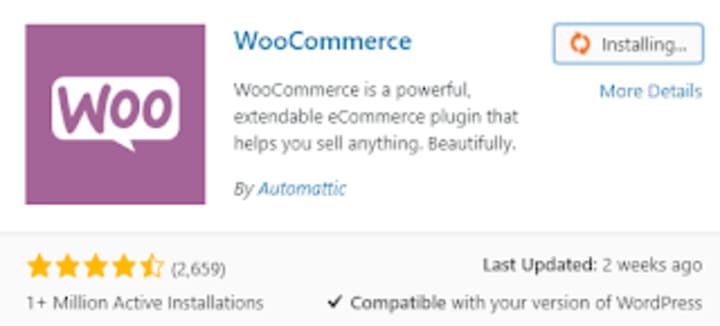
3. When activated, WooCommerce will need to be configured. Fill in all the required information: Location of the store, address, currency, whether you sell digital or physical products. Payment, shipping fees.
After completing the configuration, the site becomes ready to sell products.
Here's how to add products to the store:
1. Hover your cursor over Products, and then Add New.
2. Add your product information: Title, description, price, category, featured images…etc.

3. Click Publish.
If you want your shop on the homepage, do this:
1. Hover your cursor over Settings, and then click on Reading.
2. Set Homepage as Shop.
3. Set Posts page as Blog.
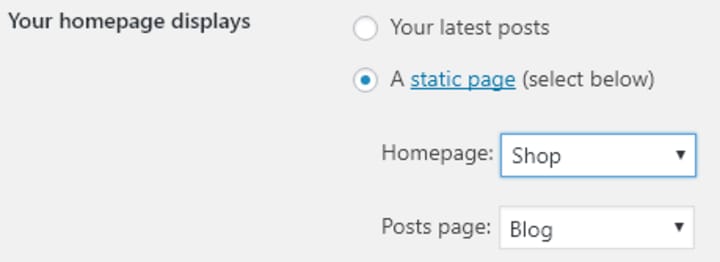
3. Click Save Changes.
The website is now complete and ready to sell products.

5. SEO YOUR WEBSITE

The newly built website needs to be optimized for search engines.
This process is known as SEO.
SEO helps your website rank on search engines that will bring you a lot of visitors.
The technical side of it may seem difficult, but in WordPress, most work can be done using ready plugins and well-structured themes.
In the following lines, I'll share the first SEO actions that should be completed to optimize the new website.
1. Join Google and Bing Webmaster Tools
Since Google and Bing are the most popular search engines, it's important to join their webmaster tools by creating an account on Google Webmaster Tools and Bing Webmaster Tools.
Webmaster tools help site owners optimize their websites with the detailed reports and technical suggestions offered.
2. Optimize Your Website With Plugins
- WP Super Cache: it will speed up your website by caching your pages.
- Jetpack: it will speed up your images load times with the help of their fast and secure servers around the globe.
- Yoast SEO: a plugin that fixes most of your website's basic SEO issues.
3. Submit a Sitemap to Search Consoles
A sitemap is a file that contains a bunch of links to your websites' content.
It informs search engines of how your site is structured and notifies them of new publications.
Yoast SEO plugin handles it for you. It creates a complete and detailed sitemap, ready to submit to search engines.
4. Check Your Website Loading Speed
Google and other search engines love websites that load fast.
The PageSpeed Insights tool is made to help you understand different types of loading problems.
It gives you a complete overview of all issues hindering your website's load speed with a list of suggestions to fix them.
5. Use External Tools to Diagnose Your Website
Other tools on the web can also provide you with detailed reports of your website for free.
The CLEVIOUS SEO Checker tool, for instance, analyzes your website and shows you a list of suggestions that will help you fix your website's SEO errors.
In addition to this, I suggest the Bing Webmaster Tools. It has a powerful SEO tool as well.
To get a better understanding of your website, it's very important to try both the main URL and any single post URL.
6. Check Your Website Structured Data
A website with a good structure helps search engines identify its different parts: The headlines, the content, the author, the date on which a post or a page was published, and all the necessary pieces of information.
The Structured Data Testing Tool checks on this and tells you whether your site is well structured or not.
In case it finds many errors or shows a blank page, it means that it is not very well coded.
You'd better change it.

Conclusion
Making a website is a very easy thing to do.
All that is needed is a domain name, a hosting service, and a tool like WordPress.
But, the most important step of all, as you may have noticed, is planning and optimization.
Notice: This article is part of the Definitive Guide: How to Make a Website | 2021 by Sid Ahmed KHETTAB. If you have any questions or suggestions, don't hesitate to contact me.
About the Creator
How Businesses Actually Choose the Best SEO Services Today?
Most businesses do not begin their SEO search with excitement. They begin with frustration. They have tried agencies that promised rankings without explaining trade-offs. They have paid for reports that looked impressive but changed nothing. By the time they start looking again, the question is no longer who sounds confident. It is who understands consequences.
By Jane Smith6 days ago in 01


Comments
There are no comments for this story
Be the first to respond and start the conversation.