
The Ultimate InterServer WordPress VPS Hosting Review
A spontaneous report of an ongoing experience that summarizes the impressions and opinions I have before, during, and after purchasing the service.


In this article, I'm going to show you how to make a WordPress Website on InterServer WordPress VPS Hosting (Virtual Private Server).
At the same time, I will share with you my honest and unbiased review of this service.
Unlike other reviews, this is going to be a spontaneous report of an ongoing experience that summarizes the impressions and opinions I have before, during, and after the purchase and the use of the service.
Why InterServer?
In the ultimate guide of How to Make a Website, I strongly recommended established companies that have good experience with hosting and InterServer was one of them.
InterServer is an American hosting company and a domain registrar that has been in the industry for more than 21 years.
Although a lot has changed, these long years must have enriched its experience.
Today, the company provides varied services ranging from simple hosting plans intended for small businesses to advanced plans for giant companies.
I liked this because it is a great indicator that this is the hosting that one can grow and stay with for a long time.
1. My First Impressions: Before Selecting a Package
The website of InterServer looks professional: The combination of the main colors, white and blue, plus the organization of the information makes the understanding of the website structure and main services they provide easy.
At this time, I see that they are offering a 65% OFF discount ($2.50 / month), plus a special coupon (PENNYDEAL) that allows you to get their shared hosting for $0.01 the first month.
It's clear that this offer is made to encourage new visitors to buy and try their services.
I already got their shared hosting plan, and now I want to try their WordPress VPS Hosting.
I'm choosing this option to benefit from the power and the speed it provides.
My choice of a VPS over a shared hosting will result in a faster and stronger website: And after all, VPS to Shared Hosting is like a private car to a public bus.
Promises & Guarantees
On the purchase page, InterServer promises that my WordPress Website will be ready in 20 minutes and says that the price starts from $6 per month.

InterServer also promises high performances and speed: It states that their VPS is optimized for WordPress, making it more powerful to WP than an ordinary VPS.
Furthermore, they guarantee:
- Free Migration Service (Migrate your website from a place to another)
- High-performance storage. (Optimized for WP, fast and responsive)
- Instant Provisioning (Activates in a few seconds)
- 99,99% Uptime Guarantee (Website available everywhere in the world, all the time)
- Easy Control Panel
- Multiple Language Servers (PHP, MySQL, Perl, Python, Ruby…etc.)
- Flexible Software Options (full root access to install any software.)
My Choice
There's a bar in the middle of the page to customize the VPS: If you want more power, you can move it to the right. But, the more you do, the more the price rises.

As a starter, 1 core, 2048MB, 30GB SSD, and 2TB transfer are more than enough for my project.
At a later time, If I ever need more resources for my website, I will always have the option to upgrade them.
Now, with this configuration and at this price, it's worth it. Yet I think it would have been more appealing if it was a little bit cheaper than this.

2. Ordering the VPS
By clicking on BUY NOW, the configuration page shows up.
On the left side, there's a table that can be used to customize the VPS before ordering it.

The table allows you to choose:
- The platform of the VPS (Virtuozzo, KVM, or HyperV),
- The location of the VPS (New Jersy, Los Angeles, or Equinix NY4),
- How many slices you need (1 or more, and up to 16),
- The operating system (CentOS, Debian, Fedora, OpenSUSE, Ubuntu, VzLinux, and Windows),
- The version of the operating system,
- The control panel (None, DirectAdmin, or cPanel),
- The Hostname and Root Password,
- The Coupon Code
And it indicates the overall price.
I will not change a lot here; I will only enter the Hostname (Domain Name) and a Root Password.
To get a price reduction of $0.01 for the first month like me, you can use the coupon code PENNYDEAL before you proceed.
On the right side of the screen, there's a table titled VPS availability.
As you can see in the picture below, VPSs are not available in Los Angeles right now. I will stick with New Jersey.

Below it, there's a table that indicates the current VPS information:

When you click on proceed, you will be directed to the confirmation page, where you will be able to review your order.
You will also be asked to read and accept the Terms and conditions as well as the Privacy Policy.
After that, you will be able to pay for the service.

3. After Purchase: Let's Test the Promises
VPS Activation
Once I placed the order, I saw a progress bar telling me to hold on while building the server.
I noted the starting time to see how many minutes it will take.
Surprisingly, in about 60 seconds, I had my server up and running.

Linking the VPS to the Domain Name
Now that I have a unique VPS IP, I need to link it to my domain name to be able to access my website through the URL.

To do that, I just have to add an A record in the DNS configuration page of my domain name (image 2) and set the hostname to the hostname I chose (vps.clevious.com), and the IPV4 ADDRESS (image 1) to the unique IP address I got.

Installing WordPress via Webuzo
To install WordPress, I need to log in to Webuzo.
The login details are on the email I received after the activation of the VPS: It contains all the information required such as usernames and the documentation that will assist you in configuring your VPS.
In fact, to know more about Webuzo and learn how to configure it, you can read the tips and tricks written by InterServer on this topic.
Where is the Password?
On the login page of Webuzo, it is asking me to enter the username and the password.
But hold on, is it asking me to enter the username and the password I set on the checkout page…?
To be honest, I don't know. For security reasons, the password has not been sent to the email.

Let's Contact The Customer Service
I tried the password I registered with, but for some reason, it doesn't work. I also tried to change the Webuzo password from the panel, but I'm getting the following error message:
Error! Unable to update password. Please contact support team for further assistance.
At 10:20 PM, I decided to send a message to Live Chat and see how much time it will take them to help me. Will they help me soon?
This is a good opportunity to tell whether their support is responsive or not.

At 10:32 PM, I got a response! Great!
It didn't take too long for them to respond to my message.

At 10:36 PM, the problem has already been resolved.
Finishing the Installation of WordPress
Now that I'm able to log in to Webuzo, I'm going to show you how I installed WordPress.
For me to know how to perform this the right way, I followed the InterServer guide, titled "How to Install WordPress on Webuzo?".
On the sidebar, click on Blogs and select WordPress.

From the page that appears, click on Install Now:

Now you just need to fill the sections below and be sure to delete wp from in Directory if you want your website accessed from the main URL.
Also, try to choose a strong password, you will need it to log in to your WordPress Dashboard.

In the following sections, feel free to customize your site the way you want.
But note that activating Limit Login Attempts (Loginizer) to secure websites from Brute Force Attacks is strongly recommended. Be sure to activate it.
If your website is very important to you, it is also recommended to activate Automatic Backups under Advanced Option to be able to restore it in case anything wrong happens.

And finally, under the last section, you can select a theme, fill in your email address, and then install your WordPress.
The option to select a theme is optional; you can change it at a later time.
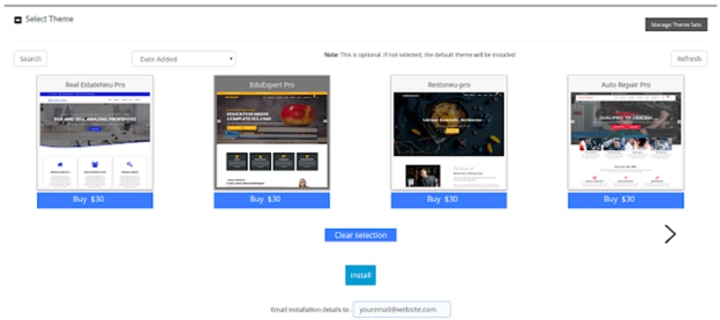
Click on install and wait a moment. The installation may take 2–4 minutes to complete.

With these simple steps, WordPress is now installed.

You can now start customizing your WordPress website by clicking on the Administrative URL link and logging into your WordPress Dashboard.
If you are not familiar with WordPress, I invite you to read the chapter Install and Customize WordPress.
Performance, Availability & Speed
Now that the website is up and running, let's test its performance, availability, and speed.
The tools I'm going to use are Google PageSpeed and Uptime.
The first will inform me of the server response time according to Google.
The second will be about the availability and response time from different locations in the world.
As you can see in the image below, the website has passed the Google PageSpeed Test, Server Response Times, and took only 540 ms to respond to the request sent by Google.
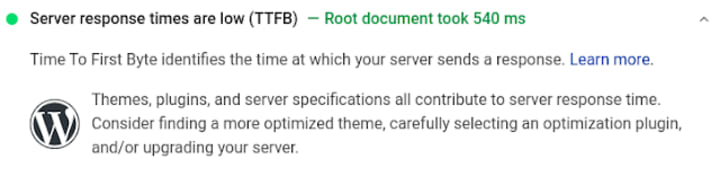
Also, the general score of the default theme of WordPress is high, 95/100.

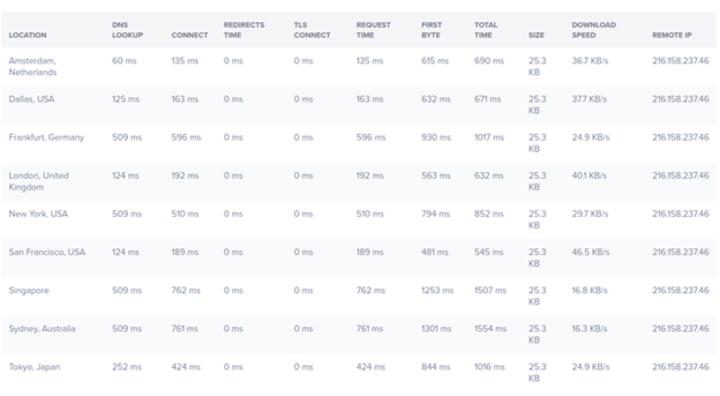
On Uptime servers, you can see variable scores according to the location of the servers.
These cannot be used to tell exactly how fast the server is, but they provide you with an idea of where your website is available and how much time it takes to load.
For stronger scores, you can link your VPS to a CDN. This latter spreads your website across different servers in different places in the world.
So, for instance, someone from Japan doesn't necessarily need to get your site's data from the NJ server, but from the closest server to his country.

Conclusion
In this experience, I discovered a hosting service that fulfills most of what it promises.
Some of the promises I tested are:
- The service was easy to get & quick to configure.
- The Server was fast and performant.
- The customer service was responsive.
- There is plenty of documentation and tutorials available on their website.

So, do I recommend this service?
Yes, I recommend it to people who are looking for independence, speed, and performance.
About the Creator
How to Plan a Flawless SharePoint to SharePoint Migration?
SharePoint migrations might be complex, especially if you're not an IT expert or a professional user. Whether migrating from SharePoint to SharePoint Online or simply restructuring site collections between tenants, the process involves detailed planning and precision.
By Xanthe Clay3 days ago in 01
The Role of Architectural Rendering in Modern Real Estate
From Blueprints to Buy-In: How Hyper-Realistic Visualization is Rewriting the Rules of Real Estate In the high-stakes arena of real estate development, stakeholders are often tasked with selling the invisible. They are asking investors and homebuyers to commit millions of dollars to an asset that, at the moment of sale, exists only as a dataset of geometry and metadata. For decades, the industry relied on abstract 2D floor plans and watercolor sketches to bridge this gap. Today, however, that approach is not just outdated—it is a liability.
By Tesla CAD Solutionsabout 11 hours ago in 01
Affection and Healing for Yourself
During the night of the last quarter moon, I gathered my ritual supplies. I carefully handled the chunk of black tourmaline that would protect me from your overall negative and narcissistic energy. I carefully walked the house with my stick of selenite in hand, asking the universe to cleanse our working space.
By Alisha Wilkins ✒️🦋🖋️2 days ago in Fiction


Comments
There are no comments for this story
Be the first to respond and start the conversation.