
How to Burn a DVD on Windows 10?
Are you wondering how to burn a DVD on Windows 10 without any hassle? Read this article to learn how to use the free or paid methods.

Sometimes, we need to burn a DVD, whether it's to share files with friends, transfer data between devices, or back up important memories. DVDs are reliable backups, offering a physical copy of your data that’s not dependent on digital storage. Plus, you can play them on standalone devices without worrying about an internet connection. So, knowing how to burn a DVD on Windows 10 is a handy skill to have, especially if you still rely on DVDs for these purposes.
In this guide, we'll also explore a few of the top DVD burners out there, just in case you need alternatives to Windows' built-in options. But first, let's go over what you need to get started.
What Do We Need to Burn a DVD on Windows
Before you begin, it's important to have everything ready. Here's a quick checklist:
Blank DVD: Choose between a blank DVD-R or DVD+R disc for burning. Both options work just fine, so it’s really up to your preference.
DVD drive: Make sure your computer has a DVD drive that can write data to DVDs. If your device doesn’t have one, you’ll need to grab an external DVD-RW drive.
DVD Burning software: While Windows 10 comes with basic tools, you might need additional software if you want to burn DVDs that can be played on standalone players or want more features.
How to Burn a DVD on Windows 10 Using Built-in Tools
Using File Explorer (Without Software)
File Explorer is a built-in tool in Windows for managing files, folders, and drives. It offers two options: "Like a USB flash drive" for automatic writing and erasing files, and "With a CD/DVD player" for burning DVDs, which is more compatible across different systems and is commonly used for creating and mastering DVDs.
PROS
- Windows 10 comes with File Explorer already installed, so no additional software is needed
- You can easily add files to the burn list using a simple drag-and-drop interface
- It supports multiple formats, including both the Live File System and Mastered formats
CONS
- Not able to create video DVDs that are compatible with DVD players; specific DVD creation software is needed
- Lacks sophisticated features like customized burning settings and the ability to create menus for video DVDs that are present in specialized burning software
How to burn a DVD on Windows 10 using File Explorer
Using the USB Flash Drive Option
Step 1: Insert a writable DVD into the computer's drive; the "Burn a Disc" window will appear, prompting you to start the burning.
Step 2: In the provided space, type the name of your disk.
Step 3: After that, select the first option, "Like a USB Flash Drive." Then click "Next" to proceed with setting up the disc.
Step 4: The File Explorer window will open once the formatting is complete. Drag and drop your files or folders onto the DVD disc. You can remove the disc at any time. Windows will perform the necessary actions to complete the disc before ejecting it.
Using the CD/DVD Player Option
Step 1: When the "Burn a Disc" window appears, click the radio button next to "With a CD/DVD player." After that, click the "Next" button to continue.
Step 2: Place the files in the desired position on the disc. A Windows Explorer prompt that reads, "Files Ready to Be Written to the Disc" will pop up. Confirm the burning procedure.
Step 3: Next, click "Drive Tools" from the top menu and choose "Finish burning" to open the "Burn to Disc" window and begin the disc-burning process.
Step 4: Choose the speed of the recording as 4x, 8x, or another from the available options.
Step 5: When everything is set up, click "Next" to begin burning the files to the disc. You will see the burning progress and estimated time. The disc will be automatically ejected from the optical drive after the process is complete.
Using Windows Media Player
Windows Media Player is a multimedia software created by Microsoft. It is commonly used for playing audio, video, and displaying images on Windows-based computers. The program also offers features such as burning CDs and DVDs, ripping audio CDs to MP3 format, syncing content with digital audio players, and providing access to online music stores.
PROS
- Burns a huge number of files, up to 4.7 GB on a DVD 5 disc and 8.5 GB on a DVD 9
- Enables you to burn a variety of audio, image, and video formats
- Easy to use
- Upgraded performance from Intel "Tiger Lake" CPU
CONS
- Editing capabilities are limited when compared to dedicated DVD burning tools
- Before burning, you may need to convert the video file to a compatible format
- The burning rate is slow
How to burn DVD on Windows 10 using Windows Media Player
Step 1: Open Windows Media Player. You can download it from the Microsoft Store, if it's not already installed on your computer.
Step 2: Make your "Burn list" by selecting the songs, videos, and other media you want to burn. Then you can just drag and drop them into the Windows Media Player window's "Burn list," located on the right.
Step 3: Next, insert a blank DVD into your drive. Verify that there is sufficient room for all of the files you wish to burn.
Step 4: Then, organize your "Burn list." Make sure the files are in the correct order if you want them to play in a specific order. The first file to play is the one at the top of the "Burn list".
Step 5: Select one of the following options after clicking the "Burn Options" button:
Data CD or DVD: if you wish to burn a video file or files.
Audio CD: when you want to burn an audio CD.
Step 6: Start the burning process by clicking the "Start Burn" button.
After burning is complete, you might need to finish the disc. Also, ensure that the disc plays properly on the intended device.
How to Burn DVD on Windows 10 with Free Software
Using DVDStyler
DVDStyler is a free DVD burning software perfect for beginners who want to burn DVDs on Windows 10. As an open-source, cross-platform tool, it allows users to create professional DVDs that play on most standalone players. It features customizable menus, including design options, templates, photo slideshows, and the ability to add multiple subtitles and audio tracks.
PROS
- Open-source and cross-platform, compatible with Windows, macOS, and Linux
- Uses multi-core processor support for faster DVD burning
- Allows for fully customizable DVD menus with scalable vector graphics
- Enables the creation of personalized photo slideshows with custom transitions
- Provides a wide selection of professional menu templates for easy DVD design
- Supports burning multiple videos onto a single DVD with titleset management
CONS
- Outdated interface
- Slow burning speed
How to burn DVD on Windows 10 using DVD Styler
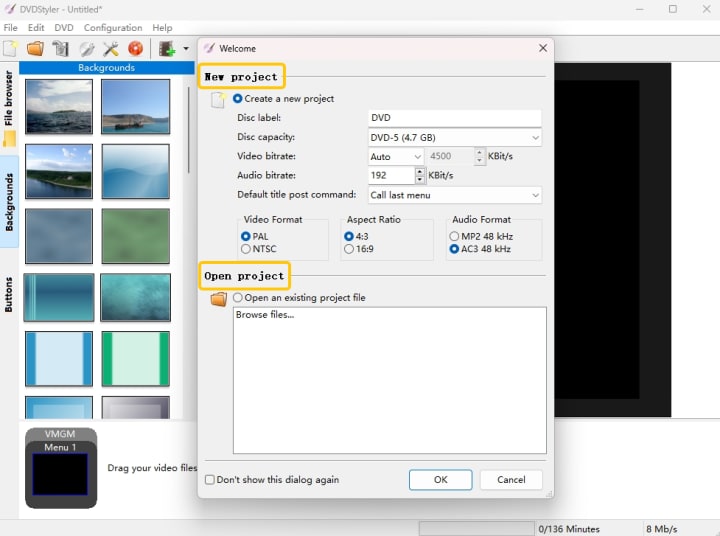
Step 1: First, click the DVDStyler icon on your desktop screen. Open the "New Project" menu and select NTSC as the "Video Format". Then, click "OK" to start the DVDStyler project creation.
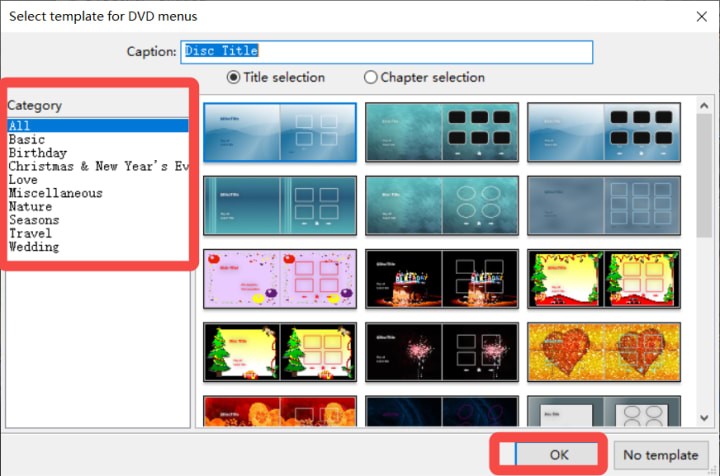
Step 2: After clicking "OK", select a DVD menu template and title for your project. You must choose the "Chapter Selection" option. Click "OK" to confirm your choices in the program.
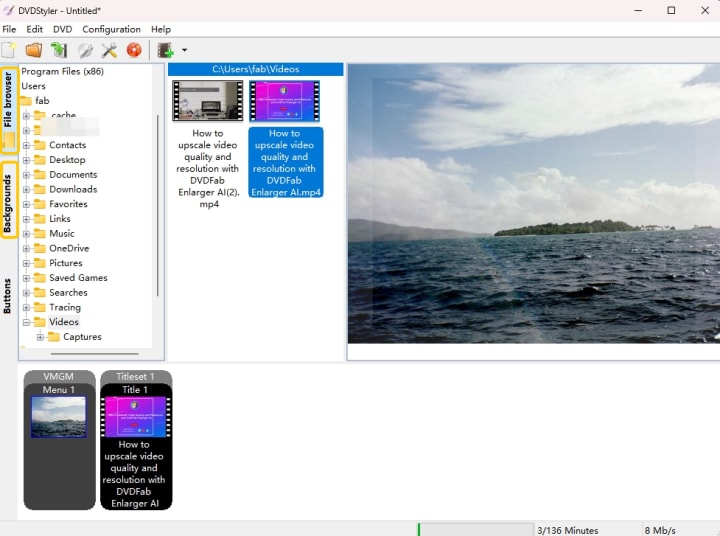
Step 3: Next, drag your MP4 video file to the timeline marked "Drag your video files from the File Browser here." Alternatively, you can right-click the timeline to add the file from your computer or connected storage.
Step 4: To burn a movie to a DVD, use a DVD drive or an external one connected through USB. Place a blank DVD into the drive and close it. Then, click the orange burn icon in DVDStyler and select the "Start" option on the burn menu to begin the burning process.
Step 5: During the burning process, keep track of the progress on the "Generate DVD" screen, where the "Summary" section shows the current progress.
Step 6: Finally, the "Generate DVD" screen will show "Burning was successful," and the DVD will eject. If prompted to clear the cache when closing DVDStyler, click "Yes."
Using BurnAware
BurnAware Free is a free, user-friendly tool for burning DVDs on Windows 10. It can burn files such as music, documents, videos, and photos to CDs, DVDs, and Blu-ray Discs, including M-Disc and BDXL. It also supports creating boot and multisession discs, high-quality Video DVDs and Audio CDs, ISO image management, disk copying, and data recovery.
PROS
- It' free and easy to use
- Burns various kinds of files
- Offers multisession discs
CONS
- Unable to play DVD-RWs, but you can use DVD-R discs instead
How to burn DVD on Windows 10 using BurnAware
Step 1: First, download BurnAware and install it on your computer.
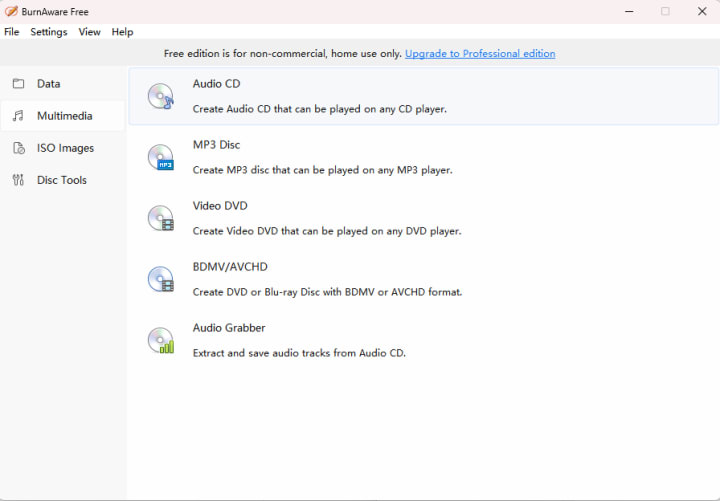
Step 2: Then, open the program and select "Multimedia" from the options given. After that, you will see some functions to choose from on the right side. Click on the third task "Video DVD" where you can import your targeted video to the program.
Step 3: After you locate the digital video on your computer and insert it into the burner, click the red "Burn" button at the top left corner of the main interface.
Step 4: Lastly, just wait for the burning process to finish. A new DVD disc will be successfully created in a few minutes, so just be patient.
How to Burn Video to DVD on Windows 10 with Professional Software
Using DVDFab DVD Creator
DVDFab DVD Creator is a powerful and versatile DVD burning tool available for both Mac and Windows 10. It's designed for users who want to create physical copies of videos and movies by burning DVDs, ISO files, or folders. The software supports a wide range of video formats, ensuring high-quality output every time. If you're the type who enjoys adding a personal touch to your DVDs, DVDFab offers a variety of customizable menu templates.
Features:
- Handles all types of DVDs, from DVD-5 and DVD-9 to DVD-R/RW and DVD+R/RW, even the dual-layer ones
- It works smoothly on Windows (7/8/8.1/10/11) and macOS (10.10-14)
- Creates regular DVD discs, ISOs, and folders from over 200 video formats
- It handles batch burning at top speed without compromising quality
- Choose audio tracks or subtitles, and add external subtitles if needed
- Utilizes professional devices, pre-installed templates, and DVD menu to personalize DVDs
How to burn DVD on Windows 10 using DVDFab DVD Creator
Step 1: First, open DVDFab DVD Creator and put the source DVD into the drive.
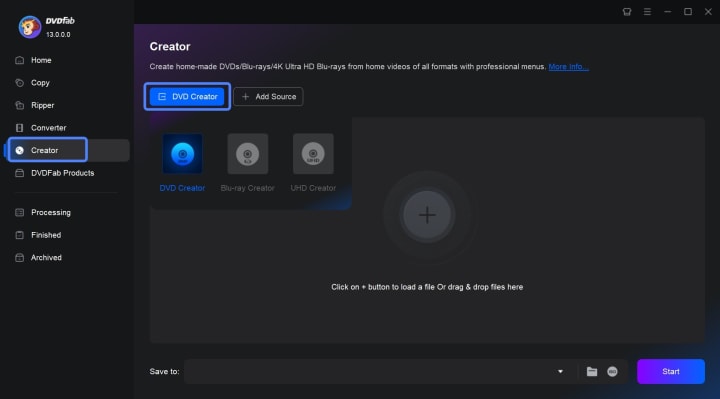
Choose the "Creator" > "DVD Creator" module. You can click the "Add" button on the home page or you can just drag and drop the file onto the interface to add your video.
Step 2: Personalize your DVD and design a custom menu.
After loading your source video, you can choose the audio tracks and subtitles to include. Additionally, you can add external subtitles to your video.
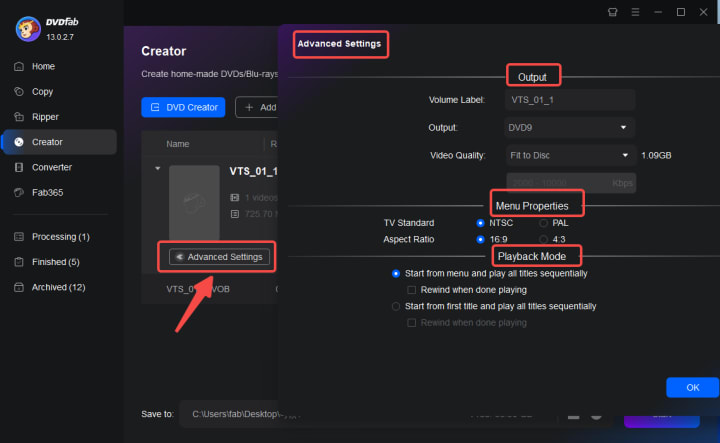
Next, use the "Advanced Settings" to customize the output size and quality according to your preferences.
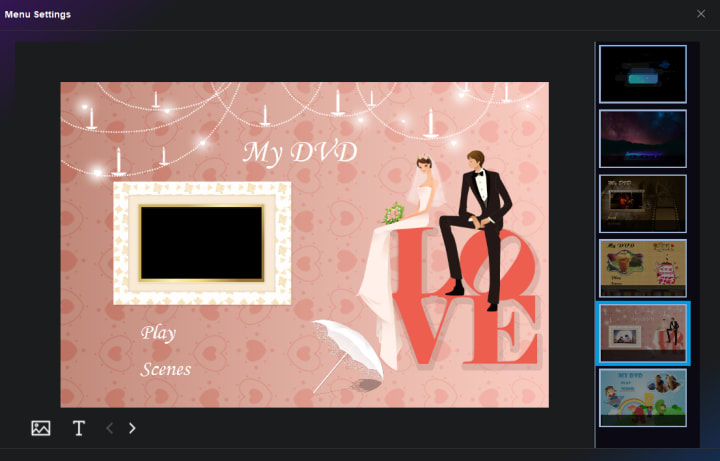
You can also click "Menu Settings" to choose a free menu template and personalize it by adding text or widgets, adjusting the size, shape, and more.
Step 3: Start burning a playable DVD on Windows 10/11.

Choose the output directory in the "Save to" section, then click the "Start" button to begin burning your DVD on Windows 10/11. The DVD Creator will display detailed progress information during the process.
Conclusion
In conclusion, when you're wondering how to burn a DVD on Windows 10, the process is actually quite simple and efficient. You can use built-in tools like Windows Media Player or File Explorer to easily burn your files to a DVD. If you're looking for more advanced options, third-party software offers additional features and customization. Just ensure your PC has a compatible DVD burner to create a functional and playable DVD.
About the Creator
DVDLOVER
Sharing the latest on DVD & Blu-ray releases, E-book downloads, and trending TTS. Stay tuned for updates, tips, and exclusive content!
How Professional Congress Organisers Shape Association Meetings Strategy
In today’s highly competitive and rapidly evolving event landscape, associations are under increasing pressure to deliver meetings that are not only engaging but also strategically aligned with long-term organisational goals. This is where Professional Congress Organisers (PCOs) play a critical role. Far beyond handling logistics, PCOs have become strategic partners who influence how associations design, plan, and execute their meetings to achieve measurable outcomes.
By Meeting Media7 days ago in 01
Understanding 925 Sterling Silver Jewelry: History, Craft, and Modern Relevance
Jewelry has been a part of human culture for thousands of years, serving purposes that extend far beyond decoration. Among the many materials used in adornment, 925 sterling silver jewelry holds a distinct and enduring place. Known for its balance of beauty, durability, and accessibility, sterling silver continues to be valued across cultures and generations.
By charliesamuel5 days ago in 01


Comments
There are no comments for this story
Be the first to respond and start the conversation.