
A Brief Introduction to React Native Navigators | React Navigation
React native navigators


React native is the framework that builds native apps using JavaScript. React native navigators or react-navigation navigators help navigate the screens one by one. As per other frameworks such as flutter, React native does not provide the navigation navigators by default to move from one screen to another. Hence, we use react-navigation navigators to navigate among the screens.
Mobile applications are infrequently made up of a single screen. Handling the presentation and transition between multiple screens is managed by a navigator. React Navigation offers a straightforward navigation solution with the ability to represent numerous navigation patterns such as Stack, drawer, bottom tabs, top tabs, etc., on Android and iOS. It involves various navigation components available in React native navigation.
Introducing React Navigation and react-native Navigation
React Navigation is a segment dependent on and intended to be utilized along with React Native. It demands knowledge of core concepts that offer you fully native platform navigation on iOS and Android for React native apps.
React-native Navigation is cross-platform and straightforward built-in javascript that you can install in your application and offer your users the native feel they deserve. It is a famous alternative to React Navigation.
The applications using React Native Navigation may target iOS 11 and Android 5.0 (API 21). It is easy to use as it starts quickly with built-in navigators that offer a seamless out-of-the-box experience.

Introduction to React Navigation navigators
React Native Navigation is a module dependent on and intended to be used alongside react native. With the rise of react-native services, React navigation navigators or react native navigators played a significant role in the navigations that help you move among the screens and go with the transitions. The native stack Navigator of react-navigation gives you access to your app transitions among the nets and manages navigation history. Suppose your application utilizes only one stack navigator. In that case, it is conceptually similar to how a web browser handles navigation state- your app uses push and pops from the navigation stack as users interact with it and come up with the user seeing multiple screens. React Navigation’s native stack navigators provide the gestures and animations you would expect on Android and iOS when navigating between routes in the Stack.
What does a react native navigator do in terms of Navigation?
React Native Navigation is best-suited for maintaining the presentation and transition between multiple screens. In mobile applications, navigation is of many types: stack navigation and tabbed navigation.

1. React navigation installation
React Navigation is induced from the react-native community that offers the navigation solution written in javascript. Installation is the prominent factor for the react-native navigators. To accomplish your project, you need to install the required packages and dependencies that can be chosen from any platform available in the market. Such as
After installing a particular package, you can give the command for execution. Then you can proceed with the react-native-gesture-handler package. Link all the native dependencies together using power. To be done with the installation of a react-native gesture handler for Android, you need to make modifications in MainActivity.java; however, it is not required in the react-native version <0.60.
2. Adding title and styling Navigation
After getting the expected outcome, to make the interaction better, you can give finishing to the page by adding some titles and styling. In styling, you can perform many actions, such as the title of the active screen, adding style to the header bar, and adding the background color that will set the background color of the header bar. You can style the font-weight and header title style as well. It will help make your application interactive and engaging.
3. Adding a second route screen
Another class can be created in the App.js file to add the second route screen to the stack navigator. Moving from one screen to another includes some steps of coding. Suppose we have two screens named "home" and "profile." The Home screen is the first screen using the "intialroutename" property and the Profile screen as the second.
Routing with React Navigation in React Native
React Navigation is a famous library for routing and Navigation in a React Native application. This library assists you in solving the problem of navigating between multiple screens and sharing data between them. It will show the number of connections a user has and provide a way to connect with additional friends. You will use this application to explore how to navigate mobile applications using react-navigation. While routing the react-native navigators, a path is described that works step to step for using the Navigation, which is as follows. Here we are with some following steps followed when routing the Navigation. You will have a rudimentary social network at the end of this tutorial.
1. Creating a new react native app
An application is required to implement Navigation. We can even choose any pre-built template to impose Navigation.
2. Creating a Home Screen and Friend screen
To make the transitions and jump from one screen to another, we need to make two screens. More screens can be added according to the requirement of the application.
3. React Navigation with the help of stack navigators
Stack navigators provide the memory to store the screens and make the navigations one to one in a sequence.
4. Adding buttons to Home screen and friends screen
After making the screens, we need to jump between screens; an event is required. The press of a button can be that event. Therefore we create buttons to trigger that event.
5. Using context to pass data information to other screens
The data is generally saved in the database, and it consumes more time in the revoking process. Instead of calling the data again and again from the database, we call the data once in the prominent screen and pass it to others if required for other screens, so we use context to give data information to different screens.
Stack react-native navigators or react-navigation navigators
React Navigation is a standard in navigating between screens in React Native. Some essential navigators have the option to create a custom one, but it works like magic when combined appropriately.
1. Stack navigator
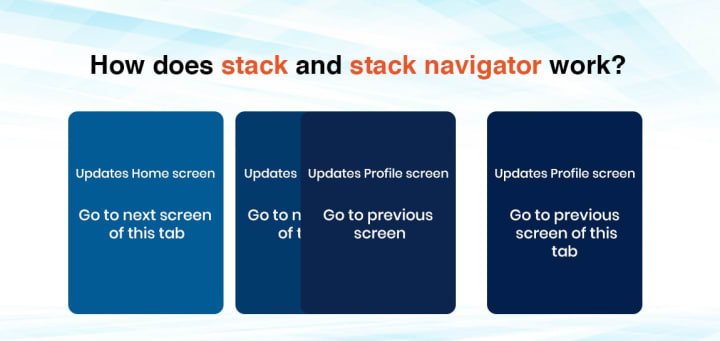
The stack navigator works similarly to the web browser history stack. When any user moves forward to the next screen, the screen is added to a stack, and when they go to the previous one, the existing screen is popped off from the Stack. The main difference between a web browser history stack and the stack navigator is the extensive gestures and animations that give a more native-like experience to the users.
- Transitions among the screens
- Navigation history on Stack
- Built-in header
2. Tab navigator
This is the most common navigator in mobile applications. It is generally placed at the bottom of the screen but can also be placed at the top. You can mark the tabs at the bottom of the screen. You can move between the screens in the tab navigator by clicking on the tabs instead of calling Navigation.navigate().
- No navigation history
- Customized bottom tabs
3. Switch navigator
Switch navigators can load one screen at a time. There is no back functionality by default, and it reset the route when switching between screens. This is useful in the authentication feature when resetting the state between screens.
- No additional UI
- Automatic screen unmount on leave.
As we already discussed, React Navigation also has packages for different kinds of navigators such as tabs, swaps, drawers, and many more. You can use numerous patterns in implementing them. You can also use drawer and tab navigator, but it is advised to use tab navigator instead of drawer navigator.
Practical use of react-native navigators
React native navigators are react-navigation navigators that consist of many navigation navigators. Here we are using @react-navigation.
Installation and setting up React Native navigators
Step: 1 Installation and setup

The preliminary step a developer needs to do is the installation of react-native navigators.
There are various dependencies that you require to install for further procedure. After installing the navigators second step is to install the required peer dependencies.
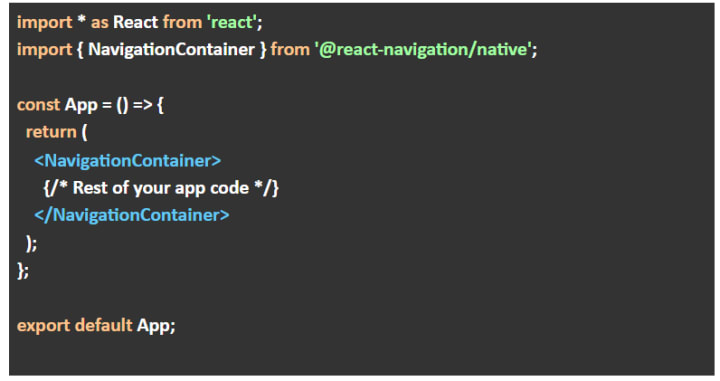
Your app is ready to build and run on the device or simulator. The entire app is required to be wrapped in a Navigation container. Generally, it's to be done in an entry file like entry.js or app.js.
Step: 2 Usage
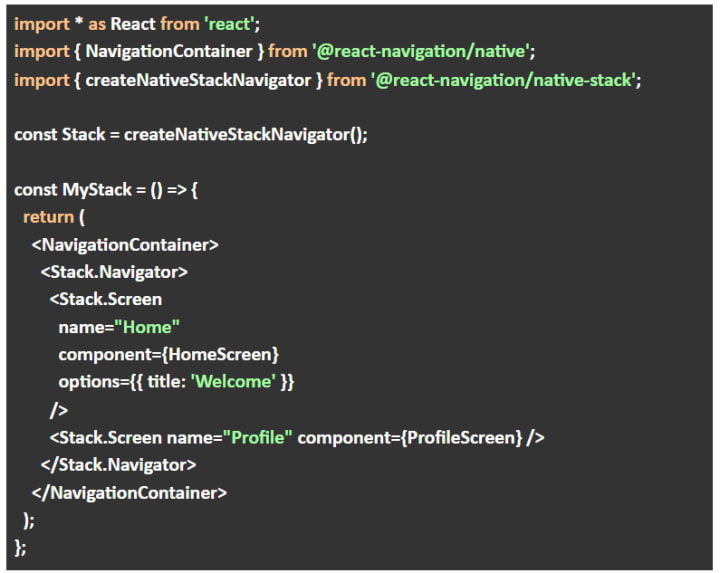
After the installation process, it is time to use the navigators. You can create an application with a home screen and profile screen.
We have explained two screens (home screen and profile screen) utilizing the Stack.screen component. You can set attributes such as the screen title for each screen in the options prop of Stack.screen. It's all up to an individual's choice and requirement, and one can define as many screens as he requires.
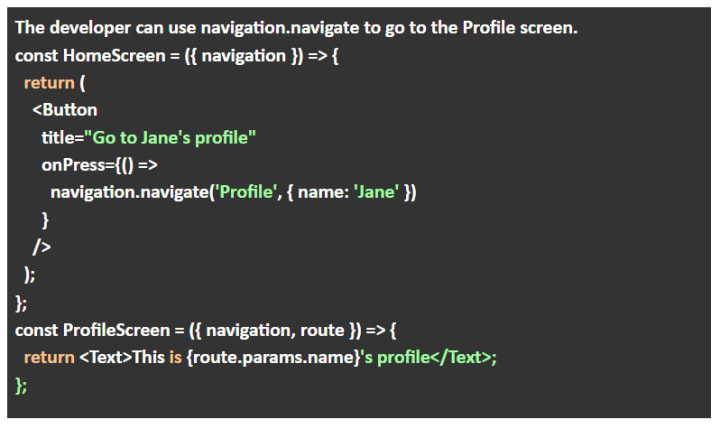
Every screen fetches a component prop that is a React component. Those segments receive a reinforcement known as Navigation that has various methods to link to other screens.
These native-stack navigators use the native APIs: UINavigationController on iOS and fragments on Android. Navigation built with createNativestackNavigator will behave the same and have the same performance strategies as apps built natively on top of those APIs.
Step: 3 Creation of stack navigator
It is essential to create a stack navigator as it plays a vital role in Navigation from one screen to another screen. Stack is used to making a sequence of screens that displays one to one, and the Stack navigator helps shift from one screen to another in the series. For the stack navigation, two functions are known as createStackNavigator and createAppContainer of the react-navigation library. These functions create a memory container to store the screens in the form of a Stack. It is the function that helps in route configuration objects and options objects. It returns the React component.

Step: 4 Output
After performing the described actions, you will come to an outcome of the home screen. In the case of a single screen as a route that may be a home screen element, we do not need to use the {screen: Home Screen} in coding, and we can directly use the home component.
Conclusion
React navigation navigators are one of the essential components for developing an application. Instead of writing code for each platform like iOS and Android for Navigation in react native, there is a better way, with a pure Javascript-based navigation library that uses native drivers for fluid transitions. All the changes with react-navigation expected from a modern app are available out of the box involving tab navigation, drawer navigation, stack navigation, and deep linking. It may be hard to say when not to use React Navigation over native APIs since the economic benefits and customization far outweigh the disadvantages. It is good to use react-navigation, and so is the react-native community, with the package boasting around 90k-10k weekly downloads at the time of this writing.
About the Creator
Gourav Khanna
APPWRK IT Solutions Pvt Ltd. is a global IT service providing company. We provide a wide range of IT services and support solutions which includes Web Development Services, UI UX Development Services, Website Design Services.
Keep reading
More stories from Gourav Khanna and writers in 01 and other communities.
10 marketing mistakes made by startups and how to avoid them
Each year, millions of entrepreneurs start new businesses. They begin with excitement, passion and hope that they'll have a brighter journey in the Industry, but some of them fall. The reason might be cash flow problems, lack of industry insights, poor vision, bad partnerships, less experienced team and, of course, poor marketing mistakes startups usually make. Well, mistakes are important to learn something new and come up with something big, but repetition can lead to failures.
By Gourav Khanna4 years ago in Journal
Autonomy Is The Real Privilege
Good morning, freedom-seekers! Today we’re gonna be looking at autonomy. A strange word, I know; one many would probably look at blankly and run away from on sight. We’re gonna figure out what it actually means, consider how it’s achieved, and decipher just how deeply most of us are tangled up in dependence without realising it.
By That ‘Freedom’ Guyabout 7 hours ago in Humans


Comments
There are no comments for this story
Be the first to respond and start the conversation.