
How to Draw a Horse-Step by Step?
Drawing a horse seems to be one of those daunting challenges, especially for the amateur artist.


Horses are such graceful, strong, and at the same time complex creatures. This is what adds to their overall fascination and places them in the intimidating league to put onto paper. But don't you worry, breaking it down into steps that are manageable does a long way in ease.
Learning how to draw a horse in steps can be for fun, to improve skills, or to come up with a masterpiece; in any case, it will give the confidence to freely tackle this majestic animal.
We take this journey one step at a time, so by the end of the journey, you will not only be proud to present your drawing, but you may also be well-equipped with knowledge on how to handle similar challenges if they re-arise in the future.
First Step: Horse Anatomy

Before you have even begun to put pencil to paper, take some time to observe horses. There is a specific proportion and set of body parts that create the form of horses. Note the long, lean legs of horses, yet so muscular. Notice how their heads taper down into an elegant nose and how wide-set their eyes are. The softness of the mane and tail that balances out the big chest and haunches that reflect its strength. A quick study of horse anatomy will provide the basic understanding. The horse has three main sections of the body: the head, the torso, and the legs. Their bodies have a natural flow of lines, and this is why starting with basic shapes and guidelines will be so effective.
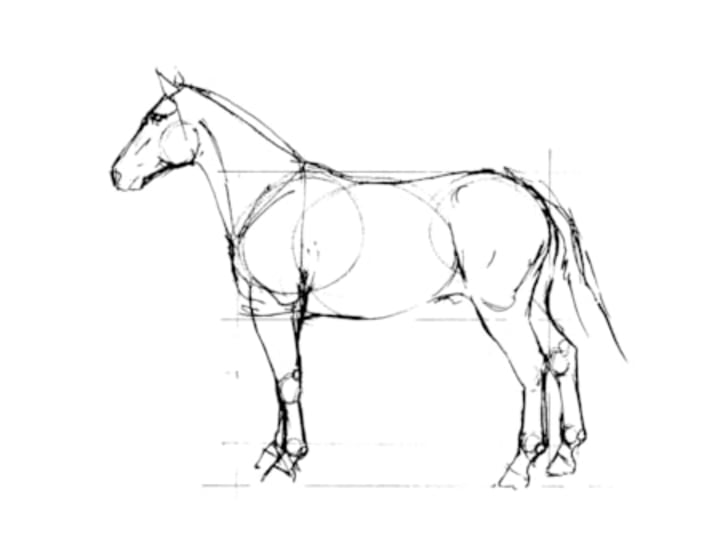
Second Step: Draw with Simple Shapes

Every drawing begins with basics, and it’s the same when it comes to the horse's structure in a preliminary drawing. Lightly outline a few circles and ovals to begin mapping your horse’s body. You’ll start with a large oval for the main torso, a smaller oval for the chest, and a medium-sized circle for the head. Lightly connect these shapes with soft lines to form the neck and spine.
At this stage, don’t worry too much about details. The goal is to establish a general skeleton to guide your drawing.
Now, add four straight lines for the legs, positioning them based on your desired pose. Keep in mind that a horse’s front legs tend to bend backward at the knee, while the hind legs bend forward at the hock. Remember to keep everything light and fluid—this is just your foundation.
Third Step: Refine the Outline
After establishing the general structure, begin fleshing out the horse’s form by using curved lines to connect and describe the contours of its body. Pay attention to the horse’s posture. Is it standing tall, rearing, or in motion? A horse in motion requires dynamic lines to suggest movement, while a standing horse demands balanced proportions and grounded legs.
Refine the neck; it should arch gracefully from the chest to the head. The horse’s head is somewhat angular, so modify your original circle into a more triangular shape. Add small triangles for the ears and sketch lines on the face to define the jawline and muzzle.
Don’t neglect the legs—they can be tricky but are vital. Horses’ legs are surprisingly intricate, so take your time outlining their cylindrical shapes. Add small joints at the knees and hocks. Patience is key here—it’s better to take your time now than to end up with awkward proportions later.
Fourth Step: Draw the Details

Now that you have the basic outline, it’s time to focus on the finer details that bring your horse to life. Start with the face. Draw the eyes, making them large and expressive. Since horses’ eyes are positioned on the sides of their heads, ensure they’re wide apart. Add nostrils and a subtle curve for the mouth to complete the muzzle.
Next, focus on the mane and tail. These features are particularly enjoyable to draw because they add a sense of movement and personality. Use smooth, flowing lines to depict the mane cascading down the neck or blowing in the wind. The tail should exhibit a similar flow, starting thick at the base and tapering into fine strands.
Add muscle definition to the body as well. Horses are extremely muscular, and gentle shading and contour lines can emphasize their strength. Reference photos can help you identify the areas where muscles are most pronounced, such as the chest, shoulders, and haunches.
Fifth Step: Add Texture and Shading

By now, your horse should resemble a complete drawing, but it may still look flat. Adding texture and shading will bring it to life. Begin by lightly shading areas that naturally fall into shadow, such as beneath the neck, along the belly, and inside the legs. Use your pencil to create smooth transitions between light and dark areas for a realistic effect.
For the mane and tail, use quick, short strokes to create the appearance of individual strands. Similarly, you can use fine lines on the horse’s body to suggest the texture of its coat. Be careful not to overdo it—subtlety is key to achieving a natural look.
For added depth, think about the direction of the light source in your drawing. Is the light hitting the horse from above, from the side, or from behind? Adjust your shading accordingly to make the horse appear three-dimensional.
Sixth Step: Focus on the Legs and Hooves

The legs and hooves are often the most challenging parts of drawing a horse, but they are critical to capturing its essence. Refine the shape of the legs so they taper gently from the body to the hooves, showing visible joints and tendons. When drawing hooves, pay close attention to their distinctive shape. Horses’ hooves flare slightly at the bottom and have a unique outline. Use reference photos to get these details right.
If your horse is standing, ensure the hooves are aligned with the ground; if it’s in motion, adjust the angles to match the pose.
Seventh Step: Finishing Touches

Now that your horse is drawn and shaded, take a step back to evaluate your work. Are the proportions correct? Does the pose feel natural? Are there areas that could use more detail or refinement? Use an eraser to clean up stray lines and smudges, and make any necessary adjustments.
If you feel ready, consider adding a background. A simple grassy field or a dynamic racing scene can add context and enhance your artwork. Keep the background light so it doesn’t overshadow the horse.
Eighth Step: Practice for Perfection

Drawing a horse takes practice, so don’t expect your first attempt to be perfect. The more you practice, the better you’ll become at capturing the intricate details and graceful proportions of horses. Experiment with drawing horses in different poses, such as galloping, jumping, or grazing. Each new pose will teach you something about the horse’s anatomy and movement.
If you’re serious about improving, invest in quality art supplies like good pencils and sketchbooks. Consider carrying your supplies in a backpack i.e. helmet backpack, shoulder backpack, etc. so you’re always ready to sketch, whether you’re outdoors or at the stables.
Conclusion
Learning to draw a horse step by step may seem overwhelming at first, but breaking it into manageable stages makes the process far more approachable. Start with basic shapes, refine the outline, add details, and finish with shading and texture. With patience and practice, you’ll soon be able to capture the beauty and elegance of horses in your drawings.
Remember, every artist was once a beginner. Even if your first few attempts aren’t perfect, don’t give up. Each sketch will bring you closer to mastering this incredible subject. And who knows? One day, you might inspire someone else to pick up a pencil and draw their own horse.
About the Creator
Huntley Equestrian
Huntley Equestrian is a premium brand that specializes in equestrian equipment, apparel, and accessories for riders of all levels.
Keep reading
More stories from writers in Writers and other communities.
TUS NUA - ch 49
TUS NUA – ch 49 New Beginnings – Mia and Midnight (*)(*)(*) As Mia spoke on the phone to Ali’s sister, Ellen, Finola slipped quietly away and walked to the stream behind Tus Nua. Carefully, she put a block on her family so no one could know what she was about to do.
By Margaret Brennana day ago in Fiction


Comments
There are no comments for this story
Be the first to respond and start the conversation.