
How to Clear the DNS Resolver Cache in Chrome, Edge, Firefox, Opera, and Windows 10?
How to Clear the DNS Resolver Cache
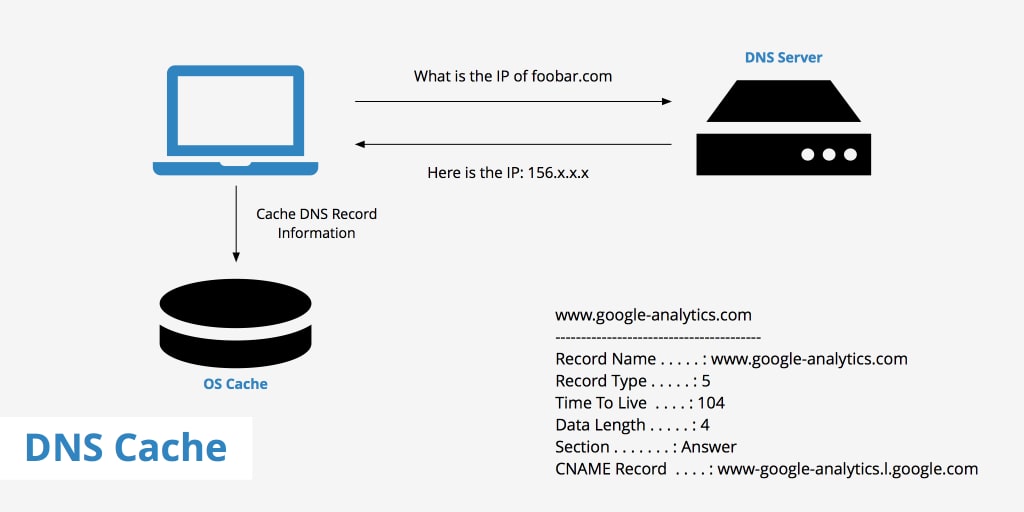
The DNS cache keeps track of the URLs that have been seen before. Converting domain names into IP addresses facilitates faster access to these websites. However, issues like broken connections or delays in accessing new material might arise when the DNS resolver cache becomes damaged or out of current. This guide will explore several ways to clear the DNS cache in various web browsers, including Chrome, Microsoft Edge, Mozilla Firefox, and Opera.
Clearing the browser's cache and cookies is usually the first thing people do when they're having trouble loading websites or getting problems in their browsers. Website loading issues are typically fixable after clearing the DNS resolver cache on a Windows PC. On the other hand, clearing Chrome's DNS cache is all it takes to fix these kinds of problems sometimes. Follow these steps to remove the DNS cache from a Windows web browser.
Method 1: Deleting Chrome's DNS Cache
Google Chrome's Settings tab makes erasing browsing data and host resolver cache easy, but deleting the DNS cache isn't as straightforward. To remove all DNS host cache entries, you must use a command in your web browser's address bar. We'll figure it out together.
Step 1: Enter chrome://net-internals/#dns into Chrome's address bar. This is the way to go if you want to get to the DNS page on Net Internals.
Step 2: Select the option to clear the host cache.
Step 3: Restart Chrome after closing all tabs. Performing all DNS lookups again may take a few extra seconds, but clearing your flush DNS resolver cache will be worth it.
These Google Chrome keyboard shortcuts will make your browsing experience much more efficient.
Method 2: Getting the DNS Cache Out of Edge
As you may have observed, Microsoft Edge and Google Chrome are quite similar. The reason is that Microsoft decided to align Edge with the Chromium open-source web browser project. So, everything about the two browsers—their preferences, extensions, flags, etc.—are shared. This implies that clearing the flush DNS resolver cache in Edge is identical to the process in Chrome. An easy and quick way to fix these difficulties is to clear your DNS cache. You can follow these steps to clear DNS resolver cache:
Step 1: Launch Microsoft Edge and go to the address bar—type in edge://net-internals/#dns.
Step 2: Select "Clear host cache" from the menu that appears on the Network Internals screen.
If you want to clear Edge's DNS cache, do this.
Step 3: To make the modifications take effect, close the Network Internals tool page and restart Edge.
Method 3: Making Opera's DNS Cache Clear
Opera is a web browser that uses the Chromium engine, similar to Google Chrome and Microsoft Edge. Just like Chrome, Opera also allows you to delete the DNS cache. This is the way to clear the DNS resolver cache:
Step 1: Launch Opera, then into the address bar, type or paste opera://net-internals/#dns, then hit Enter.
Step 2: To access the DNS settings, click on it.
Step 3: Next to the host resolver cache, you should see the Clear host cache button; click on it.
Step 4: That's all! Please relaunch the browser.
Method 4: Remove DNS Cache from Firefox
Mozilla Firefox's approach to clearing the DNS cache differs from those of Chromium-based browsers. Nevertheless, it's easy to fix surfing problems and improve internet connection. To clear Firefox's DNS and resolver cache, follow these steps:
Step 1: In Firefox, go to the address bar and type about:networking#dns. Hit the Enter key.
Step 2: To clear your DNS cache, click the button.
An immediate flush of the DNS cache will take place. Another option exists for clearing Firefox's DNS cache.
Step 3: In Firefox's address box, type about:config and hit Enter.
Step 4: Look for the term "network.dnsCacheExpiration".
Step 5: To modify the DNS expiry value, go to the "Edit" tab and replace the value of 60 with 0. Keep the modifications.
Step 6: You can get your changes to stick by closing the about:config page and then restarting Firefox.
Step 7: Now, you should be able to delete your DNS cache.
How to Flush DNS in Windows 10?
Launching Windows' command line interface, Command Prompt is the first step in clearing your DNS cache. This program is accessible in Windows 10 through the Start menu. Here are the steps to follow for DNS resolver cache Windows 10:
Step 1: In Windows, go to the System menu and then select Command Prompt.
Step 2: After you launch the command prompt, type ipconfig /flushdns.
Step 3: If the operation successfully flushed the DNS cache resolver, it should return a confirmation.
Step 4: After that, you will be able to dismiss the Command Prompt.
Check DNS Settings
At the heart of every Windows computer is the Settings menu. You can control your connected devices, tweak your preferences, and set up the operating system. On Windows 11, you can also find your current DNS server on Windows settings. In this way:
Step 1: You can press the Windows key and bring up the Start menu.
Step 2: Press Enter after typing "Settings" into the search field. Launch the Settings menu.
Step 3: From the menu on the left, select Network & Internet.
Step 4: When you see the name of the linked network, click the Properties button.
The DNS server is visible in the following window. The choice for IPv4 DNS Servers will be next to it.
Conclusion
Although emptying the DNS and resolver cache won't make surfing much faster, it can fix some problems caused by old or erroneous data kept in the system. If you ever experience a problem with your browser, cleaning its DNS caches should be your first step.
About the Creator
Keep reading
More stories from writers in Writers and other communities.
It's Winter
Anne Bernays and Pamela Painter — What If? Writing Exercise for Fiction Writers prompts The Exercise —Write a scene involving two characters. Have the point-of-view character presume something entirely different about the situation from what the other character's overt behavior seems to imply. For example, a landlord comes to visit, and the tenant suspects that it isn't a visit but an inspection. Make up several situations in which one character can fantasize or project or suspect or even fear what another character is thinking. The Objective - To show how your characters can use their imaginations to interpret the behavior and dialogue of other characters.
By Denise E Lindquist21 days ago in Writers
Why Students Are Turning to a Humanizer AI Instead of Relying on AI Alone
Why Students Are Reconsidering AI-Only Writing in Academic Work Artificial intelligence tools have become deeply embedded in student workflows. From outlining essays to organizing research notes, AI has changed how students approach assignments. However, a noticeable shift is taking place in academic environments. Students who rely exclusively on AI-generated writing are increasingly encountering issues related to grading, feedback, and academic credibility.
By Abbasi Publisher4 days ago in Writers
So You Decided To Become a Nurse Practitioner:
So you decided to become an "Advanced Practice" nurse. Congratulations!... is what I would say if this was a good idea. Grad school? In this economy? What were you thinking? Likely it was something along the lines of either 1) “I've seen these other chucklefucks do it— Why can't I?” or even 2) “I've got a nice career, I should shake it up. I miss feeling like I have no clue what I'm doing.”
By Sandor Szabo6 days ago in Fiction


Comments
There are no comments for this story
Be the first to respond and start the conversation.