
Helix Piercing Aftercare: The Ultimate Guide for a Safe and Stylish Healing Process
Helix Piercing Aftercare Guide: Tips for Healing & Infection Prevention | Earrings
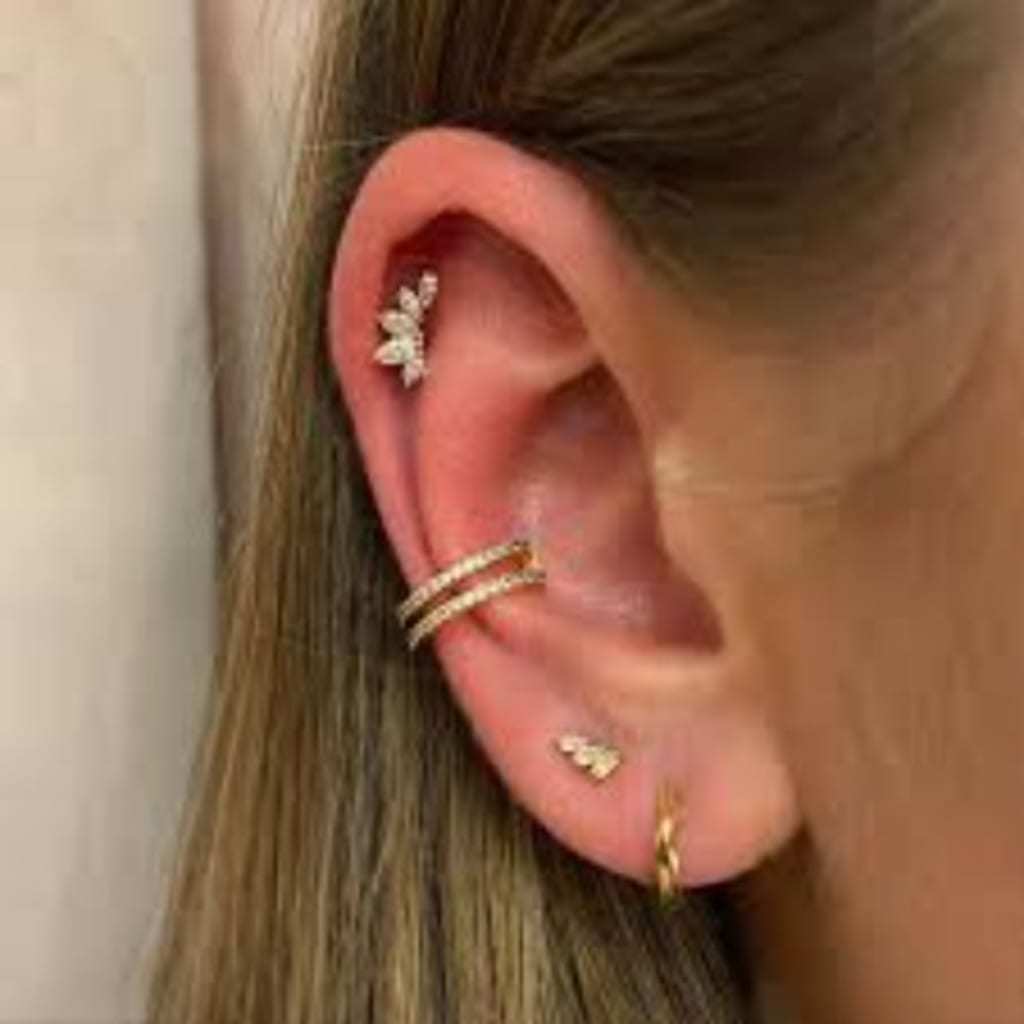
Helix piercings are a bold and fashionable way to express your personality. Positioned along the upper cartilage of the ear, they offer a sleek, edgy look that pairs beautifully with everything from minimalist studs to statement hoops. But as stylish as they are, helix piercings require a bit more care than standard lobe piercings. That’s why helix piercing aftercare is crucial for a safe healing process and long-term success.
In this blog post from Earrings, we’ll walk you through everything you need to know about helix piercing aftercare, from cleaning routines and healing timelines to tips for avoiding infection. Whether you're a first-timer or just need a refresher, this guide will help you protect your piercing and rock your new look with confidence.
What Is a Helix Piercing?
Before diving into aftercare, let’s clarify what a helix piercing is. A helix piercing refers to any piercing located on the upper cartilage of the ear. You can get a single helix, double, triple, or even a forward helix closer to the face. Because cartilage is firmer and less vascular than the earlobe, healing takes longer and requires extra care.
Why Helix Piercing Aftercare Is So Important
Helix piercings are more prone to irritation and infection because cartilage has limited blood flow. Without proper aftercare, you risk developing complications such as:
Infections
Keloids
Swelling and prolonged redness
Migration or rejection of the jewelry
To avoid these problems, following a structured helix piercing aftercare routine is essential.
Immediate Aftercare: The First 24–48 Hours
The first two days after getting a helix piercing are critical. Here’s what to expect and what you should do:
What to Expect:
Tenderness and slight throbbing
Swelling and redness around the site
Minor bleeding or discharge (clear or pale yellow)
What to Do:
Leave the jewelry in. Don’t twist or remove it.
Avoid touching the piercing with dirty hands.
Use a saline solution (store-bought or DIY with 1/4 tsp sea salt in 1 cup warm water) to gently clean around the piercing twice a day.
Sleep on the opposite side to avoid pressure and friction.
Avoid alcohol, hydrogen peroxide, or harsh cleansers—they can delay healing.
Long-Term Helix Piercing Aftercare Routine (Weeks 1–12)
The full healing time for a helix piercing is generally 3 to 6 months, though it can take up to a year for some individuals. During this time, consistency is key.
Daily Cleaning Steps:
Wash your hands thoroughly.
Soak a sterile saline pad or cotton ball in saline solution.
Hold the soaked cotton against the piercing for 3–5 minutes to loosen debris and reduce inflammation.
Gently wipe around the piercing, removing any dried discharge.
Let the area air dry. Do not use towels that may harbor bacteria.
Dos and Don’ts:
Do:
Keep up a twice-daily cleaning routine.
Avoid sleeping on the pierced side.
Keep hair, headphones, and phones away from the piercing.
Wear clean, breathable clothing and avoid hoodies or hats that could snag.
Don’t:
Switch out your earring before the piercing is fully healed.
Use ointments (they trap bacteria).
Swim in pools, lakes, or hot tubs during the initial healing phase.
Overclean—once or twice daily is enough; more than that can irritate.
Signs of Normal Healing vs. Infection
Normal Signs:
Minor swelling and redness
Clear or light yellow fluid
Occasional itching
Signs of Infection:
Intense pain or warmth
Green or dark yellow discharge
Pus or foul odor
Fever or swollen lymph nodes
If you experience these symptoms, consult your piercer or healthcare provider immediately. Early treatment can prevent complications.
Best Products for Helix Piercing Aftercare
Here are a few products we recommend at Earrings to make your helix piercing aftercare routine smoother:
Sterile Saline Wound Wash – Simple and effective for gentle cleaning.
Piercing Aftercare Spray – Travel-friendly and convenient.
Hypoallergenic Jewelry – Opt for surgical steel, titanium, or 14K gold during healing.
Remember: investing in quality jewelry and proper care products helps speed up healing and reduces the risk of irritation.
How to Prevent Helix Piercing Bumps
One common issue with cartilage piercings is the appearance of bumps. These are usually not dangerous but can be annoying.
Causes of Piercing Bumps:
Trauma from sleeping on the piercing
Touching or rotating the earring
Changing the jewelry too soon
Allergic reaction to low-quality metal
Prevention Tips:
Stick to your aftercare routine
Don’t fiddle with your earring
Use hypoallergenic materials
See your piercer if a bump develops—they can advise if it’s a keloid, hypertrophic scar, or infection
When Can You Change the Jewelry?
Patience is key when it comes to changing helix jewelry. Even if the piercing looks healed on the outside, it may still be fragile internally.
General Rule:
Wait at least 6 months before changing your helix jewelry for the first time—or until your piercer gives the all-clear.
Switching too soon can damage the healing tissue and lead to infection, scarring, or bumps.
Helix Piercing Aftercare FAQs
Q: Can I go to the gym after getting a helix piercing?
A: Yes, but wipe down equipment and avoid lying on your side. Clean your piercing after workouts.
Q: What should I do if my ear gets hit or snagged?
A: Clean the area immediately with saline and monitor for swelling or pain. See a professional if symptoms persist.
Q: Can I use tea tree oil or other essential oils?
A: Only if recommended by a piercer. Tea tree oil can be too harsh and cause irritation if not diluted properly.
Q: Is it normal for a helix piercing to take longer than 6 months to heal?
A: Yes. Some people take up to a year depending on factors like immune health, jewelry type, and lifestyle habits.
Final Thoughts
A helix piercing is a chic and modern addition to your ear jewelry collection, but it does come with responsibilities. Practicing good helix piercing aftercare is essential for avoiding infection, ensuring a smooth healing process, and ultimately enjoying your stylish new look.
At Earrings, we’re here to help you every step of the way—from choosing the perfect piece to guiding you through aftercare. Remember: clean, protect, and don’t rush the healing. Your ear (and your look) will thank you!
About the Creator
Keep reading
More stories from hamza awan and writers in Writers and other communities.
Mastering Boat Docking: Essential Tips and Techniques by Boating Madness
Boat docking is a fundamental skill that every boater must master to ensure smooth and safe arrivals at the dock. Whether you're a seasoned sailor or a novice boat owner, understanding the nuances of docking can enhance your boating experience and prevent potential mishaps. At Boating Madness, we're committed to providing you with practical advice and expert tips to help you perfect your docking technique. In this blog, we'll explore key strategies, common challenges, and essential tips for mastering the art of boat docking.
By hamza awanabout a year ago in Writers
It's Winter
Anne Bernays and Pamela Painter — What If? Writing Exercise for Fiction Writers prompts The Exercise —Write a scene involving two characters. Have the point-of-view character presume something entirely different about the situation from what the other character's overt behavior seems to imply. For example, a landlord comes to visit, and the tenant suspects that it isn't a visit but an inspection. Make up several situations in which one character can fantasize or project or suspect or even fear what another character is thinking. The Objective - To show how your characters can use their imaginations to interpret the behavior and dialogue of other characters.
By Denise E Lindquist19 days ago in Writers
How to Start an Event Management Company in Dubai, UAE (2026 Guide)
Dubai has firmly established itself as one of the world’s leading destinations for events of every scale. From international exhibitions and corporate conferences to luxury weddings and private celebrations, the city offers consistent demand and a business-friendly environment for event professionals. With the right planning and structure, starting an event management company in Dubai can be both rewarding and sustainable.
By Alexander James5 days ago in Writers


Comments
There are no comments for this story
Be the first to respond and start the conversation.