
10-Day .Net Aspire Challenge: Day 1 - Introduction
Step-by-step guide on how to use the .Net Aspire framework in Visual Studio.

Introduction
.Net Aspire framework is used to develop cloud and production-ready distributed applications. It consists of components to handle cloud-native concerns such as Redis, Postgres etc.
Prerequisites
- Install .Net 8
- Install Visual Studio 2022 version 17 or higher
- .Net Aspire Workload
- Container runtime such as Docker Desktop
Objectives
Learn how to create a starter project using .Net Aspire templates.
Getting Started
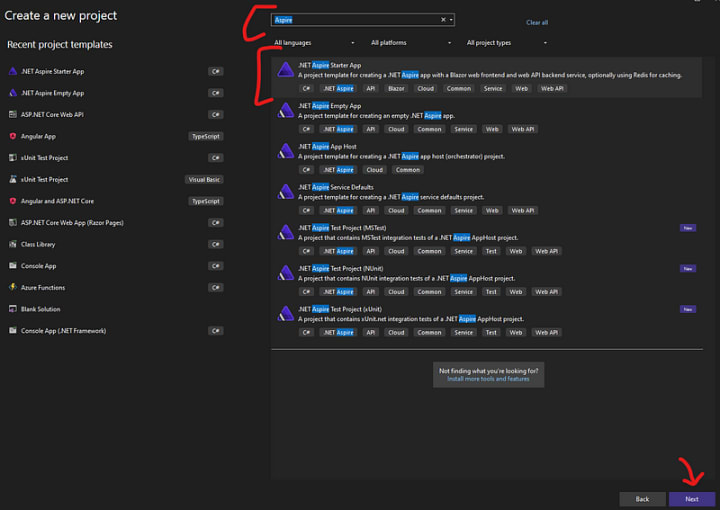
Step 1: Open Visual Studio
Open Visual Studio, and then select ".Net Aspire Starter App" as shown below
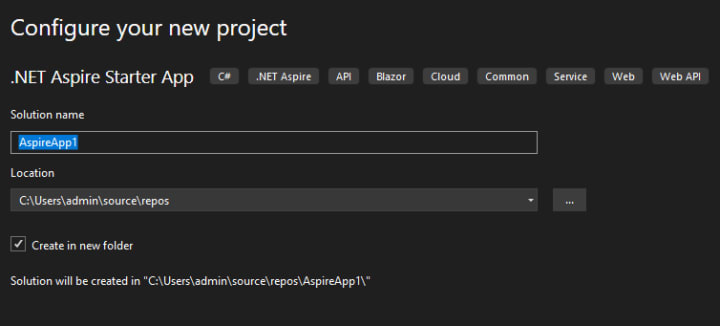
Step 2: Provide the project name
Provide the project name and project directory.
Step 3: Select Frameworks
The next step is to select the applicable frameworks, and check "Configure for https".
Note: Select "Use Redis for caching" only if the docker container is up and running.
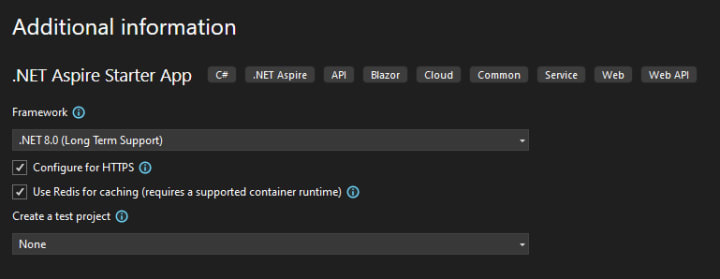
and finally, click the "Create" button at the bottom.
Step 4: Understand the Solution Structure
The solution consists of 4 different projects as follows [If a test project is selected then an additional test project will be available]
- DotnetAspireChallenge.ApiService: An ASP.Net Web API project is used to provide data for the web application.
- DotnetAspireChallenge.AppHost: An orchestrator project to connect and configure multiple projects and services.
- DotnetAspireChallenge.ServiceDefaults: A shared configuration manager for all of your projects and services.
- DotnetAspireChallenge.Web: A blazer web application that connects with "DotnetAspireChallenge.ApiService" to fetch data.
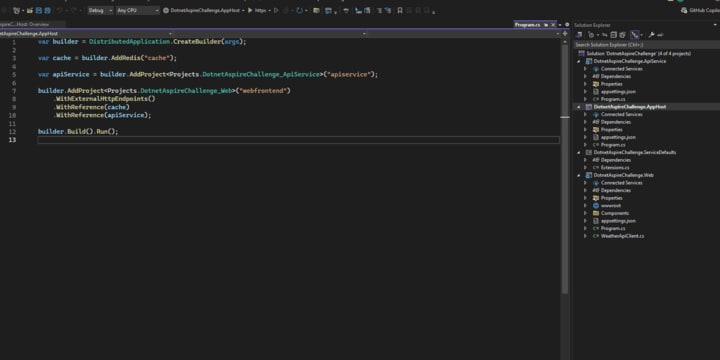
Step 5: Run the project
Set "DotnetAspireChallenge.AppHost" as the startup project and run the project as shown below.
Congratulations..!! You've created your first .Net Aspire project.
Github Project
C# Programming🚀
Thank you for being a part of the C# community!
BuyMeACoffee
About the Creator
Keep reading
More stories from Sukhpinder Singh and writers in Writers and other communities.
What to Know About Spanish Book Translation in 2026
Maria took two years to write her first novel. When a Spanish-language publisher came calling, she faced an unforeseen hurdle: finding someone with the ability to translate her book without losing its voice. Three translators later, she learned that spanish book translation consists of so much more than converting English words into equivalents in Spanish.
By Hillshire Mediaa day ago in Writers


Comments
There are no comments for this story
Be the first to respond and start the conversation.