
TradingView Signal Automation (Paper Trading)
Let's automate any TradingView indicator using virtual funds


Curious about automating TradingView indicators and strategies using paper trading or virtual funds? In this guide, we’ll break down how it works and why demo mode is a crucial step for testing any TradingView indicator, strategy, or custom Pine Script before putting real money on the line. By executing trades in a fully simulated environment, you can monitor performance, fine-tune settings, and optimize strategies—all without financial risk. Once you’ve validated your approach in demo mode, you can seamlessly transition to live trading with confidence.
Overview
The process works by setting up alerts in TradingView and forwarding them to a bot. Whenever an alert is triggered—whether from an indicator, strategy, or custom Pine Script—TradingView instantly sends the signal to the bot, which executes a simulated trade using virtual funds. This allows you to test your strategy in real market conditions without any financial risk. Once you've analyzed the results and fine-tuned your approach, you can seamlessly switch to live trading, where the bot will execute real trades based on the same signals.
👉 Learn more about TradingView Signal Bots
👉 How to set up a TradingView bot for automated trading
How It Works
Choose Your Indicator, Strategy, or Pine Script
Pick any built-in TradingView indicator such as RSI, MACD, or Moving Averages, or use a custom Pine Script strategy tailored to your trading rules.
For this example, we’ll use "UT Bot Alerts", a powerful indicator for automated trading signals. You can easily add it to your chart by opening the Indicators tab in TradingView and searching for "UT Bot Alerts" in the library. Once added, it will generate buy and sell signals, which we can automate using a bot.
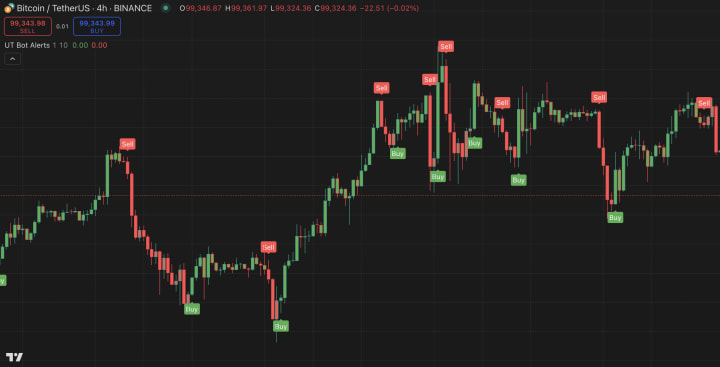
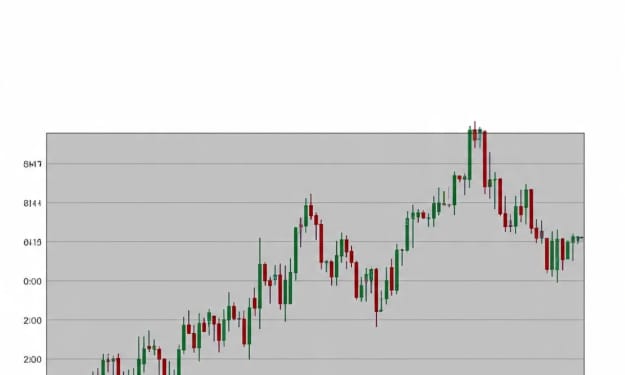
As you can see, this indicator generates buy and sell signals, and we want to test how it works using virtual funds—without putting real money at risk.
Create a TradingView Alert
On TradingView’s top bar, click on “Create Alert”, then define your trigger conditions. If you’re using UT Bot Alerts, set the buy condition as "UT Long" and the sell condition as "UT Short".
If you prefer another indicator, like RSI, you can customize your conditions. For example:
- Buy Signal: When RSI crosses below 30
- Sell Signal: When RSI crosses above 70
Send Alerts to a Webhook
Instead of receiving just a notification, configure the alert to send a webhook request to your trading bot. Before doing this, you need to create a TradingView Signal Bot in CryptoTailor.
CryptoTailor.io is an automated trading platform that connects TradingView alerts to a bot, executing trades in demo mode using virtual funds. With no coding required, you can test any indicator, strategy, or custom Pine Script in a fully simulated environment. Once your strategy proves effective, you can seamlessly transition to live trading, where the bot will execute real trades based on the same signals.
I’ve already created my bot, and it's now waiting for buy signals from TradingView to execute trades using virtual funds.
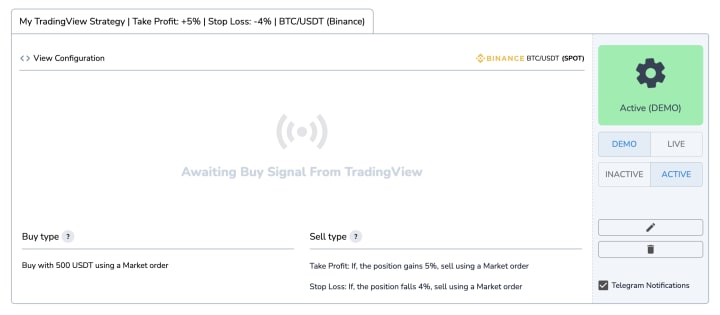
When you create a TradingView bot, the buy and sell signals originate from TradingView, but you still have control over Take Profit and Stop Loss levels for better risk management. This ensures that your trades follow a structured risk-reward ratio, helping you optimize exits based on predefined conditions.
For this bot, I’ve set a 5% Take Profit and a 4% Stop Loss. This means that if the price moves 5% in profit, the bot will automatically close the trade to lock in gains. Conversely, if the price drops 4%, the bot will exit the trade to limit potential losses. By integrating TradingView signals with risk management tools, you enhance automation reliability and control, ensuring that your strategy is both efficient and secure.
TradingView Bot Executes Trades in Demo Mode
Once a TradingView alert is triggered, the webhook forwards the signal to the bot, which then places a simulated trade using virtual funds. This allows you to test everything in a risk-free environment, following real market conditions without using actual money.
This process, known as demo mode, ensures that every trade mirrors real-time market behavior while keeping your capital safe. Whether it's a buy signal from an RSI crossover or a sell signal from a moving average, the bot processes it just as it would in live trading. It logs the trade, calculates entry and exit prices, and tracks performance over time.
By running your strategy in demo mode, you can analyze results, identify weaknesses, and optimize settings before transitioning to live trading. This risk-free testing phase helps ensure that your TradingView bot is fine-tuned and ready for real-market execution.
One of the biggest advantages of using a TradingView bot in demo mode is the freedom to test multiple configurations without financial risk. You can experiment with different indicators, entry conditions, take profit, and stop loss levels, adapting your strategy to changing market conditions. Unlike manual backtesting, which only provides historical data insights, live demo trading lets you see how your strategy performs in real-time market conditions before committing actual funds.
By running TradingView signals through a bot in demo mode, traders can fine-tune their strategies, optimize risk settings, and build confidence in their automation—all without putting real money on the line. Once the strategy consistently delivers positive results, transitioning to live trading is as simple as switching from demo mode to real mode—allowing the bot to execute trades using actual funds.
Analyze Results & Go Live When Ready
Monitor trade performance, adjust risk settings, and optimize your strategy based on real-time demo results. Once you’re confident in its profitability, seamlessly switch to live trading, where the bot will execute real trades based on the same validated signals.
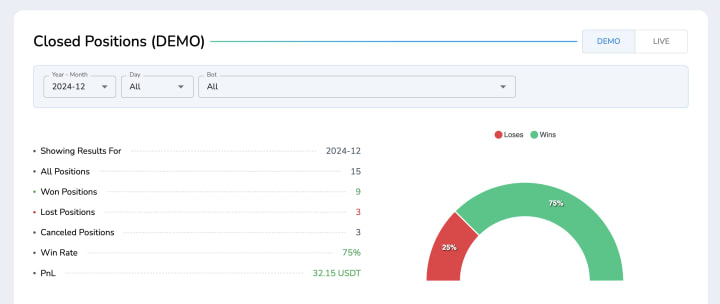
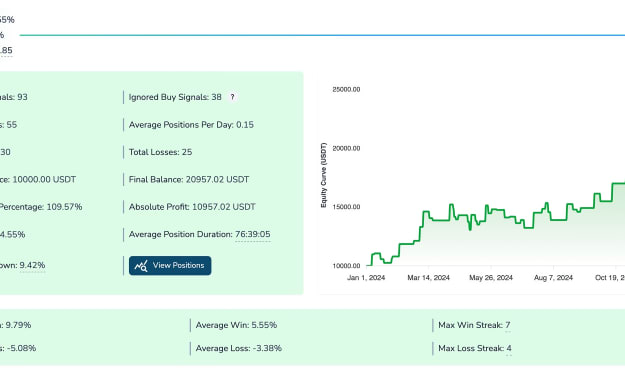
After your bot has been running in demo mode for a while, the next step is to analyze its performance and determine whether your strategy is meeting expectations. This involves reviewing key trading metrics such as win rate, average profit per trade, drawdown, and overall profitability. By assessing these insights, you can spot patterns, refine settings, and fine-tune your strategy before moving to live trading.
If your demo trades consistently generate profits with a favorable risk-reward ratio, you can start optimizing your Take Profit and Stop Loss levels to enhance gains while minimizing losses. Additionally, adjusting your indicator settings or entry conditions may help improve trade accuracy. Since all demo trades replicate real market conditions, this phase provides valuable testing without financial risk.
Once you're confident in your strategy’s performance, transitioning to live trading is straightforward. Instead of using virtual funds, the bot will begin placing real trades on your connected exchange. At this stage, proper risk management is essential—starting with smaller position sizes and monitoring live trades closely can ensure a smooth and controlled transition.
By thoroughly testing TradingView signals in demo mode, you minimize the risk of unexpected losses and increase your chances of running a profitable, automated strategy in real market conditions.
Want a step-by-step guide? Learn how to automate TradingView signals from setup to execution:
About the Creator
Behzad Khoshdouz
Software Engineer | MBA | Building automated trading solutions 🚀
Keep reading
More stories from Behzad Khoshdouz and writers in Trader and other communities.
Easily Test and Verify Crypto Trading Strategies with Backtesting and Forward Testing
Before risking real money, it’s important to make sure your trading strategy works well and can deliver reliable results. That’s where backtesting and forward testing come into play.
By Behzad Khoshdouzabout a year ago in Trader
Hind Zinc Share Price: A Detailed Guide for Investors
Hind Zinc share price is one of the most watched stock movements in India’s metals and mining sector. Hindustan Zinc Limited (HZL) is a leading global zinc producer and a key player in the Indian commodity market. Investors keep a close eye on Hind Zinc share price because it reflects not only the company’s performance but also global demand for zinc, supply constraints, and macroeconomic trends.
By Hammad Nawaz5 days ago in Trader
lmt stock momentum surges: hidden opportunities, steady demand, and investor confidence
lmt stock is catching the attention of both new and experienced investors. Its steady performance and rising demand make it an attractive option for those who want growth with reliability. They will explore why lmt stock is turning heads, what drives its momentum, and how it fits into long-term investment plans.
By hamza mirza5 days ago in Trader


Comments
There are no comments for this story
Be the first to respond and start the conversation.