
How to Use Zapier to Process Images from Google Drive
How to Use Zapier to Process Images from Google Drive

The powerhouse automation tool would be Zapier, an application that connects your favorite apps and services so they can work together without coding. You can create auto-performing workflows for you called "Zaps," which save a lot of time in the reduction of manual tasks.
In this guide, you'll learn how to use Zapier to automate handling images stored in Google Drive. Specifically, we will show how to:
- Set up a trigger in Zapier so that it keeps an eye out for new images in a specified folder in Google Drive.
- Send those images to an Image Editing API (such as PhotoCut) to process them.
- Save the edited images back to Google Drive.
This implies that you won't have to cope with manual picture uploads and downloads. Working with digital content, marketing, or e-commerce will help you save time and be more productive.
What is Zapier?
With Zapier, you can automate the most tedious activities by connecting several applications together without the need for technical expertise or coding knowledge. Thousands of apps are integrated, such as Dropbox, Slack, Gmail, Google Drive, and hundreds more, allowing you to construct Zaps, or automated processes.
To submit the photographs to an image editing provider for additional processing, Zapier may be used to automatically check a certain folder in Google Drive for new images. After completion, you don't need to do anything further because the photos are stored back into Google Drive.
Setting Up Your Zap: Automating Image Processing from Google Drive
Step 1: Watching a Google Drive Folder for New Images
Configuring your Zap begins with selecting the application that will initiate the process. Here, Google Drive will be the Trigger application. This is the way to accomplish it:
- Log in to your Zapier account, creating a new account if you have no account created yet. Now, after successful login, look for the button labeled "Make a Zap". Now, for setting up this integration, after the prompt is given, select an application for being triggered. So search for the application Google Drive, which holds all the image files that need processing.
- You then choose the event that will trigger the workflow. For this, you should choose "New File in Folder". This will monitor a particular folder within your Google Drive for new files uploaded.
- Once you have selected your trigger event, you will be prompted to link your Google Drive account with Zapier. If you have not authorized Zapier to access your Google Drive account, then follow the instructions given to complete the authorization.
- Once you connect your Google Drive account, you will need to choose a folder for the new images where Zapier will monitor and scan for new additions. You just need to indicate which folder includes the images needing processing. It will automatically scan for new additions of images that will trigger further action in the workflow.
- Once you have created the folder, Zapier will prompt you to test the trigger to ensure everything is working correctly. If the test is successful, Zapier will be able to detect new files in the folder and move on to the next step.
Discover the magic of instant editing with PhotoCut’s API Playground.
Step 2: Processing Images with the Image Editing API
With your trigger watching the Google Drive folder, it's time to set up an action to process your images. Here, we're going to make use of the Image Editing API, PhotoCut, which is used for background removal, enhancement, and many more custom changes. Let's set up an action.
- In the next step, search for PhotoCut in the Action app search bar on Zapier. Once you’ve found it, select PhotoCut - Image Editing API. PhotoCut offers various image editing features such as background removal, lighting adjustments, shadow additions, and resizing.
- After selecting PhotoCut, choose the appropriate action for your workflow. Depending on the available features of photo editing, like removing the background, adjusting illumination, or setting a new one for the photo, you choose one of a few options and start working to get the right effect. Selecting "Remove Background" would most likely be when you want an isolated subject out of the entire picture.
- You'll need to add your PhotoCut API key to authenticate the connection between Zapier and PhotoCut. You can easily generate an API key by signing up for PhotoCut and following the instructions to generate your unique key. You can then enter the key in Zapier to complete the integration.
- Once you input your API key, you'll have to specify the parameters of your image editing task. This might involve the type of edit (background removal, for example), adjustment of shadow intensity or lighting, and choosing the resolution or size of the output image.
- After setting up the settings, Zapier will allow you to test the action. In this test, Zapier will send a sample image from Google Drive to the PhotoCut API, process it according to the parameters you have set, and send the edited image back.
Find the best background remover between PhotoCut and Remove.bg.
Step 3: Uploading the Result to Google Drive
Now, with the Image Editing API having processed the image, you can set up the next action to save the edited image back into Google Drive. Here is how you can do it:
- The next action for your Zap would be to again use Google Drive as the Action app.
- Choose “Upload File” as the action event. This will enable Zapier to upload the processed image back into a specific folder in Google Drive.
- You will have to specify where the edited image in Google Drive has to be saved. Select which folder you like to store them in after their processing. Here, you are also able to specify the filename and format for your preference as well.
- Zapier will now give you the option to test the upload action. This test ensures that the edited image is correctly saved back into your Google Drive folder.
Create amazing image backgrounds using PhotoCut’s API.
Step 4: Testing the Integration
Once all the steps are set up, it’s time to test your Zap to make sure everything is working as expected:
- After testing the trigger, action, and upload, activate your Zap by clicking the “Turn on Zap” button. This will enable the automation to run automatically whenever a new image is added to your selected Google Drive folder.
- Now, go ahead and add an image to the monitored Google Drive folder. Within moments, Zapier will automatically trigger the workflow, sending the image to PhotoCut for editing and then saving the edited image back to Google Drive.
- Check the folder where the edited images are saved in Google Drive. You should see the edited image, with the background removed or any other changes you applied, ready for use.
Learn to create a viral social media campaign with PhotoCut API.
Conclusion
Through integration between Google Drive and the PhotoCut API through Zapier, seamless automation in any image processing procedure is accomplished with a basic flow. Through creating a flow you can scan an image being updated in your folder in Google Drive, process it through an Image Editing API for necessary editing to ensure consistency with its other pieces, and then upload your outcome back into your Google Drive again - all with automation. It makes the most efficient use of one's time to avoid redundancy among your various photo editing assignments.
FAQs
Q1. What is Zapier and how can it help process images from Google Drive?
Ans. Zapier is one automation tool to connect apps or services, wherein actions can automatically be performed minus the manual entry. Using this Zapier feature for processing pictures from Google Drive will automatically let you send it to an editing service and the results saved to Google Drive automatically without coding needed.
Q2. How do I set up a Zap to process images from Google Drive?
Ans. To configure a Zap: log into the platform, select the trigger app for Google Drive; choose the New File in Folder event; select your account in the next pop-up; and the image editing application, like PhotoCut, as the app used to process this picture; and action to upload back to Google Drive.
Q3. What action apps can I use to process images from Google Drive?
Ans. There are lots of action apps supported by Zapier, some of them in image processing can be: for editing- Photoshop, Canva; compression, resizing- TinyPNG, convert- CloudConvert.
Q4. Can I use Zapier to automatically save processed images back to Google Drive?
Ans. Yes, Zapier can save processed images back to Google Drive by setting up a second action step in the workflow to upload the edited images to a designated folder.
Q5. Are there any limitations to using Zapier to process images from Google Drive?
Ans. While Zapier is powerful, it does have limitations. Free plans have a limited number of tasks per month, and some apps may have API rate limits that affect the speed of the workflow. Consider upgrading to a paid plan for more tasks and faster processing.
About the Creator
PhotoCut
AI Photo Editing Tool - Remove or Change your Background & Enhance Product Photos
Keep reading
More stories from PhotoCut and writers in Photography and other communities.
How to Use Zapier to Process Images from Google Drive
The powerhouse automation tool would be Zapier, an application that connects your favorite apps and services so they can work together without coding. You can create auto-performing workflows for you called "Zaps," which save a lot of time in the reduction of manual tasks.
By PhotoCut12 months ago in Photography
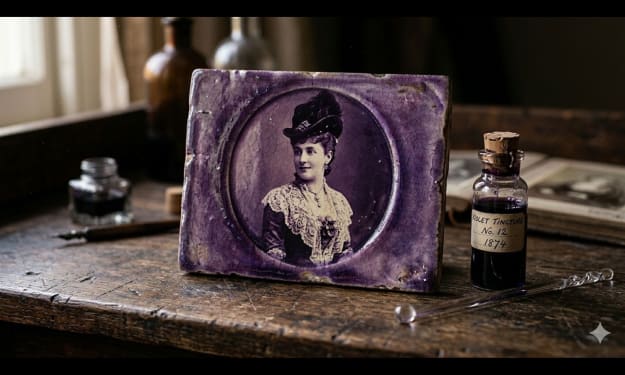
Gold Chrysotype Photography Is Back and the Colours Are Breathtaking
There is a moment when a chrysotype print is lifted from its chemical bath and held up to the light stops people mid-breath. The colours that bloom across the surface — soft dusty pinks fading into deep magenta, rich cyans pooling at the edges, velvety blacks settling into the grain of the paper — look less like a photograph and more like something pulled from a dream.
By CurlsAndCommas4 days ago in Photography


Comments
There are no comments for this story
Be the first to respond and start the conversation.