
How to Rotate Photos on iPhone & iPad
How to Rotate Photos on iPhone & iPad


Probably the best way to take life's precious moments is taking pictures using an iPhone. But then, sometimes those pictures aren't what you thought them to be. It may have been taken at the wrong orientation or maybe to compose an image differently; that's when rotating your pictures would be of help for a better appearance and be sure it looks the best it could. You can also enlarge your images with PhotoCut’s Image Enlarger. Thankfully, the built-in images app on your iPhone or iPad makes it easy and quick to rotate images without requiring you to be a computer expert. We'll go over how to rotate your iPhone or iPad images in detail in the next post, along with some extra suggestions for more sophisticated editing methods.
Why is Image Rotation Necessary?
Image rotation is sometimes necessary in fixing the orientation of an image. The orientation of a photo depends on your iPhone since it decides the orientation whether to take the picture as a portrait or landscape mode. In some cases, the wrong orientation is selected to get the proper perspective for a more interesting photo. You can also change the background of your photo.
Properly rotating and aligning your images can also enhance how they look on different devices and screens, making your photos appear more polished and visually appealing. You can do this by rotating photos to:
- Fix Orientation: Ensure that your photo is oriented correctly, say, if it was taken sideways.
- Improve Composition: Align the angle of the photo to enhance its framing.
- Ensure Optimal Display: Make sure your photo looks good on various devices and screens.
Now, let's go through how to turn your photo with the Photos app using an iPhone or iPad.
How to Rotate a Photo on an iPhone
The process of rotating a photo on an iPhone is straightforward. You either want to flip it upside down by rotating 90 degrees or move it at an arbitrary angle, it just takes these steps:
How to Rotate a Photo 90 Degrees on iPhone
Sometimes, you just need to give a photo a 90-degree twist, be it to restore its original orientation or have a fresh angle. So, here's how:
- Open the Photos application: Open the Photos on your iPhone.
- Select your Photo: Choose the one you wish to rotate.
- Tap "Edit": After selecting the photo, find the "Edit" icon in the upper right corner of your screen and press it.
- Use the Rotate Icon: The rotate icon is a square with an arrow that can be found in the bottom-left corner of the editing choices. Tap on it.
- Rotate the Picture: Double-tap the rotate icon again. It will now turn your photo 90 degrees to the right. With every tap, it turns another 90 degrees to the right.
- Tap "Done": Once you are pleased with your picture's rotation, you can tap "Done." Your changes will save and your picture will have a new orientation.
How to Rotate a Photo at a Specific Angle on iPhone
If you require to rotate your photo more precisely or level, just use these steps:
- Launch the Pictures app: Select a photo by tapping, then select Edit to launch the Photos app.
- Select "Edit": At the top-right, tap the "Edit" button.
- Press the Rotate Icon: Press the rotate icon, which is the same icon you use to accomplish a 90° rotation.
- Use the Straighten Tool: To get an even finer level of control, use the Straighten tool. You can then drag a slider to the right angle to rotate your photo.
- Save the Changes: Once you’ve rotated the image to your desired angle, tap "Done" to save your changes.
How to Rotate a Picture on iPhone Using PhotoCut
If you need more professional editing tools on your iPhone, third-party apps like PhotoCut give you the capability to attain precise adjustments to your photo. With PhotoCut you can rotate your pictures and at the same time, even flip and crop them in PhotoCut. PhotoCut can help you remove watermarks from photos using its Watermark Remover. Here is the process of how you can rotate the photos using PhotoCut:
- Launch the PhotoCut App: Proceed to the App Store, download, and launch the PhotoCut app.
- Upload Your Photo: You must select the picture from your gallery that you want to rotate.
- Locate the Rotate & Flip Icon: Find the Rotate & Flip icon after uploading your photo.
- Rotate the Photo: A few choices let you change the photo's orientation by a certain amount. Another option is to flip it vertically or horizontally.
- Save the Image: After making changes, select Save to return the rotated image to your gallery. You can convert your saved image to JPEG format.
Additional Tips for Rotating Photos
- Use the Grid: When rotating your photo, you may notice a grid in the editing interface. This can help you line up the photo better or create a more balanced composition.
- Crop After Rotating: Sometimes, rotating a photo can result in some unwanted edges or gaps. You can crop off those areas after rotating to compose it better.
- Undo Changes: You can undo the rotation in case of a mistake or just not like the rotation. You just have to tap the undo button or you can revert the changes by tapping Cancel in the process of editing.
Conclusion
Now with one rotation done, it takes more ease while turning your iPhone or iPad with new simple tasks that can greatly heighten the aesthetic appeal to your images. Whether for correcting the orientation or attempting to play with angles to achieve a better composition through use of the Photos app allows you to make quick correctional adjustments. If additional level editing is required, use some more powerful third-party apps in this case, PhotoCut in further advanced photostream changes: in controls around your photo rotation and improvements. You can choose colors from images using PhotoCut’s Color Picker.
Having been trained in photo rotating now, go ahead and give an example through experimenting with different angles or orientations on how it completely transforms the images. Pretty cool and easy to raise your photos to a new level!
FAQs
Q1. Am I allowed to rotate photos in Photos without changing anything that would lower the quality of your photos?
Ans. No, there is no loss of image quality from rotating a picture in Photos. The image size is original unless you crop or use some other edits that would affect its size.
Q2. How do I get back to the normal orientation on a rotated picture?
Ans. If you took a picture and want to bring it back to the starting position, just go back into the Edit screen, and click the rotate icon until it restores the original position. You hit the icon each time; it rotates 90 degrees so you can take your picture back to the point of origin.
Q3. Can I turn photographs any number of degrees by using the Photos app?
Ans. The Photos app offers basic rotation functionality that enables you to rotate the photos in increments of 90 degrees. However, for more control or an exact angle, you would have to use the Straighten tool for the finer-degree angles.
Q4. Is there a third-party application for iPhone for rotating images?
Ans. Yes, many third-party apps available include PhotoCut, Snapseed, or Adobe Lightroom. Among these, you get superior photo editing tools such as rotation. You can just rotate photos with greater versatility and have other options for adjusting the brightness or contrast on the image, crop them, or flip them.
Q5. Can I rotate multiple photos at once?
Ans. Unfortunately, the Photos app on iPhone does not support rotating multiple images simultaneously. Each photo must be rotated individually. However, some third-party apps may allow batch editing features, so you can rotate multiple images at once.
Q6. Why does my iPhone sometimes automatically rotate photos?
Ans. Your iPhone uses built-in sensors (for example, the gyroscope) to determine the direction your photos are taken when you take them. Sometimes it will automatically rotate your photo based on how you held the camera when you took the picture. But if it gets it wrong, you can rotate your photo using the Photos application.
About the Creator
PhotoCut
AI Photo Editing Tool - Remove or Change your Background & Enhance Product Photos
Keep reading
More stories from PhotoCut and writers in Photography and other communities.
Automatically Colorize Black and White Photos Online
Do you have old black-and-white pictures from your family albums, old historical events, or even classic films that you wish were in color? Thanks to the growth of AI technology, it has never been easier to add these vibrant colors to your old black-and-white images. PhotoCut's AI Photo Colorizer can give those nostalgia-evoking pictures a simple click to transform them into amazing, colorized versions.
By PhotoCutabout a year ago in Photography
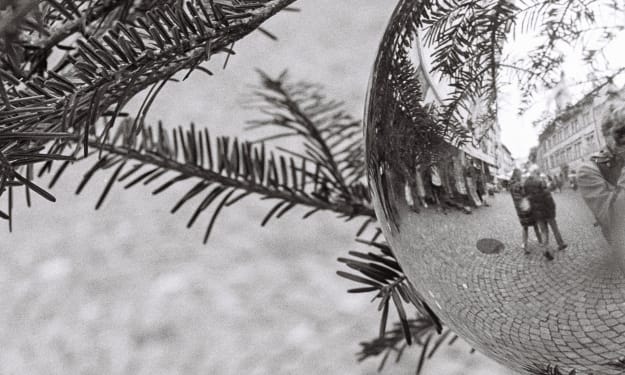
My Year, in Prattling and Photos
It's been a year since... last year. Ironically, it seems I've found myself a new tradition of getting sick during the New Year holidays. At least, this year (that is, this inter-year period remarkable for its shiny decorations in the streets and houses, and closed supermarkets and pretty much everything), I'm doubtlessly doing better: I've managed to come visit my friends in Germany for Christmas (which I failed to do last year) and—after having some good quality time eating machanka, playing Munchkin and swinging machetes (the last one obviously crept into this checklist only for the sake of the phonological form)—I came back home via proverbial Deutche Bahn and probably less known Schweizerische Bundesbahnen, my body hosting a family of viruses, virions and who knows what other tiny critters somewhere inside my chest.
By Andrei Z.17 days ago in Photography
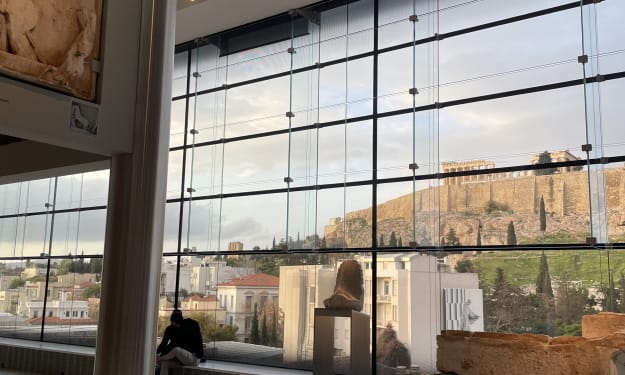
Acropolis and Its New Museum
The other day, my son and I went to the Acropolis and the new Museum at its foothill in Athens, Greece. The Museum opened in 2009 to house the collection of artifacts found at different times on the Acropolis Hill. On its own, the building is a masterpiece in architectural design not only because it has a great flow for following the history and evolution of Greek culture through the centuries as they were buried and found on the Acropolis, but also because it has a full-size replica of the Parthenon on the upper floor.
By Lana V Lynx7 days ago in Photography
The Devil's Cut
“Comrade, finally you’re awake.” The voice was smooth, sensual. A flickering incandescent bar was all that lit the white, sterile room. All Vladimir remembered was everything going black. He tried to move his arms and found them strapped to the gurney.
By Matthew J. Fromm4 days ago in Fiction

Comments
There are no comments for this story
Be the first to respond and start the conversation.