
Enhancing Your Photos in Photoshop
Enhancing Your Photos in Photoshop

Photoshop is the most excellent tool for increasing the quality of your photos if you are processing your pictures or getting them ready for commercial distribution. Photoshop boasts a variety of tools to beautify your image, whether you have an image that needs sharpening, color modification, or the removal of unsightly flaws. This video teaches you many Photoshop enhancement techniques if you want to enhance the quality of your photos quickly and effectively.
Why Use Photoshop for Photo Enhancement?
You should understand why Photoshop is so useful for picture editing before moving on to the precise techniques for photo improvement. You may use Photoshop's various functions to improve the appearance of your images in a variety of ways. You may alter the image's brightness and contrast, color, sharpness, and even composition. This program, widely used for image editing in various professional projects, can render clear, full-colored, polished, and other appealing images by applying suitable techniques despite how low its initial quality would have been.
Improving Image Quality in Photoshop
This starts by improving the quality of a photo. You can make this happen with the help of Photoshop's Super Resolution feature which works on the premise of artificial intelligence (AI). This is where enhancing your image's resolution is achieved through AI technology. The steps to doing this are explained below:
Increase Image Resolution Using Super Resolution
If the image you wish to enhance seems blurry or pixelated, making it clearer with increased resolution could be the trick. Photoshop allows you to make this easy task by using a tool called Super Resolution. Below is how you can do that:
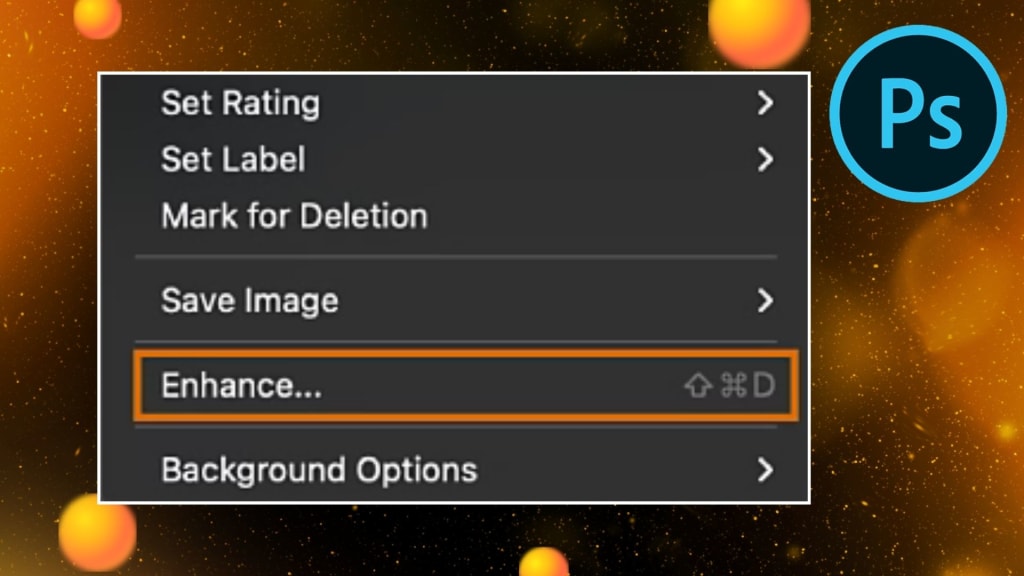
- Open up the photo that you want to enhance in Photoshop.
- Next, right-click on the picture after opening it up and select your options.
- Click the "Enhance" button. The Super Resolution tool will then open.
- AI analyzes the picture and enhances it by automatically raising its resolution with greater sharpness and detail.
It's fantastic to use Super Resolution when enlarging a picture because not too much of the quality will be lost in it. In addition, it's suitable if you intend to print it or want it on a bigger display.
Adjusting Color and Clarity
With higher resolution, you're now required to hone the color and clarity of your image. It is with slight modifications in brightness, contrast, and saturation that you will give life to an image and make it more vibrant and clear.
- To make your photos more colorful:
- Click on the image with the right button and navigate to options.
- You can find adjustments like Brightness, Contrast, or Saturation in the "Adjustments" menu and now opt for one of them to suit the color.
You can also use the Filter menu to sharpen the image. You can click the Sharpen option to make an image, that is somewhat blurry and looks clear.
If the picture you are working on seems blurry or unclear, several filters in Photoshop can help you correct it.
To make your blurry pictures clear:
- On top of Photoshop, click the Filter menu.
- This feature allows you to eliminate any unwanted grain or pixelation that could give your image that blurry look.
You can refine these tweaks to make your overall photos clearer and crispier.
Create stunning Facebook cover photos using PhotoCut’s Facebook cover photo maker.
Adjusting Composition & Blemishes
Apart from making the color and even the sharpness of the picture better, you can also correct how it is composed and remove unwanted blemishes. Here are some easy tools for you to use:
Adjusting Composition
At times, the entire composition of the image needs a slight adjustment. You can adjust the composition of the image using the Crop Tool by removing unnecessary parts of the image and emphasizing the central theme.
- Crop Tool: Crop out unnecessary parts of the image and emphasize important parts.
Removing Blemishes
Sometimes, your image may contain blemishes, spots, or imperfections, and Photoshop has been designed to fix them as follows:
- Spot Healing Brush Tool: This tool can easily remove small blemishes or imperfections within an image. The process is simply painting over the bad area and Photoshop will automatically replace it with surrounding pixels.
- Patch Tool: Even when imperfections are somewhat larger, the Patch Tool serves you well. You select an area with the Patch Tool and drag it over a better area of the image to fix it.
These are perfect for portraits and photographs where you want to clean up the details and make the image look more polished.
Create chibi art online using PhotoCut’s Chibi Maker.
Adjusting Image Resolution for Printing
Make sure the image has enough resolution if you plan to print it. Photoshop allows you to adjust the image's resolution for printing.
Here's how to adjust the resolution:
- Photoshop should open your picture.
- Click Image, then Image Size at the top of the screen.
- Use the Image Size window to change the resolution values. When printing, you will want it around 300 pixels per inch, in most instances.
- After entering the desired resolution, click OK to apply the changes made.
This step guarantees that your image will print at the best resolution, without the problem of pixelation or being blurry.
Explore aesthetic Instagram captions to elevate your Instagram posts.
Enhancing Photos with PhotoCut
Photoshop is a fairly strong tool for picture editing, but there are equally quick and simple internet programs like PhotoCut. With a few clicks, PhotoCut utilizes AI to improve your images. Here's how to accomplish it:
- Visit the PhotoCut website and upload the image you wish to transform into something amazing.
- PhotoCut's 1-press Enhancer is a straightforward AI-powered tool that can improve your shot with a single press. For an even better image, it automatically lowers contrast, brightness, and sharpness.
- After enhancement, the improved photo can be downloaded or shared directly on social media.
PhotoCut is excellent for basic editing chores since it provides other tools, such as filters and brightness control, in addition to the 1-Tap Enhancer.
Conclusion
You do not have to make improving your images complicated, whether through Photoshop or an online application such as PhotoCut. It is true that Photoshop's most advanced features, such as Super Resolution, allow improving image quality, but you can simply regulate color, increase sharpness, and make post-operative adjustments to the composition. In addition, flaws and faults can be removed with the Spot Healing Brush and Patch Tool.
PhotoCut's AI capabilities are the only option if you want to fast and simply improve your images. Photoshop and PhotoCut provide you with expanded capabilities with robust tools to enhance your personal or commercial photographs.
Use PhotoCut’s Disney filter to transform yourself into a Disney character.
FAQs
Q1. Where should I start when trying to enhance my photos?
Ans. Start here! Look first to adjust exposure, contrast, and highlights, plus shadows and white and blacks, all of which, if available are usually found at the "Camera Raw Filter" (Filter> Camera Raw Filter) or within the "Adjustments Panel", Window > Adjustments. This is a setting you can experiment around with to see how adjustments will impact a photo. Toss out the fear. Just try your luck and learn that way.
Q2. What’s the difference between the "Camera Raw Filter" and working directly in Photoshop?
Ans. The Camera Raw Filter is there to make global, non-destructive edits, such as exposure and color balance. Photoshop allows a user to fine-tune an image with much more precision and local detail. It is usually a good rule of thumb to start with the Camera Raw Filter and then fine-tune the image in Photoshop.
Q3. Should I be working with JPEG or RAW files?
Ans. RAW makes more sense as it has more data, allowing for greater flexibility in the edit. JPEGs compress in a way that they have less data, and you're limited in how much you can enhance. Use RAWs only if possible. Here are JPEGs if you wish to improve them. No problem with Photoshop.
Q4. My photos are too dark. How can I brighten them in Photoshop?
Ans. Utilize the "Exposure" slider in Camera Raw Filter, or you adjust Levels/Curves in Photoshop. You might even use the "Shadows" slider to light up the darkest portions of your image.
Q5. My photos are too bright. How can I fix that?
Ans. Decrease the amount of exposure with the "Exposure" slider or use the "Highlights" slider in the Camera Raw Filter to regain detail in overexposed areas.
Q6. How can I change the contrast in my pictures?
Ans. You may alter the contrast using the "Curves" tool in Photoshop or the "Contrast" slider in Camera Raw. An "S" curve that works well for enhancing contrast can be made.
Q7. How can I sharpen my blurry photo?
Ans. Apply sharpening tools in Photoshop (Filter > Sharpen). Be careful as over-sharpening causes noise. Instead, try the "Smart Sharpen" option for better control.
Q8. How can I remove distractions from my photo?
Ans. Spot Healing Brush and Clone Stamp may be used for unwanted elements in the image. For larger objects, try "Content-Aware Fill".
About the Creator
PhotoCut
AI Photo Editing Tool - Remove or Change your Background & Enhance Product Photos
Keep reading
More stories from PhotoCut and writers in Photography and other communities.
Create Adorable Chibi Art with PhotoCut
Do you love cute art? Do you enjoy anime characters with large heads, large eyes, and little bodies? If so, you'll fall head over heels for making chibi art! Without any talent in creativity, it takes you hardly a few moments to transform your imagination into lovely chibi characters, avatars, and more by the online chibi creator of PhotoCut. Quick, fun, and easy, chibi characters could be created starting from scratch with the tool at PhotoCut or turned into your image chibi, or unique chibi emotes. Learn how to make your chibi art in a few simple steps by reading on!
By PhotoCut11 months ago in Photography
Gold Chrysotype Photography Is Back and the Colours Are Breathtaking
There is a moment when a chrysotype print is lifted from its chemical bath and held up to the light stops people mid-breath. The colours that bloom across the surface — soft dusty pinks fading into deep magenta, rich cyans pooling at the edges, velvety blacks settling into the grain of the paper — look less like a photograph and more like something pulled from a dream.
By CurlsAndCommas5 days ago in Photography


Comments
There are no comments for this story
Be the first to respond and start the conversation.