
15 Powerful Effects and Techniques to Level Up your Videos
Find out the top video editing techniques and effects to create enhanced video content for your audience and increase engagement.
Editing videos used to be tough and costly. But now we have several free editing software available that pack powerful features. Today I will provide you tips on how to make your videos more creative and engaging based on my video editing experience.
For the below guide I will use the free video editing software, CapCut, which is widely used worldwide and also has lots of free features. If you learn how to use its effects, you can create content that rivals professional editors.
This guide shows you 15 powerful effects and techniques to make your videos looks beautiful and consequently drive engagement with your audience.
Understanding CapCut’s core tools and interface
Navigating the User-Friendly interface
CapCut’s layout is simple and easy to grasp. You can quickly find tools for cutting, adding effects, and adjusting your video. Customizing your workspace helps you work faster and smarter, saving time during editing.
Essential tools for beginners
Start with the basics: the timeline lets you arrange clips. Import media files from your device. Use cut, trim, and split tools to refine your clips. These fundamental features make easier work of complex edits later.
Before we begin you can start by downloading CapCut for PC or your mobile phone. Set up a free account and continue below.
Mastering key Effects and Techniques in CapCut
Now I will tell you about the important tips to follow:
1. Isolating Color with HSL Adjustment
Ever seen a video where one color pops while others fade? Jack Harlow’s trending effect does just that. To recreate it:
- Open the adjustment panel and select the HSL tab.
- Desaturate all colors except yellow and orange.
- Remove reds and greens by sliding their saturation down.

Your video now leaves only the desired hues, making it stand out. This simple trick grabs attention and adds a professional touch.
2. Creating Text Behind Subject Effect
Want text to hide behind a person or object? Follow these steps:
- Duplicate your video layer.
- On the top layer, go to “Remove Background” and enable auto removal.
- Add a text layer and drag it between the two video layers.
- Position and size the text as needed.
To animate this:
- In the text layer, find the scale option.
- Set keyframes to make the text grow and shrink smoothly.
- Use compound clips and cuts to keep the text moving behind your subject.
- Finish with a quick fade-out for seamless entry and exit.
This effect provides a cool, cinematic feel that looks just like high-budget movies.
3. Tracking moving subjects with Motion Track
Keeping text or objects aligned with a moving subject makes your video look more dynamic:
- Select “Tracking Motion.”
- Draw a box around your subject.
- Start tracking, and the box follows their movement.
- Adjust tracking to improve accuracy.

This technique is perfect for tutorials, vlogs, or anything where a moving subject needs highlighting.
4. Simulating a 3D Camera Effects
Creating depth in a flat video grabs viewers’ attention. CapCut offers the “Flip Series” animation:
- Pick an image or clip.
- Apply a flip effect like “Flip Number Six.”
- Adjust the flip to create a 3D look.
- Pair it with zoom effects for extra punch.

It’s a quick way to simulate a 3D environment without expensive software.
5. Adding Cinematic Effects with built-In presets
To give your video a film look:
- Apply the “Movie” effect from the effects menu.
- Reframe your footage within cinematic bars.
- Adjust the crop for perfect framing.
This instantly makes your clips look more polished and professional.
6. Creating dynamic zooms and Camera Movements
Zoom-ins, outs, and pans add excitement:
- Place keyframes at the start and end.
- For a zoom-in, set initial scale low, then increase it.
- Use the “variable speed” feature to make zooms less robotic.
- For camera movement, shift the position across keyframes, making it look like a drone shot.

Good zooms are subtle but pack a punch when done right.
7. Enhancing video dimension with Effects
The “Play Pendulum” effect makes subjects float or sway:
- Apply it to your clip.
- Adjust speed and strength.
- Refine with compound clips to animate settings independently.
This adds a surreal, animated dimension that grabs attention.
8. Highlighting key elements for audience focus
Drawing viewers' eyes helps reinforce your message:
- Use masks to cover text or objects.
- Reduce exposure to dim the rest.
- Animate masks to fade in or out.
- Layer masks with fade effects for a highlight.

This keeps your audience focused on what matters most.
9. Adding progress bars to Segment Videos
Progress bars help viewers keep track:
- Insert a shape layer for the bar.
- Set width and color (like red for alerts).
- Animate it with “show right” effect.
- Match the duration to your clip.
It’s perfect for tutorials or countdowns.
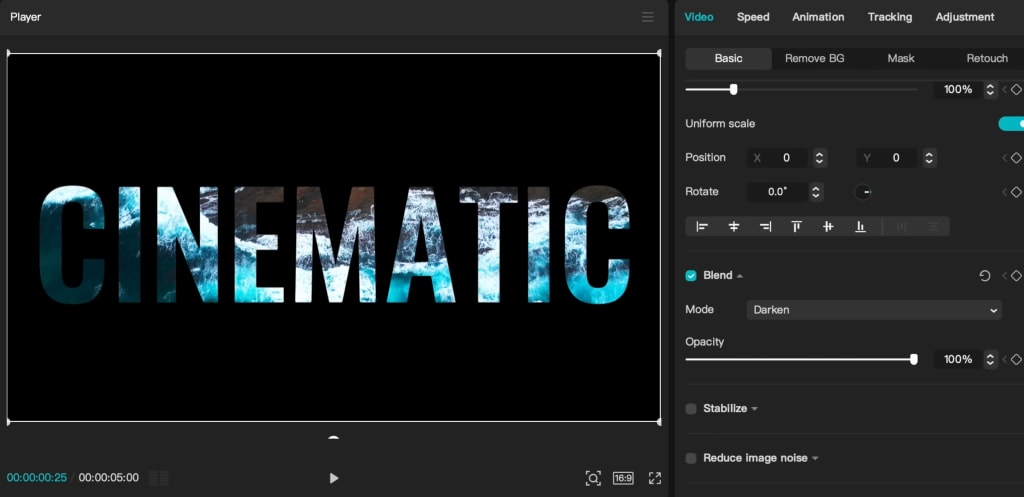
10. Creating Video-in-Text Embedding Effects
Make videos appear inside text for a cinematic look:
- Create a black background layer.
- Use your video as a top layer.
- Change the blending mode to “Darken.”
- Add animated text with the “Concentrate” effect.
This technique produces impressive, high-end visuals in minutes.
11. Voiceovers and Text-to-Speech Integration
CapCut includes a handy tool for narration:
- Paste your text into the “Text-to-Speech” tab.
- Choose a voice that suits your style.
- Generate the speech.
- Sync it with your video for clearer storytelling.
It’s a time-saver and makes your content more engaging.
12. Upscaling and enhancing old Thumbnails
Want crisper thumbnails? Use CapCut’s free image upscaler:
- Upload your low-res image.
- Select 4K resolution.
- Click “Upscale” and wait.
- Your image becomes sharper, perfect for thumbnails and social media.
Clear visuals boost click-through rates.
13. Creating customized thumbnails
CapCut offers free thumbnail templates:
- Access “Cover” and hit “New.”
- Choose from hundreds of templates.
- Customize text, images, and colors.
- Save your design and boost your video clicks.
Quickly make eye-catching thumbnails that match your brand.
14. Leveraging motion effects for still images and text
Add life to static visuals:
- Apply “3D Zoom” or “Parallax” effects.
- Layer images and text for depth.
- Adjust motion strength for a cinematic look.
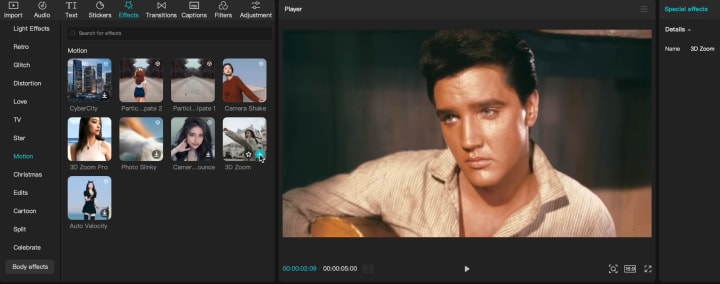
These effects turn boring images into captivating visuals.
15. Final editing tips for Pro-Level Quality
To make your videos stand out:
- Easing curves smooth out animations.
- Sync multiple effects for a unified style.
- Use high-quality export settings.
- Always check your sound and visuals before publishing.
With attention to detail, your videos will look polished and professional.
Read Also: Top 5 Video Editing Software for YouTube Beginners: A Comprehensive Guide
Conclusion
Mastering these 15 CapCut techniques unlocks endless creative options. Whether you want simple effects or cinematic moments, CapCut provides the tools. Practice each one, experiment, and combine effects to produce videos that wow your audience.
You won’t need costly software — just your creativity and CapCut's features. Start today and elevate your content to professional levels.
If you get stuck or don't understand a feature, just drop a message in the CapCut Community—its large and supportive user base is always ready to help you on your video editing journey.
About the Creator
Adithya S
I am passionate about video editing and creating stories. I explore editing techniques and the latest trends in content creation. I love experimenting and sharing tips with fellow creators. Always learning, always editing!
Keep reading
More stories from Adithya S and writers in Photography and other communities.
How to Create Dynamic Light Wave Effects for Viral TikTok Videos
Creating eye-catching videos is easier than ever, especially with the rise of effects like dynamic light waves. This effect adds energy, a futuristic vibe, and makes your videos stand out on platforms like TikTok and Instagram.
By Adithya S10 months ago in Photography
Curious Photography Tips Every Beginner Should Try
Have you ever wondered why two people using the same camera can produce completely different photos? The answer often lies in how well the photographer understands the camera itself. For beginners, cameras can seem filled with confusing buttons, dials, and settings. But what if those settings are actually the key to better photos?
By Craig Spiesman6 days ago in Photography
The Photographer's Code
You decide to visit your local park. You have become a close confidant to the homeless people who gather there most days. While talking to Cleo and Reed, you notice a new face in the crowd. It belongs to a stick-thin, middle-aged woman. She has her hand on her forehead as if taking her temperature.
By Paul Aaron Domenick3 days ago in Photography
A More Human Vocal
When we launched Vocal nearly a decade ago, the world was a very different place. LLMs did not exist, and stories were created one at a time by people sitting down to write, revise, and share something personal. Many of our assumptions about publishing, trust, and participation were built for a world where effort and output were inseparable.
By Justin @ Vocal6 days ago in Resources


Comments (1)
This article is really useful. I've used CapCut before, and it's great how easy it is to navigate. The tip about isolating color with HSL adjustment is cool. I'm curious, have you tried it on a nature video? Would love to see how the colors pop. Also, the text behind subject effect sounds interesting. Can't wait to read more about how to pull that off. Gonna try these out on my next video edit.