
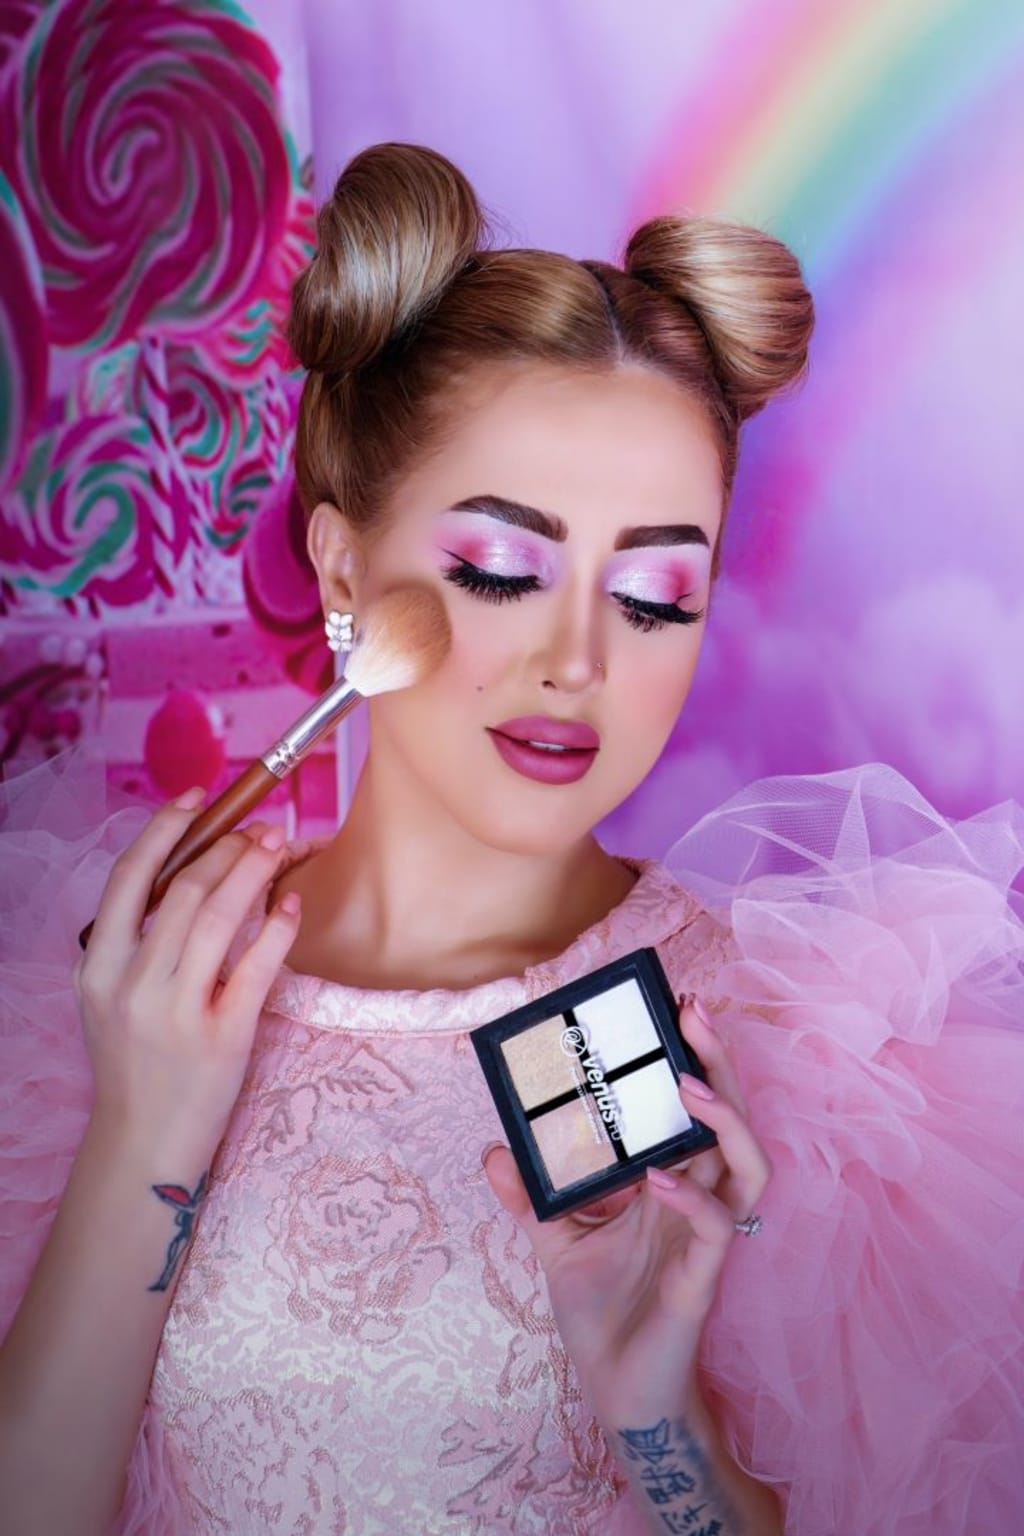
MAKEUP MAKES ME LOOK WORSE
Everyday Makeup for Beginners
Hello everybody, welcome back to my blogg.
My name is Jessica and today's artical is going to be an in-depth beginner's guide to everyday makeup
I know I'm really late to this, but I recently started watching "True Beauty"
and there's this scene where the protagonist tries makeup for the first time
and she shows up to school looking like this
It reminded me a lot of when I first started wearing makeup
and even though I would follow tutorials,
I didn't have the basics down so my brows were too dark,
I didn't know which blush tone suited me,
the application was just not right
So today I wanted to do a comprehensive "Everything You Need to Know" artical
so you can find a flattering everyday makeup look for your face
But first, if you're new to makeup, a really helpful app to have is Flip
Flip is a new beauty app that I'm partnering with today
and they're like the ultimate one-stop beauty shop
You can scroll through Flip to find honest TikTok-style reviews,
discover or stock up on products,
or get makeup inspo and tips from Flip's supportive community
I personally love using flip when I'm considering buying a specific product
Like recently, I really wanted to try the I Dew Care lip oil
So here you can see, it's really easy to search up "I Dew Care" and see the reviews
And every review on Flip is verified by the way
Like, you can see it's a real person reviewing it, so you don't have to worry about fake bots
Another really cool thing is Flip rewards you for just interacting with the app
So you can see up here when I scroll through reviews, the dollar amount is going up
So just by scrolling, shopping, voting, and posting reviews, you can make money and earn rewards
or even get free products at checkout
You can also see I automatically saved $19 for just ordering through the app
and I got my order the next day
Flip has free same-day shipping, easy returns, white glove customer service,
and a rewards program that saves you up to 30% off on every order
Download Flip for free at the link down below,
and let's get into the artical!
If your skin isn't well-moisturized before you start with foundation,
it won't look as smooth, especially if you have dry skin like me
I like to use serum to moisturize my skin right before makeup application
Serums usually leave a tacky base for your makeup
and they're quick-absorbing so you don't have to wait
I actually use this as a replacement for primer
Primers are meant to prep your skin for makeup
and some have specific functions, like skin blurring or pore filling
If you use primer, you have to check whether it's silicone or water-based
and make sure the foundation you use matches that
You can check this by checking the ingredient list and if you see words ending in these
listed in the first few ingredients, then the primer is silicone-based
Otherwise, it's water-based
If you use a water-based primer with a silicone-based foundation or vice versa,
this product separation and pilling will happen
For lip prep, I'm using the I Dew Care Glow Easy Nourishing Vitamin C Lip Oil
This lip oil has raspberry seed oil in it, which is rich in antioxidants
and softens the lips
It darkens to a really pretty berry pink,
which can become a brighter pink if you layer it
I have really dry lips and I've found that this works as a really good lip mask
while I do the rest of my makeup
So I'm going to let this sit like a lip mask while we do our base
Pump foundation onto the back of your hand and swipe it onto your face like this before blending
This ensures you get even coverage over your entire face
Remember to check whether the foundation is water-based or silicone based if you use a primer
and it's also just really good to check before you buy a foundation because water-based foundations
are better for dry skin and silicone-based foundations are better for oily skin
I wouldn't recommend using a brush to blend in your foundation for beginners
because it's really easy to make the mistake of not blending fully and leaving behind brushstrokes
A beauty sponge will perfectly blend everything in
Concealers are thicker, more full-coverage versions of foundation
They're meant to target certain areas of your face that the foundation didn't cover completely,
like dark circles and blemishes
You should use a concealer that's very close in color to your foundation
You could also use a concealer that's lighter than your foundation to brighten some areas of your face,
but don't use those for blemishes since they'll create a spotlight effect around the blemish
Because concealer is thicker, you want to use very little
If you use too much, it'll emphasize texture and cause creasing
Powder has a blurring effect and prevents the liquid base from transferring
so nothing smudges under your hands when you touch your face
Once you set your face with powder, the liquid products won't move,
so make sure to blend out any creasing beforehand
Dip a brush into the powder and sweep it back and forth against the holes in the packaging
to ensure there are no clumps
See how the evenly coated brush softly blurs the foundation?
Versus the clumpy powder, which leaves behind patches?
Pat it in and swipe it under the eyes
This is the best way to get smooth under-eyes if you deal with a lot of creasing
And then set any areas that get oily or would come into contact with something else
so you don't leave a stamp of foundation on anything
Next for contour, you want to make sure that you're using a shade that looks cool-toned on you
A lot of beginners will mistakenly use a bronzer as a contour shade
Unless you have really, really warm undertones,
you're going to want to use something more cool-toned so it looks more like a realistic shadow
'cause shadows in real life, they don't usually look like brownish red
So in the past, I would make the mistake of doing a 3 shape here,
which is just the standard that everybody knew
Like, that's what was taught by all the makeup artists,
but you want your contour to enhance your natural features
Don't follow what other people are doing to contour their face
Everybody's face shape is different and what looks good on other people might not look good on you
This step is going to look different for everybody,
but for beginners, I don't think you can go wrong with just a simple jawline contour
Blush can be used to add color back into your face and it also contours your face, depending on placement
So in the beginning, you saw me apply it here, right?
And this is where people used to tell you to apply it,
but you can see if you apply it here, it can really drag your face down
It's not very flattering, in my opinion
What I do now is I apply it right on top of my cheekbones
When I first started with makeup, I didn't think blush was an essential,
but now it's a part of my routine that I cannot skip
It makes a huge difference–you can see after we added the shadows here,
you look like a little bit dead, right?
There's like, not really much color going on in your face because of the cool tones
so adding some color back into here,
it helps create a sort of a transition into the cool tones; the shadows
And then you can apply a little bit of blush to the tip of your nose
The type of brush you use to contour your nose is actually very important
The brush should be dense, small, and have a flat side like this
I'm going to start from my brow bone
and then you can start blending it down a little bit
and then I'm going to move on to the tip of the nose
Next, I'm taking my sponge and blending it in
And then I'm going to take the Charlotte Tilbury finishing powder
This has a little bit of pigment to it,
so I like to use it to clean up the sides of my nose contour
Finally, the most important step of nose contour is actually the highlighting part
Use a small precision brush to apply highlighter to the very tip of your nose
If you apply highlighter all over the tip of your nose, it's going to make it look shiny,
but it won't contour it
So what you need is you need to apply it using a very small brush
You can lightly diffuse it; just make sure that the very center of it is the brightest
And then sometimes, I also like using it on the bridge of my nose
The three main types of eyeliners are brush tip, felt tip, and pencil
Brush tip is best used for sharp, precise lines, but it isn't as pigmented as felt tip
Felt tip is great for high pigment and thick lines,
and pencil is the best for smooth lines
I would recommend beginners use brown pencil liner over black eyeliner
The reason being, this is a lot easier to clean up if you make mistakes than black eyeliner
Here's a comparison between cleaning up black and brown eyeliner
If you make a mistake with black eyeliner, it'll smudge and smear,
which will mess up your foundation
Brown pencil is just a lot easier to use and is very suitable for everyday makeup
since it's just a little bit softer
So if you're not familiar with eyeliner, just create a very thin line here
For an everyday look, I also like to blend out my eyeliner with a brown eyeshadow
Then take a very small brush
Doing this makes the liner look cleaner while covering up any mistakes
Do you see how easy it was to do winged liner?
It's very intimidating when you think about it with black eyeliner or with just one product,
but already with just the pencil and eyeshadow combined,
you can see it creates a really nice shape
So at this point, you can use a liquid liner to make it sharper if you'd like
And then, this next step is very important
and as a beginner, you think it doesn't really make a difference,
but it actually makes a huge difference
And that's lining your lash line
You can see how, between my liner and my pupil, there's a little gap
We need to fill that in
So for the lash line, I use a felt tip liquid liner
I recommend using a felt tip liner here because felt tip doesn't have tiny little hairs
or brushes that can poke, or maybe like, irritate your eyes going back and forth
And then take your pencil liner and line the waterline
And then some people might not like winged liner for every day, or you might not like it for your eye shape
In that case, you could just do the regular diffused liner and then not create the sharp line
We're going to do the under-eye makeup now
I'm just adding some shadows to the lower lash line
and then using a brown eyeshadow,
I'm going to emphasize the outer corner
And then let's do the little under-eye fat look
Under-eye makeup is popular in East Asia
and uses contour and highlighter to imitate the look of smiling eyes
It's usually referred to as aegyo sal and emphasizes the area around your eyes, which gives a subtle eye-enlarging look
But a really common mistake people make when drawing their aegyo sal is they use the bottom of their eye socket as a guideline
This looks really unnatural because it's not where the shadows naturally fall when you smile
If I squint slightly, this is the entire under-eye fat area
We can see where the area sticks out the most
That's the area where the under-eye fat is the chunkiest,
so when the light hits it, everything above it should be highlighted and everything underneath it should be a shadow
This is what the aegyo sal looks like if we follow that guideline
But now, let's go back to the outline
The most common mistake is people use the bottom of the entire section of eye fat as a guide,
highlight and shadow in the bottom, [and] it'll look like this
Of course, this is all based on personal preference,
but I find this less flattering and I think it imitates eye bags rather than smiling eyes
I'll show you what they look like back-to-back so you can compare
Next let's curl our lashes
Curling your lashes opens up your eyes since it makes your lashes point up
When you curl your lashes, it's not like you just clamp it and then you're done
Clamp once, release, and then sort of lifting it, curl the next section
Again, release and then curl the top section
This creates a natural C curl shape
and then this step is optional, but I like to curl my lower lashes as well
How you do this is you take the lash curler,
hook it underneath your eye,
and then move it up
And once it gets to the bottom of your lashes and you can see that it'll lodge in between them,
that's when you clamp down
A mistake I used to make is I used mascaras that wouldn't work for me
and I just thought, like, "Oh, it's just supposed to coat my lashes",
so my lashes would always look heavy; they would never hold a curl
So now what I do is, I only use Asian mascaras which are made to hold a curl for really straight stubborn lashes
These are my two favorite Asian mascaras
Both are made to hold a curl, but the CLIO Kill Lash Long Curling is lighter,
while the Etude House Lash Perm Curl Fix is thicker and more volumizing
Pinching the lashes together helps separate them and remove clumps
My favorite lower lash mascara is the L'Oreal Telescopic Carbon Black Mascara
This mascara's heavy and really good at separating your lashes
We actually want the lower lash mascara to be heavy so it can weigh down the lashes and make them look longer
Now for eyebrows, I've actually struggled a lot with my eyebrows in the past
I had a dipbrow phase, and then even when I started using brow pencils,
I made the mistake of doing a line here, a line here, and then just trying to spoolie it through
If you do that, your brows are going to look very unnatural
So what I do now is I use a very fine-tipped brow pencil,
and then just create hair-like strokes at the front
And then use the spoolie end to diffuse them slightly
I leave the middle of my brows alone
It's all about knowing where you actually need the pencil
So here, I feel like my brows look pretty thick,
so I'll just go to the tail end and then create the shape
Using the spoolie just diffuses everything, so it doesn't look like there are any harsh lines
so you can see now, it just looks like a very natural brow shape
Finally, let's move on to lips
I'm just going to over line my cupids bow
In the past, I made the mistake of overlining all of my lips
Personally for me, I think it looks almost clownish when I do that
A lot of people have said that overlining makes them look like they have a mustache,
and that's the issue, is you're overlining your entire top lip
You need to be selective with where you're overlining
and then I bring it back to my natural lip edge,
swipe it up at the end
There are many types of lipstick formulas, and each have their own benefits, so everyone has their own personal preference
I prefer soft matte liquid lipsticks since they blur your lips,
but the con is they don't last very long
Not all nude lipsticks are going to look good on you
There are some that are too warm-toned, some that are too cool-toned, and
what you see that looks really good on somebody else might look very different on you
so you want to choose something that matches your skin tone and undertones
I'll show you a few lip swatches of different nude lipsticks on my skin tone
So this is my perfect nude
It just looks like a good everyday lip color
Make sure to blend out the edges of your lips slightly
This helps with the soft blurred lip look and it helps mask any application mistakes or uneven lining
About the Creator
Keep reading
More stories from muhmmad yaqoob and writers in Motivation and other communities.
One Hard Thing
Stop me if you’ve heard this one before: You have the number, you know your schedule- you’ve even picked out the perfect day and time to make this appointment. Shoot, you’ve even picked out alternative days and times just in case their schedules can’t accommodate you!
By Taylor Rigsby4 days ago in Motivation


Comments (1)
I am definitely excited to try that lip oil and that app!