
Under Ten Project Series: DIY Marbled Mugs
Marbled Mugs

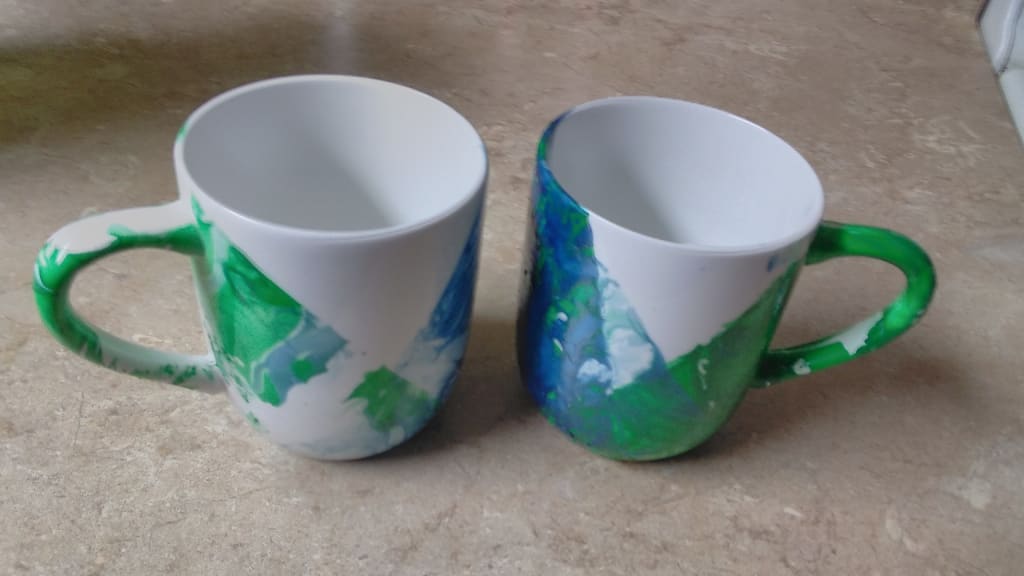
This is the second in my series of cheap DIY projects that are easy and so much fun for under $10. These marbled mugs are beautiful and remind me of the glazes that I used in my college ceramics class. The marbling effect is unique and one of a kind. No two mugs will ever be exactly the same. Once again I will tell you that I got all of these supplies at my local Walmart because of the wonderfully cheap prices contained there.
Shopping list:
- Ceramic Mugs (I grabbed 4 because they are so fun to make you wont want just one.) 88 cents/ mug.
- Nail polish (Wet N Wild is cheap and works just fine.) 98 cents/ bottle. You might even have nail polish lying around. If you do feel free to save some money and use it.
You will also need: A container you do not care about so much. The remnants of the nail polish are really hard to wash off. I learned this the hard way as the nail polish will not wash off the inside of my container. I used a Cool Whip tub that was empty and clean. I did not have to purchase this.
Step one: Fill your container with lukewarm water. Cold water does not work as well because the nail polish gets really clumpy instead of flowing nicely through the water and hot water makes it hard to hold your hand in for the needed amount of time.
Step two: Open nail polish and slowly pour some into the water. It will float on the top. You may choose to use one color or two or seven if you want. I'm not here to boss you around, only to advise on technique. I had fun mixing blue and green but you are welcome to use whatever colors your heart may desire. Blue and green turned out really nicely together. I think it would be fun to use your knowledge of the color wheel and do complimentary colors or opposing colors. Maybe make a purple and yellow mug for shock value!
Step three: Dip mug into the paint water mixture and hold for 10 - 15 seconds. I chose to dip the mug at a slant first one way and then the other so that it formed a triangle like pattern leaving one triangle in the middle with no nail polish because who wants to lick nail polish by accident. NO THANK YOU. The triangular shape allows the perfect area for your lip to meet the cup unperturbed.
Step four: Bring mug out of water and set on a paper plate or a paper towel to dry. It will want to stick to whatever it comes in contact with because the nail polish is still wet. Do not set directly on your counter tops or you are going to make a mess.
Step Five: Let mugs set for 24 hours before using and hand wash only when dirty. They don't really need 24 hours to dry but this allows the nail polish smell to dissipate before you pour your favorite drink inside.
Repeat and enjoy the results.
Expert mode: Before step three take some Washi tape (1$/roll) and craft a stencil to make a letter that doesn't get nail polish on it. These mugs can be personalized to your heart's content. Make it say your whole name on the side if you want it to. It's yours after all.
Depending on how many you wish to make, you could do this project for as low as $2 for one mug anywhere up to 4 mugs for $10 including the Washi tape to make the letters. I would love to hear what colors you choose to marble your mugs with or if you have tried marbling on something other than mugs, say plates or bowls. If you try the seven different colors please post a pic, I would love to see it in action. Happy dipping!
About the Creator
Hannah Lorrelle
I am a writer who is still trying to find her way in this great wide world. I strive to write stories that touch people's lives in some small way.
Keep reading
More stories from Hannah Lorrelle and writers in Lifehack and other communities.
Under Ten Project Series
As with my cheap meal series, I also like to make crafts, but I am sometimes short on cash. So this series includes some projects that are lots of fun and are cheap to make. Again I found all of these things at my local Walmart because I am a savvy shopper who enjoys a bargain.
By Hannah Lorrelle8 years ago in Lifehack
Bullies Suck
We’ve all had to deal with bullies. The problem is when the bullies become a problem at work. You need to figure out ways to deal with the problem, and to do so in such a way that the problem is dealt with permanently. No one deserves to be humiliated where they work or play, and if someone makes you feel like you are worth less than nothing then they need to be dealt with, preferably by the book. Hopefully, you’ll find a way to deal with your bully that removes them from the situation.
By Jamais Jochim3 days ago in Lifehack


Comments
There are no comments for this story
Be the first to respond and start the conversation.