
Tying Up Loose Ends
A Beginner's Beginner's Guide to Macramé


I just redid my room. I painted the walls and changed the curtains. I was very satisfied at first, but as I was sitting on my bed one morning, watching the sunlight peak through the window, I looked over at the many plants encumbering my shelfs and I cringed. The décor in my room was off; it was missing something. I opened my computer and searched ‘’Macramé plant hanger’’. Instead of finding online stores to purchase macramé, the result pages overflowed with DIY how-tos and tutorials. I was working two jobs and thought I didn’t have the time to start a craft project. The plant hanger would most probably not be done before weeks, and because I am very impatient, I was in a hurry. So, I sighed and searched ‘’Macramé plant hanger for sale’’ and found out that the prices ranged between 10 and 70$. After browsing for a while, I realized that the most fitting pieces, the most beautiful and perfect ones were of course on the higher side of that range. But since I was paid minimum wage, I had a tight budget.
Defeated, I went back to my original search, and clicked on the first tutorial video. Then I watched a second one, then a third. Halfway through the fourth macramé tutorial I watched that morning I was convinced. I actually could do this. It seemed easy enough and all I needed was rope, hooks, a measuring tape, and a pair of scissors, and I already owned three out of four. I was hyped, I was ready, but if I was going to do this, I had to respect my very low budget of 10$. Which honestly did not seem impossible.
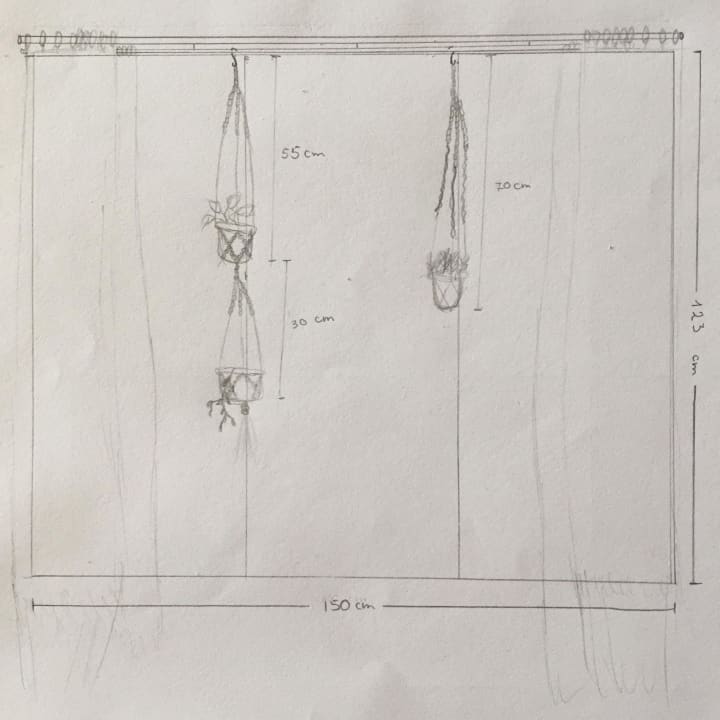
I went to the dollar store the next day and bought 27 meters of jute rope for 3.45$. When I got back home, I measured my window and drew up my plans, realizing that the smart thing would have been to do that before going to the store. I was going to hang three plants in font of my window. I wanted a longer two-tier hanger and a shorter single hanger to have an asymmetrical style.
I went back online, looking at all the different types of knot, gathering inspiration. The square knot and its variations seemed to be the go-to for (beginner) macramé plant hangers. The square knot is a four-strand knot alternating left and right. To tie it, bring the far-left cord over the two middle cords and under the far-right cord, and the far-right cord under the middle cords and over the far-left cord, and pull to fasten. Then, bring the far-right cord over the middle cords and the far-left under, and pull again to tie. The alternating square knot is a square knot spread on eight strands and the spiral knot is a half square knot.

At this point I had a pretty good idea of what I wanted. The hangers would have three strands, each knotted from four cords. For the two-tier hanger, I would tie twenty square knots, leave a space and tie alternating square knots around where the pot would sit. For the single one, I would start with twenty square knots and carry on with spiral knots until I get to the right length: just between the two pots of the tiered hanger.
I gathered my tools and was ready to start. I stared at the rope unknowingly. How much rope would I need for a 70 cm macramé? How much do you lose in length when tying square knots, or spiral knots or alternating square knots? I figured I would just forget about the plan, cut an arbitrary length, and just go from there. I would start with the single plant hanger and figure out how much rope I would need for the two-tier hanger based on that, a very scientific approach.

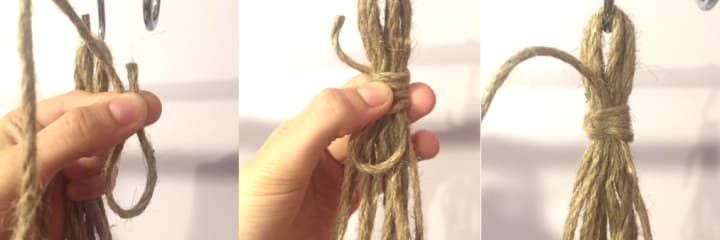
I cut my rope into six strands of about 200 cm and I inserted a hook at half length. I tied them together at the base with a gathering knot. This knot is made by taking a separate piece of string, making a U shape with it and wrap the rest of the string around it.
I began tying 10 squares knots and 15 spiral knots to make the first strand. Turns out, you lose a lot of length on the outer cords when tying, ending up with two shorter cords and two longer cords. At this point, I wasn't sure what to do. I had completely used my outer cords and so I tied them up and kept only the longer inner cords. I repeated this procedure for the other two strands. I then tied the left cord of each strand with the right strand of the one next to it. I finished up by tying a gathering knot and cutting off the excess fringe.
I was happy with it, I think. My conclusions from this first macramé were that:
- I was way off in determining the length of cord;
- jute rope has a more rustic and less clean finish.
I wasn't sure how I felt about the last conclusion. But, I still had 6.55$ in my budget so I went to the dollar store and bought another 13 meters of jute rope and carried on with the two-tier hanger.
I cut six 4 meters long strands and began the same way as for the previous macramé, with a gathering knot and a series of square knots. I tied them a lot tighter and saw that it made quite the difference. The finish was a lot cleaner and the knots more regular.

I left a few inches of loose cords and tied the strands together with square knots. I tied it off with a gathering knot and began tying a series of spiraling knots for the second tier of that hanger. I finished the same way I did for the first tier and cut off all excess strings, and fringe. I had a few strands of rope left, so I gave the single hanger another try. I did a series of square knots, followed by spiral knots.

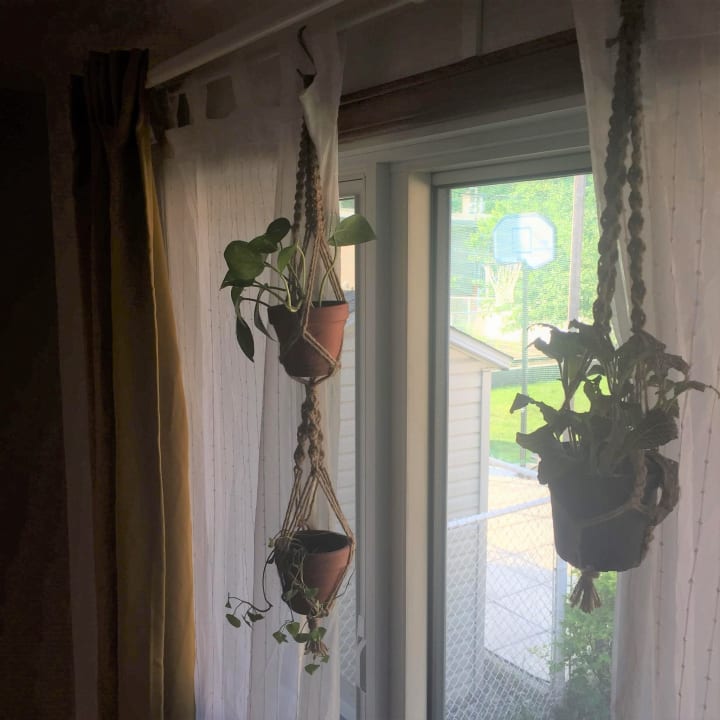
I was sitting on my bed that afternoon, watching the rays of sun peak through the window, bathing my plants in light. I sighed and smiled. I am satisfied.
About the Creator
Absolutely 100% Free Stuff With No Shipping Costs
In a world where everything seems to come with a price tag—including “free” offers that sneak in unexpected shipping fees—it can feel impossible to get truly free items. But with the right strategies, resources, and platforms, it is completely possible to score legitimate, 100% free stuff with no shipping costs or hidden charges. Whether you're looking to save money, reduce waste, or simply love the thrill of discovering freebies, this guide will walk you through the best ways to find authentic no-cost items online and in your local community.
By Master Binzabout 7 hours ago in Lifehack
A Dart at Dusk
Seconds ago, the sullen sun set on the two of us… my exuberant furry companion and me. A fresh breeze embraces us, delivering welcome relief from the day’s oppressive heat. His typical stumbling and staggering along — apace with a sloth — has turned into trip-trapping, high-stepping, almost skipping along.
By Angie the Archivist 📚🪶about 10 hours ago in Petlife


Comments
There are no comments for this story
Be the first to respond and start the conversation.