
Tankless Hot Water Heater Installation: A Step-by-Step Guide
Parzival Plumbing

Introduction
A tankless hot water heater, or on-demand water heater, is an energy-efficient, non-conventional water heater that allows you to receive hot water without the bulk of a traditional storage tank water heater & its standby heat loss. If you're thinking of installing a tankless water heater, it's important to understand the installation process before you start to ensure that you are safe & the water heater is as efficient and reliable as possible for the long haul.
Here is a step-by-step installation for installing a tankless water heater:
Step 1: Choose a Unit
Before beginning the installation process, you must evaluate the hot water needs of your home. When choosing a tankless water heater, consider:
- Flow rate (GPM): Estimate how many fixtures you will run simultaneously.
- Fuel Type: Choose between electric, natural gas, or propane based on availability & budget.
- Size and efficiency: You must choose a suitable size tankless hot water heater that meets your demand to achieve optimal performance.
Step 2: Turning Off Utilities
Always keep safety in mind. Turn off the:
• Electricity (for electric units)
• Gas supply (for gas units)
• Main waterline
Shutting off the utilities will help you avoid accidental mishaps & provide you with a safer workplace.
Step 3: Remove Existing Water Heater (in the case of replacement).
Drain the tank, disconnect the water lines, gasline, and power supply. Carefully remove the old unit & recycle it following the local ordinance.
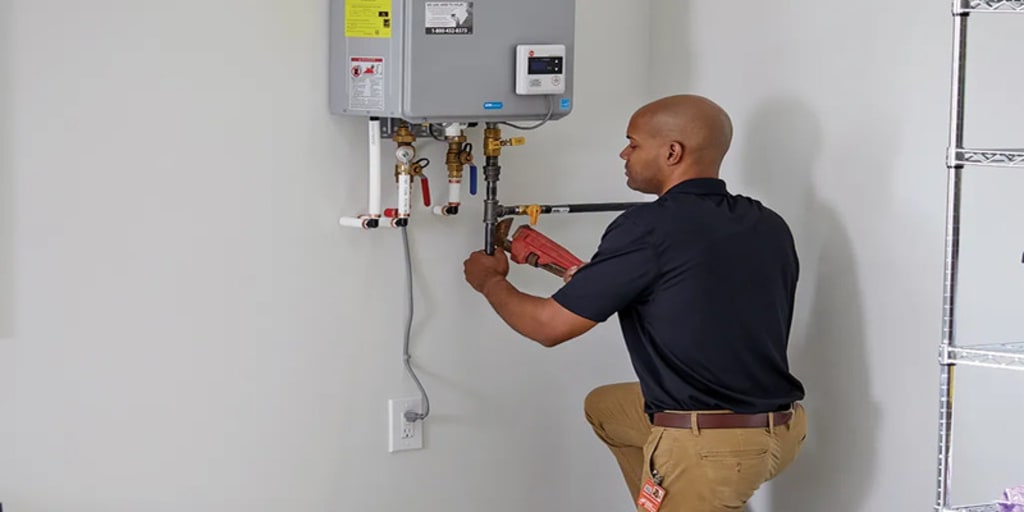
Step 4: Mount New Heater.
Install the unit in a ventilated space (especially for gas types). Mount the tankless unit securely on a wall bracket. Use the brackets provided by the manufacturer & ensure the unit is level. Choose a location that is close to your breaker panel for electric heaters.
Step 5: Connect Water Lines.
Install the cold & hot water lines to the unit, following the manufacturer's drawings to verify that the correct fittings are installed. Most models require having:
• Shut-off valve on both lines
• Pressure relief valve (appliance standard for most installations)
• Flush valve for servicing
Make all connections with Teflon tape and tighten fittings snug to prevent leaks.
Step 6: Install Venting (Gas Models Only).
Gas tankless water heaters require venting to exhaust the combustion gases. Install as follows:
• Install vent piping by following the specifications in the manufacturer's instructions
• Have a vent system that exhausts directly outdoors & in a minimum length of piping or elbows
• Seal all joints & the penetrations in the exterior wall
Proper venting is there to minimize carbon monoxide hazards.
Step 7: Wiring Electric or hooking up an electrical supply
Electric units require a dedicated circuit breaker. Gas units may still have electrical connections for ignition & digital controls. Follow local codes for the wiring, or hire an electrician if necessary.
Step 8: Turn on the Water Supply
Open the cold water supply slowly & check for leaks. Open a hot water tap to get air out of the system and to help pressurize the system.
Step 9: Turn the Unit on and Test
Restore the electricity or gas. Turn on the unit & look at the display panel (if there is one). Set the temperature you want the unit to run at (a residential unit typically runs at 120°F or 49°C). Run hot water to test the performance & make sure the heater activates properly.

Step 10: Final Inspection & Maintenance Tips
• After testing the unit, check for any gas or water leaks.
• Check for unusual sounds.
• Familiarize yourself with the error codes, maintenance reminders, & so forth in the owner's manual.
Maintenance Tip: Flush the system once a year to minimize mineral buildup & prolong the life of the heater.
Conclusion
Converting to a tankless hot water heater can be a smart choice that saves you energy in your home. While this article was just intended to be a general overview, it is ultimately wise to refer to the manufacturer’s guide, & if you are in doubt about any part of the process, consult a licensed professional. In addition to the safety it will provide you, proper installation will maximize efficiency & performance for years to come!
About the Creator
Parzival Plumbing
Parzival Plumbing is a very well organized, responsive company providing excellent customer service. Our plumber was Nick, who was very professional, and friendly. https://parzivalplumbing.com/
Keep reading
More stories from Parzival Plumbing and writers in Lifehack and other communities.
Easy Step-by-Step Guide to Clean Your Toilet Tank
Introduction Keeping your toilet clean is essential for maintaining a healthy and hygienic bathroom. While most people regularly clean the toilet bowl, the tank often gets overlooked. However, over time, the toilet tank can accumulate mineral deposits, rust, mold, and bacteria, which can affect the performance and longevity of your toilet. This buildup not only reduces efficiency but can also lead to recurring stains in the bowl and even unpleasant smells in your bathroom. The good news is, cleaning your toilet tank is a simple task that requires minimal tools and just a little time. It’s an easy DIY job that can make a noticeable difference. Here's a straightforward step-by-step guide to help you do it right.
By Parzival Plumbing8 months ago in Journal
Top 10 Questions to Ask Every Perth NDIS Service Before You Engage Them
Choosing the right National Disability Insurance Scheme (NDIS) provider shapes the quality of care, independence, and outcomes a participant experiences. In Perth, families and participants face a growing number of service options, which makes informed decision-making essential.
By Anshul Vijay3 days ago in Lifehack


Comments
There are no comments for this story
Be the first to respond and start the conversation.