
How to Do Nail Extensions Like a Pro?
Master doing nail extensions with NailConceptsDubai. Learn step-by-step on how to do acrylic, gel, and Polygel nails for salon-quality finish at home.
Nail extensions have transformed the beauty and self-care scene. For women who want length, endurance, and neat look that lasts for weeks, extensions are a remarkable confidence-builder. Whether it is to prepare for the sake of an event, as a foundation for nail art, or even because of long nails wanting elegance, extensions provide that spotless, corporate sheen. With being in Dubai where fashion is so closely related to speed, women here sometimes require beauty solutions that are both quick as well as flashy.
This is where NailConceptsDubai steps in—to provide salon-quality nails anywhere, anytime. If you're searching for the best nail salon in Dubai options but prefer the convenience of home, this guide is for you. This isn't just a tutorial on how to place fake nails; it's about becoming a pro at applying top-quality nail extensions with confidence and safety. With the right techniques, tools, and knowledge, you'll avoid lifting and breaking, and enjoy fabulous nails for weeks.
Step 1: Know Your Extension Type – Choose What's BEST for YOU
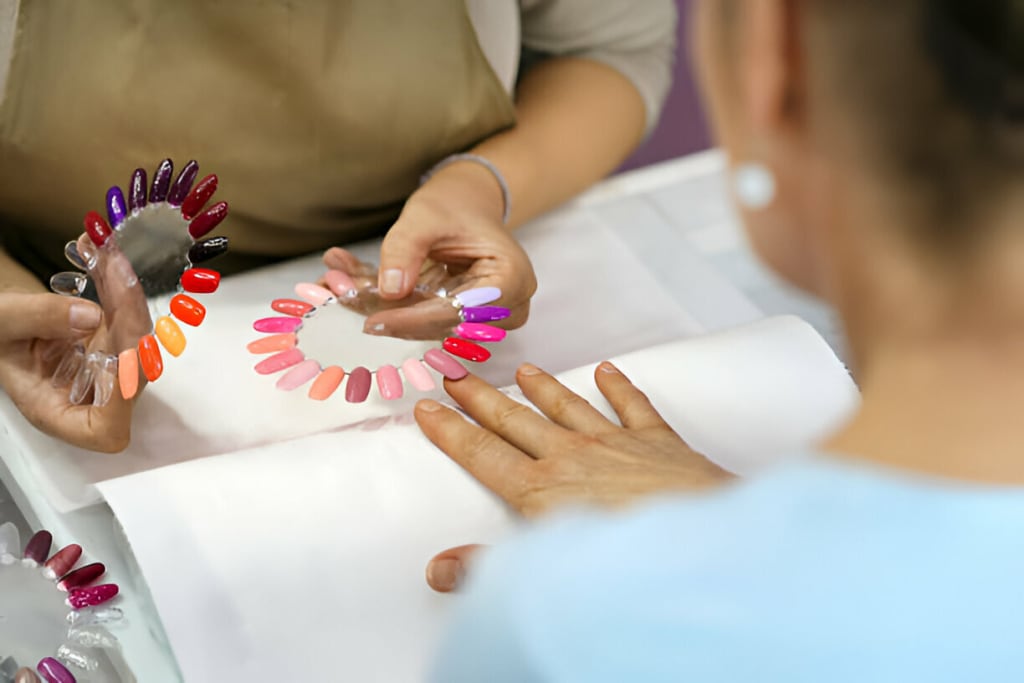
A good thing to keep in mind before you begin is which one will work best for your lifestyle, the health of your nails, and how skilled you want to get. There are three broad categories:
Acrylic, gel, and Polygel.
Acrylic tips are long-lasting and ideal for those needing full shapes and durability. Gel extensions offer a pliable, natural look and require UV/LED curing. Polygel combines the best of both worlds and is perfect for beginners. NailConceptsDubai sells kits for all types, giving you a nail salon Dubai experience right at home.
Polygel, being a blend of the two, is perfect for beginners and a pleasure to work with in a thick flexible form. It will not cure until it has been cured, so you can shape. NailConceptsDubai sell kits and products for all three, so make your requirements clear. If in doubt, use the Polygel—it is most forgiving but ideal to use at home and looks very professional.
Step 2: Preparing the Natural Nail – The Secret to a Long-Lasting Set
Proper prep is the foundation of lasting extensions. Start by sanitizing your hands and tools, push back cuticles, trim and shape nails, buff lightly, clean with alcohol or dehydrator, and finally apply a primer. NailConceptsDubai primers are climate-adapted for nail salon Dubai conditions—ideal for humidity and heat
Trim and shape your natural nails to a well-balanced foundation point. Buff lightly over the nail surface using a soft file, which removes natural oils and creates a slight bump on the surface for the extension product to bond to. Be careful not to over-file, as this will thin your nail plate and do long-term damage.
Clean the nails off with alcohol or a dehydrator to get rid of oils or dust. Finally, apply a nail primer or pH bonder to promote better adhesion. NailConceptsDubai’s primers are specifically formulated for Dubai’s climate, preventing lifting even in humidity and heat.
Step 3: Attaching the Nail Extensions – Acrylic, Gel, & Polygel Methods
Each extension type has its unique application method. For acrylic extensions, select tips that are the same size as your nails. Adhere to your natural nails and trim to desired length. Blend the tip into your nail using a buffer. Blend your acrylic bead (liquid + powder), then apply from cuticle to tip in small sections.
Let dry and then file to shape. For gel extensions, start with a base coat and cure it. Apply builder gel to nail forms or tips in thin coats, curing between coats. Use a brush to control the product and achieve the desired length and shape. Polygel is the same: squeeze product into a two form, slip solution and brush to shape it, and cure.
Remove the form, file, and top coat. NailConceptsDubai kits come with detailed instructions and tools for each system so even beginners can achieve pro-level nails from home.
Step 4: Aftercare & Finishing Touches – Getting Your Extensions to Last
Proper aftercare is necessary after a successful application of nail extensions in order to achieve longer lasting extensions and your own nails staying healthy underneath. Don't soak hands in warm water or moisturize for at least one hour after application since it breaks down the bond.
Apply cuticle oil daily to soften the surrounding skin and promote healthy growth. Do not use your nails as tools—no scratching or prying. When filing or reshaping, always work with a soft buffer so that you do not wear away the topcoat.
If you have had nail art done, remember to topcoat so that it will not peel or fade. For the clients in Dubai's hot, humid climate, applying light hand creams and refetting topcoat every few days will keep shine and strength. NailConceptsDubai aftercare kits contain oils, topcoats, and strengthening serums that are specifically designed to look after nail extensions wear, providing you with wear that will last and needs minimal maintenance.
Step 5: What Not to Do – Most Common Errors and How to Avoid Them
Even the finest products can be a failure if used incorrectly. One of the most frequent mistakes is over-filing the natural nail, causing it to become weak and tender to apply. Buff lightly at all times. Yet another common error is not using the primer or putting on too much glue, both of which may lead to lifting after a short time.
There are also some customers who improperly cure gel or Polygel—either under-curing, in which case the product remains too soft, or over-curing, which produces brittleness. Having product too near to the skin is yet another mistake. It induces lifting and traps moisture, which creates the possibility of fungal infection.
Always leave a little room between your cuticle and the product. Finally, not finishing off the edge leaves water and dirt with an entrance, causing your nails to break or lift. With NailConceptsDubai video tutorials and simple kits, it's easy to avoid these common mistakes, giving you flawless, long-lasting results with every use.
Step 6: Safe Removal Without Damaging Natural Nails
Removing extensions improperly can undo all your hard work and ruin your natural nails. The most secure way to take off acrylic is soaking in acetone for 25–30 minutes. Start by filing away the surface layer to allow acetone penetration.
Wrap every nail with a cotton ball soaked in acetone and foil. Following soaking, push away the product gently with an orange stick—never push. For gel and Polygel, buff off bulk with an e-file or coarse buffer. Then use acetone wraps or a steam remover to take off the remainder. End with a light buff and oil.
Never pull, pry, or peel off your extensions, as this removes the top layers of your natural nails. NailConceptsDubai offers acetone-safe removal kits and post-removal care sets including nail strengtheners and hydration oils to restore your nails to their natural glory without compromise.
Conclusion: Now You’re Ready for Flawless Nails—Anytime, Anywhere
Using nail extensions can be daunting at first, but with the proper products, steps, and attitude, anyone can learn it. Whether you are a beginner applying Polygel for the first time or a pro attaining acrylic mastery, both techniques are distinct and effective in their own way. The key is precise nail preparation, correct material application, and dedication to performing correct aftercare. Hiccup moments might occur, but with NailConceptsDubai selected extension kits, professional skill, and assistance, you're never alone.".
About the Creator
Keep reading
More stories from George leo and writers in Lifehack and other communities.
Impact of SEO on E-Commerce Websites in UAE
The UAE e-commerce environment is growing steadily, with increasing technological advancement and changing consumer behaviors. With businesses increasingly going online, the fight for consumer attention has become highly competitive, so effective digital marketing strategies are very important to business success. In this regard, Search Engine Optimization (SEO) is a prime strategy that can improve website visibility and attract the right traffic for sales and growth.
By George leo9 months ago in Lifehack
Interested in Being a Barista? Here’s What to Expect Your First Month
Working in a café becomes an easy and enjoyable job once you learn the basics. At first, everything can feel overwhelming, but after making drinks consistently for about a month, most of it turns into muscle memory. Your hands start moving before you think about it. It slowly becomes automatic, and confidence builds faster than you expect.
By Jakayla Toneya day ago in Lifehack
How Baltimore’s Urban Layout Shapes Daily Life and Personal Organization
Baltimore, Maryland, is a city where daily life is strongly influenced by its physical layout. Streets, neighborhoods, and transportation routes play a central role in how residents organize their time, move through the city, and manage everyday responsibilities. Understanding this structure helps explain why planning and adaptability are essential parts of living comfortably in Baltimore.
By House Doctor4 days ago in Lifehack


Comments
There are no comments for this story
Be the first to respond and start the conversation.