
How to Export Office 365 Mailbox to PST Using eDiscovery?
Step by Step Guide to Export Office 365 Mailbox to PST with eDiscovery
If you’re working in an organization that relies on Office 365, you might know the email data, mailbox size, and its importance. For various reasons, you might need to export Office 365 mailbox to PST file, but the manual way can be complex and time-consuming.
However, the eDiscovery Export tool in Office 365 simplifies the process and allows you to search and export email data directly into PST files. It has an easy-to-use interface that makes the compliance and document review process easier.
But how can you export Office 365 mailbox to PST using eDiscovery? In this guide, you’ll get the step-by-step procedure to export Office 365 to PST effectively.
Common Reasons to Export Office 365 Mailbox to PST Using eDiscovery
There are many reasons that may compel you to export Office 365 mailbox to PST using eDiscovery. Some common ones are:
- When you need to provide email records if your organization gets involved in litigation, exporting email in PST is helpful.
- If you’re migrating from Office 365 to another email platform, then exporting mailboxes into PST files is a necessary way of data transfer.
- Regular mailbox exports can work as a backup to prevent data loss or for long-term archiving purposes.
- The eDiscovery makes sure that the exported data is secure and compliant with the organization's privacy policies.
Export Office 365 Mailbox to PST Using eDiscovery | Steps-by-Step Process
Follow these series of steps below to export Office 365 mailbox to PST using eDiscovery effectively:
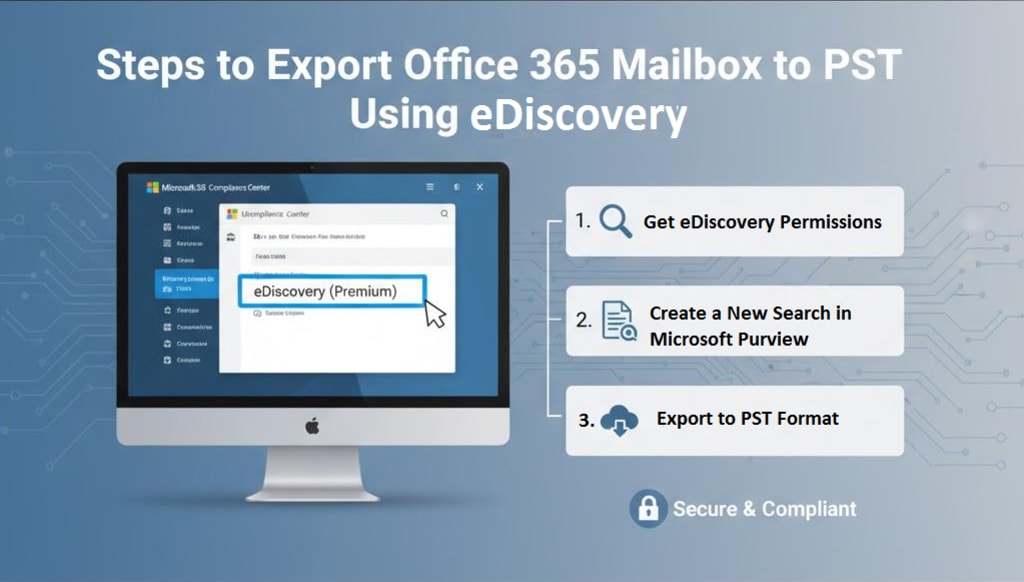
Step 1. Get eDiscovery Permissions
Before using eDiscovery, make sure that you have the necessary permissions. You’ll need to be assigned the Compliance Administrator or eDiscovery Manager role in the Microsoft 365 compliance center. Here's how:
- Log in Microsoft 365 and go to the Compliance Center.
- Tap on Permissions and select eDiscovery Manager.
- Assign yourself or other users the eDiscovery Manager role.
Step 2. Create a New Search in Microsoft Purview
When you have all the necessary permissions, follow the steps below to create a new Search in Microsoft Purview:
- Log in to the Microsoft Purview Compliance Portal and go to Content search.
- Click on the Search tab and tap on the + option.
- Enter the Name and Description for the search. Click Next.
- Specify the Location you want to search. Click Next.
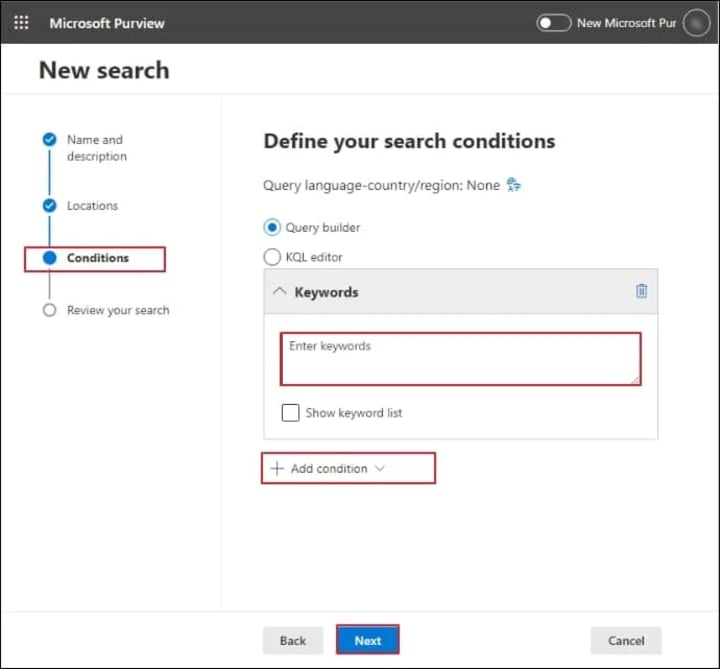
- In the Conditions section, apply filters only for a specific search. Click Next. (Note: If you want to export the entire mailbox, skip this step.)
6. Review all your settings within the Review your Search section. Tap on Submit.
Step 3. Export Search Results to PST Format
After a successful search, follow the steps given below and get all your required Office 365 emails in PST format:
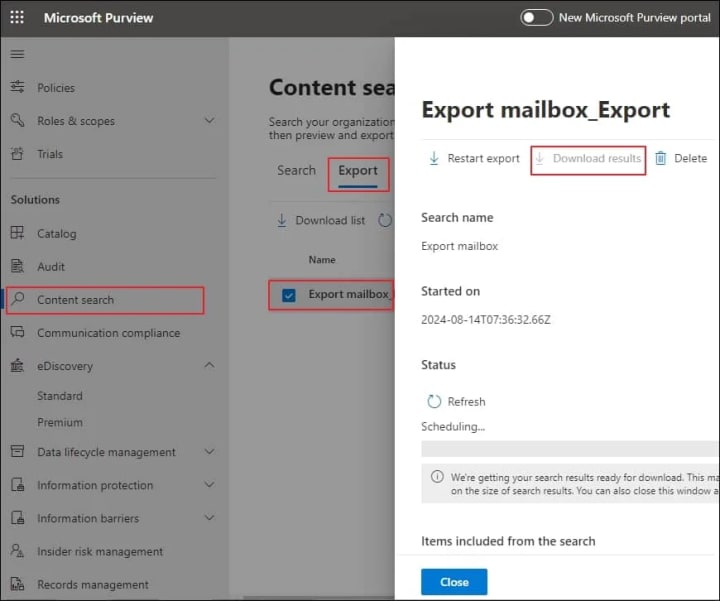
- Go to eDiscovery, then tap on Standard. Choose the search you created.
- Take a look at the summary of your search. Tap on Actions, then click on Export results to export your data.
- If you want to customize the export settings, you can but go with the default settings [if not well-versed with the right export settings]. Then, click on Export.
- The export process starts. Navigate to the Export tab and monitor the progress.
- Once done, click on Download results. Copy the unique Export Key now.
- Open the eDiscovery tool, paste the unique export key to link with the source, and select the location to save the PST file.
- Click Start to begin exporting the mailbox data to PST.
Wait for a while. The Office 365 mailbox data will be saved in PST file on your computer.
Best Practices to Export Office 365 Mailbox to PST Using eDiscovery
When exporting mailboxes from Office 365 to PST via eDiscovery, it's necessary to follow the practices below for a smooth process:
- Use filters such as date ranges, keywords, and specific data types (emails, calendars, etc.) to export only the required data.
- Before performing the full export on large mailboxes, do a test search on a smaller dataset.
- Try to monitor export status throughout the export process.
- After the export, make sure that the PST files are stored in a secure location.
- Always backup Office 365 data to counter any failure during the export process.
Possible Issues You Might Face When Exporting from Office 365 Mailbox to PST Using eDiscovery
When exporting Office 365 mailbox to PST using eDiscovery, users may go through a few challenges. Some common issues are as follows:
- Sometimes the export process fails to start, so make sure that you’ve the required permissions and no ongoing searches or exports.
- Usually, exports may take a longer time if the mailbox is large. So, split large exports into smaller batches.
- If the PST file becomes corrupted, do the export again. But before that, check for network issues.
Conclusion
The eDiscovery tool is a helpful tool when you need to export Office 365 to PST for organization's needs. With the above step-by-step guidance, you can effectively export Office 365 mailbox to PST via eDiscovery.
About the Creator
Claire Bowen
Tech-savvy and detail-driven, Claire shares insights on Microsoft 365, email migrations, and smart tools. Loves streamlining workflows as much as she loves coffee and a well-organized workspace.
Keep reading
More stories from Claire Bowen and writers in Journal and other communities.
Office 365 to Google Workspace Migration: Key Challenges and Solutions
As remote work is growing, businesses are seeking platforms that enhance their teamwork and advancements. Microsoft 365 and Google Workspace are the two most popular platforms that provide integrated tools and applications for cloud operations. Over 400 million monthly active users, Google Workspace is becoming the go-to choice, even as Office 365 users are making a switch there. However, it is not as smooth as it looks to perform an Office 365 to Google Workspace migration, and thus, it involves many challenges.
By Claire Bowen3 months ago in Journal
The goals I did not achieve
Every writing goal I made for the year is a wash. It has been this way for a while, but I think it's important to be open about my failures and the reality of how life can get in the way. This is especially true considering the several times I have posted on Vocal about my writing goals, how I was changing my approach, and where I was hoping to be for the upcoming year. I will probably do that again in a couple months, but for now, it is time to acknowledge where I am today.
By Kay Husnick20 days ago in Journal
Strategic Power View – The Global Balance of Power
The global geopolitical stage today feels heavier, louder, and more uncertain than at any time in recent decades. Statistics coming from defense budgets, alliance structures, and conflict zones tell a clear story: power is shifting, and the rules that once governed international stability are being rewritten. Global geopolitics stats are no longer background noise for diplomats. They are signals that affect markets, borders, and everyday safety.
By Global World News 7 days ago in Journal


Comments
There are no comments for this story
Be the first to respond and start the conversation.