
Zen of Painting
Find happiness, make beautiful things.

I love painting miniatures. I have been playing various games that use miniatures for many years. There is a satisfaction that comes from having other people admire your handiwork. At root though, there is something even more satisfying, when you see yourself improving in a skill that is simple to begin, but increasingly more difficult as your skill improves. In the beginning, having a miniature that is partially painted is a big leap from using unpainted minis. A solid leap from there is when you start to become neat and skilled, and people start to admire your work. The next stage, is competition. I started entering my work in painting contests at some of the gaming conventions. Gencon, is one of the largest gaming conventions in the world. Over 100,000 people descend upon Indianapolis for four days of gaming and socializing. Some of the best painters in the world also attend, as there are numerous painting contests. As an example, speed painting, is an event where several artists are given miniatures, and are graded on the quality of their work, with only limited time, one hour in this case, to complete it. Here is video of this event, one of my favorites.
With COVID19 in full swing, Gencon2020 was held entirely remotely, so all of the events such as this one, were done remotely over video. This allowed larger groups to view the painting, as normally, you are not able to get so close, or see such detail. With the relaxation of quarantine restrictions, Gencon2021 should be even bigger with hopefully, more painting events.
Once you have started down the road as a painter, prepare for equal parts frustration and satisfaction. I have found in my own case, that I am able to paint for hours, and time flies away from me. Parts of the painting process have fine details, such as eyes or jewelry on a figure less than an inch tall. I would sometimes become frustrated, as I could not see well enough to notice the fine details, but when viewed from a distance, it was obvious that something was not right. Enter the smartphone. With a high-resolution camera, all of my eyesight issues went away. In fact, at some point, our bodies fail us all. Some of my family, are not able to sit for long, others cannot stare at the small details for long, some have arthritis, and other such issues. With practice, we come to understand our limitations, and when possible, we use technology to help us overcome some of them as well. I have come to think that overcoming my limitations, and painting better than my previous work is the entire point now.
Here are some tips and suggestions for becoming a painter, and enjoying the quiet, detail-oriented work. Painting can be expensive, for example, some miniatures cost hundreds of dollars, or when painting military miniatures, you need large numbers of models for most games. In order to cut down on my costs, I started 3d printing my own miniatures. Don’t feel that you have to buy any printer in particular, as there are dozens of manufacturers with their own brands. The printer I use is the Prusa Mk3.
It is also possible to buy from other people that are no longer interested in the hobby. While starting out, low quality paints can be found at craft stores, and when using acrylic paints, there is no need for expensive chemicals or fancy equipment. The biggest concern, is attitude. Don’t expect that your work will match the professionals right away, and in some cases, my own for example, you may never become professional. My main purpose, is the enjoyment of playing with my own painted minis. Even the newest of tyros can paint a base coat. As long as you use the same colors for all of your military figures, then even my color blind friends are able to paint. Set your goals in manageable leaps.
Next, the nuts and bolts of painting.
Step 1) Selection - Choose your models, and appropriate paints. As stated above, cheap paints work fine starting out. There are a number of painting kits that can be picked up at reasonable prices, if these are more than you want to spend, a trip to Michael’s, or some other craft store will set you up with primary colors and a set of brushes for around five dollars.
Step 2) Priming - All of the minis should be cleaned and primed. Do not do too many miniatures at one time. Working in small batches, or even one mini at a time is recommended. I have an allergy to some of the accelerants used in spray paints, so I always spray my primer coat outdoors, and use a mask to keep from breathing in fumes. Some of the cheaper mini manufacturers, and especially home printed miniatures need to be cleaned, and have flashing removed before priming.
Step 3) Base coat - While primer is good enough to allow you entry to most tournaments, as the rules state that unpainted miniatures are generally not allowed, but if you want to impress others with your fearsome army, or show off your character in living color, you will want to go further. Next, we need to base coat. With military miniatures, it is easy to just use the correct national colors, but for civilian models, or figurines, you might want to decide on a color scheme ahead of time. Less colors are best. Pick at most three or four colors for your mini. If painting several military figures, or something such, then all of them can use the same paint scheme. Once your primer is dry, put an even base coat on all of the minis you are working with. If you are doing a large military unit, you can base coat the entire army at once if you are itching to play with them, but be careful not to set your goals too high and ruin the enjoyment of completing some pieces.
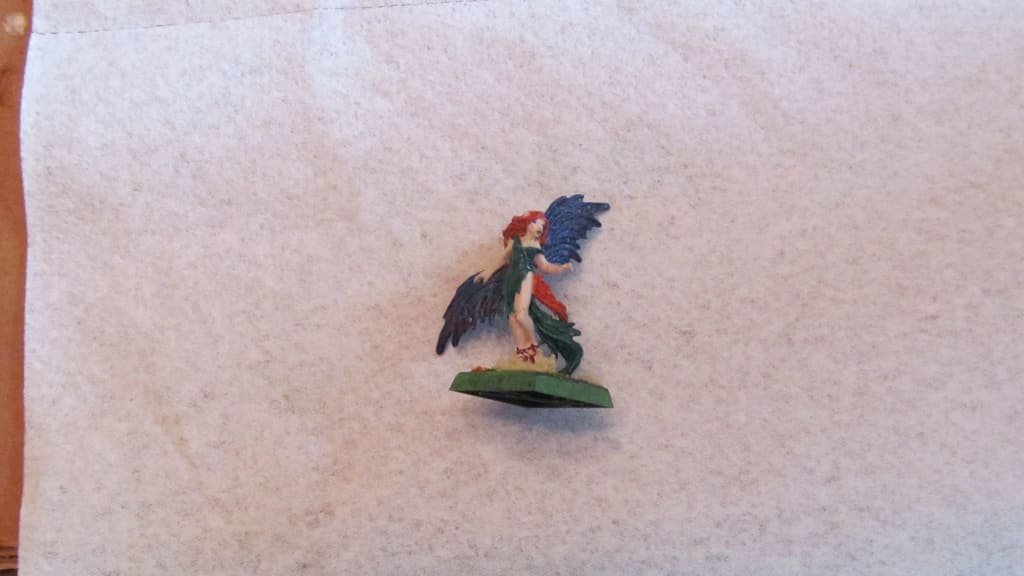
Step 4) Roughing - After your base coat is dry, time to begin rough painting. While the base coat is used liberally, the rough paint is more detailed. You have your paint scheme firmly in mind, time to make it live. Work on only a small number of miniatures at a time. If doing a large military unit, start with just one tank, or one commander figure. If you have a leader that is painted to a higher standard than the rest of your army, it makes them really stand out. I normally do a rough coat for all of my miniatures one at a time, before doing any more detailed work. When doing the rough coat, I like to work from the inside out, meaning any recessed parts, like hands inside sleeves, or the inside of ears for example, and then work my way outward. Detailed flashing on uniforms, or decals on vehicles would be last. In the case of the fairy at the top of the page, I started with her face arms and legs, and then did her hair and clothing, with the fine details of her wings and pieces of jewelry last.
Step 5) Highlighting - For most people, the rough coat is then end. Fine detail is wasted on most army painting, but if you want to single out a small group of special vehicles, such as the command vehicle, or if you are working on role-playing miniatures, then some finer detail might be advised. For the fairy above, I did a number of highlights and shadows. With a live model, light shines from a given direction, and anything that is not in direct light will shade, or look darker. Places in direct light will look lighter. Many of the better paints come in triads, a base color, and a light and dark shade that go with it. Simply dry-brushing a highlight over detailed areas will make them pop-out like magic. When you couple highlights with a wash, a very dilute darker color that seeps into crevices in a model, they seem to come alive. This is not a beginner step, and there is much room for frustration when you start washing and highlighting. Try to have fun with it, and be ready to strip your models and start over if needed. Acrylic paints can be easily stripped by soaking in cleanser solution. I like to use simple green, followed by using either a toothbrush, or a dremel with a rotary brush.
Step 6) Lighting – While washing and dry-brushing are good for bringing out details, if you want to make things look really professional, you need to use your triads. After you have decided the direction of light, you will use the darker shade from your triad in places where shadow would be cast, and lighter colors in places where the light would be direct, this will be similar to dry-brushing, but it can add highlights where they might not exist otherwise. This is definitely getting into pro territory, so be careful not to psyche yourself out. If your minis look good without this step, then don’t rush to try this with them all, maybe only use it on key spots, and for the most important miniatures.
Step 7) Blending and NMM – as in step 6, using triads can bring out details that otherwise won’t be noticed, but in reality, we see many more than three shades with our eyes. With blending, you add very fine lines of thin paint and gradually smooth them into the base colors. By gradually working the wet paint colors together, they become more natural. NMM, or Non-Metal Metal, is a specific blending technique, meant to control the glint of light that metals pick up. Since a shining piece of metal will shine in the direction of the light that hits it, gold or silver paint will shine in different directions as you turn the mini. Replacing gold paint with varying shades of yellow and white, you can make the light appear to shine like gold in only one direction, similarly, using shades of gray and white can replace silver or steel. This is a very advanced concept, and when you have mastered it, your miniature will look spectacular.
Step 8) Socializing – Talking to other painters, particularly with those who have work you like, you can improve your skills, and any time spent with like minded people doing what you love is time well spent. Probably my all-time favorite painter is Jen Haley. She has online training, and some excellent examples of master level work.
Thanks everyone for your time, remember, this is meant to be fun, don’t stress mistakes too much, and you can always clean the paint off your minis and do them again if you don’t like your previous results. I actually like to redo minis as my skill improves. Buying several copies of the same mini will allow you to compare with and without the various techniques. I hope that I have inspired some of you to take a leap into painting, and I look forward to looking at your work someday.
About the Creator
Brian Amonette
From chef to network engineer to shut in writer wanabee. Seems to be a natural progression.
Husband, father, grandfather; the support chain is long and varied with years of diverse experience and gaming knowledge.
Keep reading
More stories from Brian Amonette and writers in Gamers and other communities.
Justin
Kayla didn’t like going to Mama June’s. Mama was a bit creepy, and there were always some men at the outpost. She was tempted to stay in her home, safe with her friends, but she’d recently made a good haul, that she knew would earn her some nice things. Mama June paid really well for glass or mirrors, and things like that. Kayla had found a house with several whole sheets in the doors and windows. Not only that, but she also found some fresh fruits and vegetables. She knew Mama couldn’t pass those up. She packed a wagon full of goodies scavenged from the old farm, including the pieces of glass, wrapped in blankets to keep them from breaking. While most of the canning jars she’d come across, were filled with preserved food, she did include several empty jars, with perfect lids, those would fetch a good price too.
By Brian Amonette5 years ago in Fiction
No Man’s Sky Will Take You to a Universe You Can Explore Forever
Few games capture the sense of wonder and scale like No Man’s Sky. Developed and published by Hello Games, the title continues to redefine what open-world exploration means on Xbox. With constant updates and expansions, No Man’s Sky offers a universe that is as vast as it is unpredictable, inviting players to explore, survive, and create without limits.
By Lukáš Hrdlička3 days ago in Gamers
Chasing Connection and Play in the Modern Internet Era
The city never really slept anymore. Even at midnight, windows glowed with the quiet hum of screens, each one a small portal into somewhere else. For Daniel, those glowing rectangles had become both a refuge and a question he couldn’t quite answer.
By CEO A&S Developers4 days ago in Gamers


Comments
There are no comments for this story
Be the first to respond and start the conversation.