
How To Repair VGA Port On Motherboard (Easy Fixes for Beginners)
Learn how to repair VGA port on motherboard with this simple, step-by-step guide. Perfect for beginners, this tutorial helps you fix display issues quickly and safely.

How To Repair VGA Port On Motherboard
If your monitor suddenly goes black or shows no signal, don’t panic. It might just be a problem with your VGA port. In this guide, you’ll learn how to repair VGA port on motherboard using easy steps. Even if you’re not a tech expert, don’t worry—this guide is written in simple English and is easy to follow.
🧰 What Is a VGA Port and Why Does It Matter
A VGA (Video Graphics Array) port is a connector on your motherboard that sends video signals to your monitor. It’s usually blue and has 15 small holes. Although newer systems use HDMI or DisplayPort, many older PCs still rely on VGA.
If this port gets damaged, your screen might not show anything. That’s why knowing how to repair it can save you time and money.
🔍 Signs Your VGA Port Is Damaged
Before jumping into repairs, let’s check if the VGA port is the problem. Here are some common signs:
- The monitor says “No Signal.”
- The screen flickers or turns black
- You see bent or broken pins inside the VGA port
- The display works with HDMI but not VGA
If you notice any of these, it’s time to learn how to repair VGA port on motherboard.
🛠️ Tools You’ll Need
To fix the VGA port, gather these tools first:
- A small screwdriver set
- A magnifying glass or flashlight
- A soldering iron (only if needed)
- A replacement VGA connector (optional)
- Anti-static wrist strap (for safety)
Now that you’re ready, let’s move on to the repair steps.
🧼 Step 1: Power Down and Open the Case
First things first, turn off your computer and unplug it. Wait a few minutes to make sure all power is gone. Then, open the case using a screwdriver.
Tip: Always wear an anti-static wrist strap to avoid damaging your motherboard.
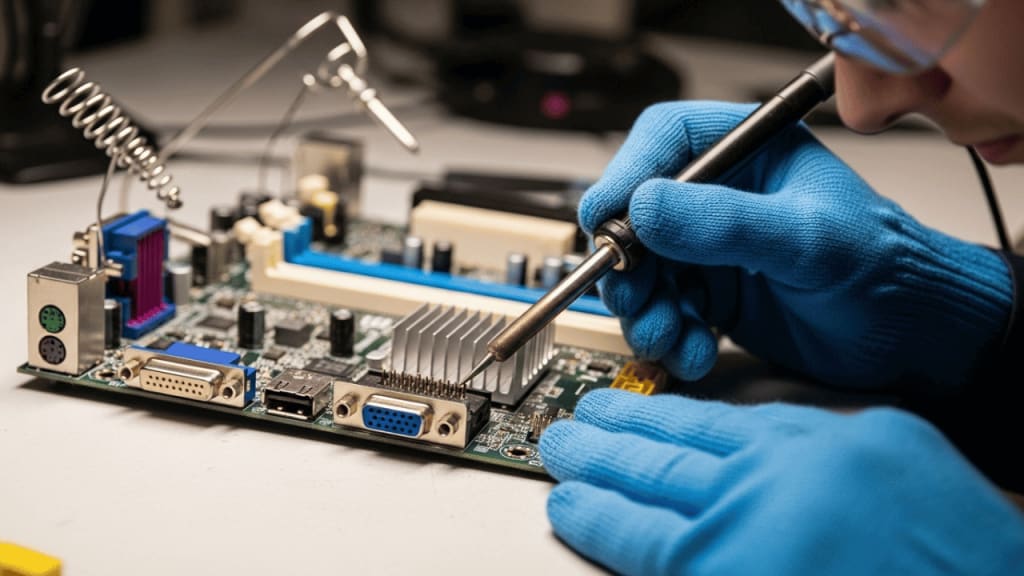
🔎 Step 2: Locate the VGA Port on the Motherboard
Once the case is open, find the VGA port. It’s usually near the back panel and connected directly to the motherboard. Use a flashlight to inspect it closely.
Look for:
- Bent pins
- Cracks in the plastic
- Loose solder joints
If everything looks fine, the issue might be with the cable or monitor. But if you see damage, keep reading.
🧰 Step 3: Remove the Motherboard (If Needed)
Sometimes, you’ll need to take out the motherboard to access the VGA port properly. Carefully unscrew it and place it on a clean, flat surface.
Important: Take pictures of cable connections before removing anything. This helps you put everything back correctly later.
🔧 Step 4: Fix Bent Pins or Loose Solder
If the pins inside the VGA port are bent, use a small tool (like tweezers) to gently straighten them. Be very careful—these pins are fragile.
If the solder joints are loose, you may need to re-solder them. Heat your soldering iron and carefully apply a small amount of solder to the broken connection.
Note: If you’re not comfortable with soldering, ask a technician for help.
🔄 Step 5: Replace the VGA Port (Optional)
If the port is badly damaged, replacing it might be the best option. You can buy a new VGA connector online or from a local electronics store.
To replace it:
- Desolder the old port
- Insert the new one into the same holes
- Solder it in place
- Reassemble the motherboard
🧪 Step 6: Test the VGA Port
Once everything is fixed, put the motherboard back in the case. Reconnect all cables and power on your PC. Plug in your monitor using the VGA cable.
If the screen lights up, congratulations! You’ve successfully learned how to repair VGA port on motherboard.
🧼 Maintenance Tips to Avoid Future Problems
To keep your VGA port working well:
- Don’t force the cable into the port
- Keep dust away using compressed air
- Avoid moving your PC while it’s running
- Use surge protectors to prevent electrical damage
These small steps can help you avoid big problems later.
🧠 Conclusion
Learning how to repair VGA port on motherboard might sound hard, but it’s simple if you follow the right steps. From checking for damage to fixing bent pins or replacing the port, you now have the knowledge to handle it yourself.
Not only does this save money, but it also gives you the confidence to fix other small PC issues. Just remember to stay safe, take your time, and don’t be afraid to ask for help if needed.
❓ FAQ
Q1: Can I fix a VGA port without soldering?
Yes, if the issue is just a loose cable or bent pin, you can fix it without soldering.
Q2: What if my motherboard doesn’t have a VGA port?
You can use a graphics card with a VGA output or use an HDMI-to-VGA adapter.
Q3: Is it safe to repair the VGA port myself?
Yes, as long as you follow safety steps like unplugging the PC and using an anti-static strap.
Q4: How much does it cost to replace a VGA port?
A new VGA connector usually costs between $5 and $15. If you hire a technician, labor charges may apply.
Q5: Can a damaged VGA port affect other parts of the motherboard?
Usually not, but if there’s a short circuit, it could damage nearby components. Always inspect carefully.
Click here if you want to buy 👉 Best PC Components of Dell
About the Creator
Perfect Tech Views
Welcome to Perfect Tech Views—your go-to source for clear, unbiased, and insightful tech knowledge. Whether you're a pro, a beginner, or just exploring gadgets, we've got you covered with expert guidance!
Keep reading
More stories from Perfect Tech Views and writers in Gamers and other communities.
How To Install IO Shield? (A Simple Guide for Beginners)
How To Install IO Shield If you're building a PC, one of the first steps is learning how to install IO shield. This small metal plate might look simple, but it plays a big role in protecting your motherboard and keeping your build clean and safe.
By Perfect Tech Views7 months ago in Gamers
Master the Meta: How to Increase Legendarity Fast in Rush Royale 2026
The landscape of Rush Royale shifted dramatically with the introduction of the Legendarity system. For veteran players, the old days of simply stacking critical damage percentage are over. In 2026, your prowess is no longer measured solely by how many common units you have painstakingly leveled up to 15.
By Richard Bailey3 days ago in Gamers


Comments