
DIY Duct Cleaning: A Step-by-Step Guide for Homeowners
How Regular Duct Cleaning Can Improve Your Home's Air Quality and Efficiency
Indoor air quality is crucial for a healthy home environment. One of the often-overlooked aspects of maintaining this quality is duct cleaning. Over time, dust, dirt, and other debris can accumulate in your home's ductwork, leading to poor air quality and increased energy costs. While professional services, such as Duct Cleaning in South Yarra or your surrounding areas, offer thorough cleaning, you can also take on the task yourself with some basic knowledge and tools. This article will guide you through a comprehensive, step-by-step process for DIY duct cleaning.
Why Clean Your Ducts?
Improved Air Quality
Dirty ducts can harbor allergens, dust, and other contaminants that circulate throughout your home. Regular cleaning can significantly improve the air you and your family breathe.
Enhanced HVAC Efficiency
A buildup of debris in your ducts forces your HVAC system to work harder, leading to increased energy consumption and higher utility bills. Clean ducts improve airflow, making your system more efficient.
Prolonged HVAC Lifespan
Maintaining clean ducts reduces the strain on your HVAC system, potentially extending its lifespan and saving you money on costly repairs or replacements.
Tools and Materials Needed
Before you start, gather the following tools and materials:
- Vacuum cleaner with a long hose
- Brushes (soft-bristle and stiff-bristle)
- Screwdriver or drill
- Microfiber cloths
- Mask and gloves for personal protection
- New air filter for your HVAC system
Safety Precautions
Turn Off Your HVAC System
Before beginning the cleaning process, ensure your HVAC system is turned off to prevent any accidents or dust circulation.
Wear Protective Gear
Use a mask and gloves to protect yourself from inhaling dust and coming into contact with debris.
Use a Sturdy Ladder
If you need to access high vents, make sure you use a stable ladder to prevent falls and injuries.
Step-by-Step Duct Cleaning Process
Step 1: Inspect Your Ducts
Before you start cleaning, inspect your ducts to identify areas with the most buildup. This will help you focus your efforts where they are needed most.
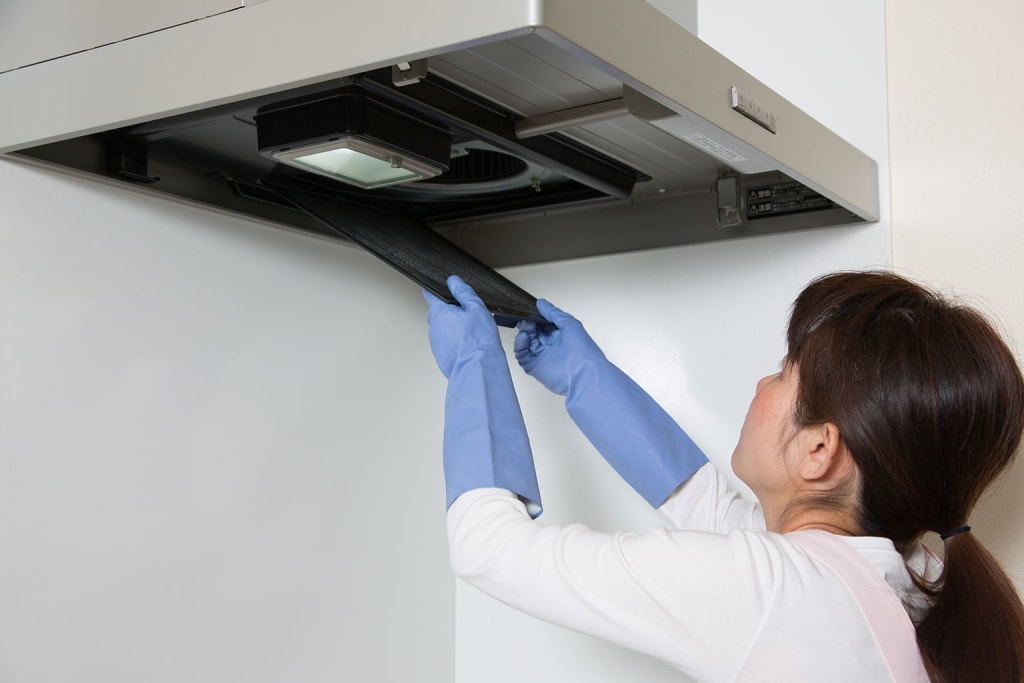
Step 2: Remove Vent Covers
Use a screwdriver or drill to remove the vent covers. Place them in a safe location, as you'll need to clean these separately.
Step 3: Clean the Vent Covers
Wash the vent covers with warm, soapy water and a soft-bristle brush. Rinse them thoroughly and let them dry completely before reinstallation.
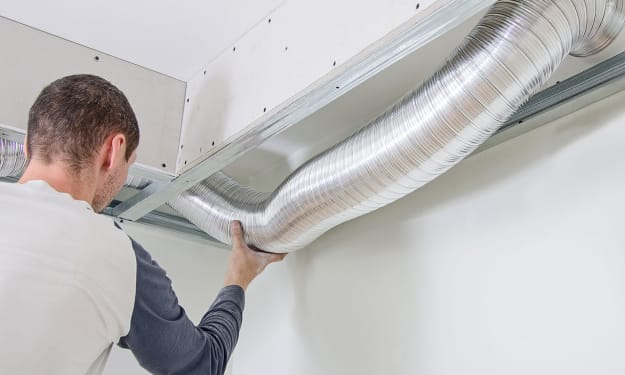
Step 4: Vacuum the Ducts
Using a vacuum cleaner with a long hose, reach as far into the ducts as possible to remove loose dust and debris. Take your time to ensure you get as much out as possible.
Step 5: Brush the Ducts
Use a stiff-bristle brush to scrub the inside of the ducts, loosening any stuck-on debris. Follow this with another round of vacuuming to remove the loosened particles.
Step 6: Wipe Down the Ducts
Use a microfiber cloth to wipe down the interior surfaces of the ducts, removing any remaining dust and dirt.
Step 7: Clean the Blower Compartment
Don’t forget to clean the blower compartment of your HVAC system. Use the vacuum and brushes to remove dust and debris from this area as well.
Step 8: Replace the Air Filter
Install a new air filter to ensure your HVAC system operates efficiently and the air circulating in your home remains clean.
Step 9: Reinstall Vent Covers
Once the vent covers are dry, reinstall them securely. Ensure they fit tightly to prevent any air leaks.
Step 10: Turn On Your HVAC System
After everything is cleaned and reassembled, turn your HVAC system back on and enjoy the benefits of clean ducts.
Tips for Maintaining Clean Ducts
Regular Inspection
Inspect your ducts every few months to catch any buildup early and address it before it becomes a problem.
Change Air Filters Regularly
Replace your HVAC system’s air filter every 1-3 months to maintain optimal airflow and air quality.
Keep Your Home Clean
Regularly dust and vacuum your home to minimize the amount of dust and debris that can enter your ducts.
Schedule Professional Cleaning
While DIY cleaning is beneficial, scheduling professional duct cleaning services in Pakenham or wherever you are at least once a year ensures a thorough clean and addresses any issues that might be difficult to handle on your own.
Common Mistakes to Avoid
Using the Wrong Tools
Ensure you use the appropriate tools for duct cleaning to avoid damaging your ductwork.
Skipping Safety Precautions
Always prioritize safety by wearing protective gear and turning off your HVAC system before cleaning.
Ignoring the Blower Compartment
Neglecting the blower compartment can reduce the efficiency of your HVAC system, so make sure to clean this area as well.
Benefits of Professional Duct Cleaning Services
Expertise and Experience
Professional cleaners have the expertise and equipment to thoroughly clean your ducts, ensuring optimal air quality and HVAC efficiency.
Time-Saving
Hiring a professional service saves you time and effort, allowing you to focus on other important tasks.
Comprehensive Cleaning
Professionals can reach areas of your ductwork that might be difficult for you to clean on your own, ensuring a more thorough clean.
Conclusion
DIY duct cleaning is a manageable task that can significantly improve your home's air quality and the efficiency of your HVAC system. By following this step-by-step guide, you can maintain clean ducts and enjoy a healthier living environment. However, don't hesitate to enlist professional duct cleaning services for a more thorough clean and expert care. Regular maintenance and professional help will keep your ducts in top condition, ensuring your home's air is always fresh and clean.
About the Creator
Keep reading
More stories from David Campbell and writers in Families and other communities.
How to Properly Care for Different Types of Air Ducts
Air ducts are essential for maintaining indoor air quality and ensuring your HVAC system operates efficiently. Proper care and maintenance of air ducts can prevent dust, allergens, and other pollutants from circulating in your home. This guide will help you understand how to properly care for different types of air ducts. We will also discuss the benefits of using professional services for duct cleaning in Essendon or the surrounding regions.
By David Campbellabout a year ago in Families
Wise~Guys
— Look Behind what's in Front of You ~ Make Good Choices — Hey, So how you Doin'..! Made~Men — Mobster Movies romanticise a distinctive, elegant appearance, impeccable attire style, along with the 'Families' expressive lingo. Making their 'Bones' gave them Panache — with vintage fedoras, tailored pin-striped suits, mirror-polished wing-tip shoes adorned with tassels; with their 'Gun Moll' gorgeous dates on their arms.
By Jay Kantor23 days ago in Families
Men who eat nuts tend to have better quality sperm
Peak Potency: How a Daily Nut Habit Elevates Male Sperm Quality Male fertility rates have dropped in recent years. Many couples struggle to conceive, and men often overlook their role in this challenge. Your diet can make a big difference here. Nuts stand out as a simple fix. They pack antioxidants and healthy fats that support better sperm quality. Think of them as fuel for your reproductive system. Studies show men who eat nuts regularly see real gains in sperm health. If you're planning a family or just want peak vitality, adding nuts could be your smart move.
By Story silver book 6 days ago in Families
Autonomy Is The Real Privilege
Good morning, freedom-seekers! Today we’re gonna be looking at autonomy. A strange word, I know; one many would probably look at blankly and run away from on sight. We’re gonna figure out what it actually means, consider how it’s achieved, and decipher just how deeply most of us are tangled up in dependence without realising it.
By That ‘Freedom’ Guy3 days ago in Humans


Comments
There are no comments for this story
Be the first to respond and start the conversation.