
Integrating Redux Toolkit into a React App: Step-by-Step Guide with Code Examples
Effortlessly Manage State in React: A Comprehensive Tutorial on Using Redux Toolkit with React


Redux is a state management library for JavaScript applications. It provides a predictable and easy-to-reason-about state management solution. However, using Redux can be quite verbose and repetitive, especially when dealing with large-scale applications. That’s where Redux Toolkit comes in. Redux Toolkit is a package that simplifies the process of using Redux, making it easier to set up and manage.
In this article, we’ll look at how to integrate Redux Toolkit into a React application. We’ll cover the steps required to set up Redux Toolkit and provide some code examples along the way.
Step 1: Create a new React application
To get started, we need to create a new React application. You can create a new React application using create-react-app by running the following command in your terminal:

This will create a new React application with the name my-app.
Step 2: Install Redux Toolkit
Once you’ve created your React application, you can install Redux Toolkit by running the following command in your terminal:

This will install Redux Toolkit as a dependency of your project.
Step 3: Create a store
Next, we need to create a Redux store. The store is responsible for holding the application state and managing the state changes. We can create a store using Redux Toolkit by creating a new file called store.js in the src directory and adding the following code:

Here, we’re using the configureStore function from Redux Toolkit to create a new store. We're also importing a counterReducer function from a file called counterSlice.js. We'll create this file in the next step.
The configureStore function accepts a configuration object that contains a reducer property. The reducer property is an object that maps the state key name to a reducer function.
Step 4: Create a slice
In Redux Toolkit, a slice is a collection of Redux-related code for a specific feature of your application. A slice contains the reducer function and the action creators.
To create a slice, we need to create a new file called counterSlice.js in the src directory and add the following code:
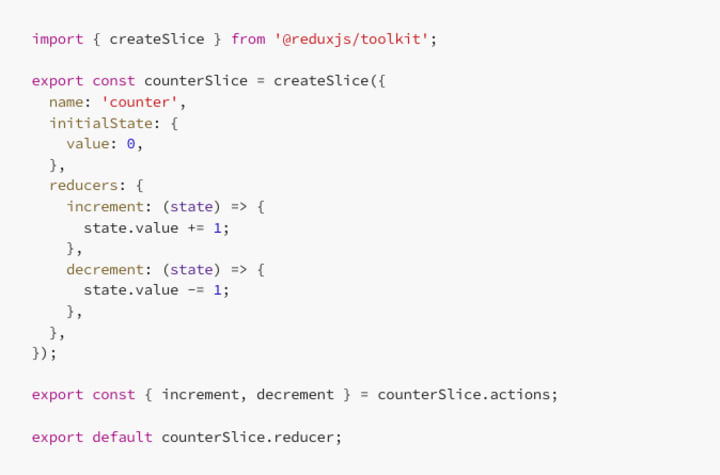
Here, we’re using the createSlice function from Redux Toolkit to create a new slice. We're defining the slice name as 'counter' and setting the initial state to an object with a value property set to 0. We're also defining two reducer functions, increment and decrement, that update the value property of the state.
Finally, we’re exporting the increment and decrement action creators along with the counterSlice.reducer function. The action creators are used to dispatch the actions to the store.
Step 5: Connect the store to the application
Now that we’ve created the store and the slice, we can connect the store to our React application. To do this, we need to wrap our root component with the Provider component from the react-redux library. We can do this by adding the following code to index.js:
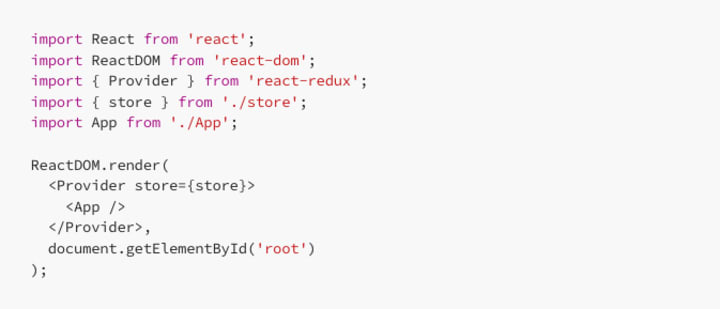
Here, we’re importing the Provider component from the react-redux library and the store from the store.js file we created earlier. We're then wrapping our App component with the Provider component and passing the store as a prop.
Step 6: Use the state in a component
Now that we’ve connected our store to our React application, we can use the state in our components. We can do this by using the useSelector hook from the react-redux library.
Let’s create a new component called Counter that displays the current value of the counter and provides two buttons to increment and decrement the value. We can add the following code to a new file called Counter.js in the src directory:
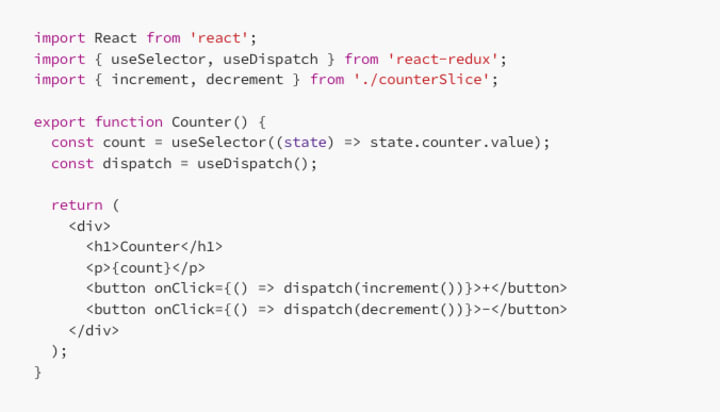
Here, we’re using the useSelector hook to get the current value of the counter from the store. We're also using the useDispatch hook to get a reference to the dispatch function, which we can use to dispatch the increment and decrement actions to the store.
Finally, we’re rendering the current count, along with two buttons to increment and decrement the value. When the buttons are clicked, we’re dispatching the corresponding actions to the store.
Conclusion
In this article, we looked at how to integrate Redux Toolkit into a React application. We started by creating a new React application and installing Redux Toolkit as a dependency. We then created a store and a slice using Redux Toolkit and connected the store to our React application using the Provider component.
Finally, we created a new component that uses the useSelector and useDispatch hooks to interact with the store and display the current value of the counter. By using Redux Toolkit, we were able to simplify the process of using Redux in our application and make it easier to manage our state.
About the Creator
FARDA KARIMOV
I'm a front-end engineer creating visually appealing and user-friendly web experiences. On Vocal Media, I share insights and advice on front-end development and design trends. Join me to explore the world of front-end development.
Keep reading
More stories from FARDA KARIMOV and writers in Education and other communities.
React Performance Optimization: How to Make Your App Faster
While React is designed to be fast and efficient, there are many techniques you can use to optimize the performance of your React applications. In this article, we’ll explore some of these techniques and provide code examples to help you get started.
By FARDA KARIMOV3 years ago in Education
Misplaced Optimism: A Year of Accountability Promised — and Withheld at LAUSD
“We must hold the Superintendent accountable” – Karla Griego (2024) Ten years ago, I ran for a seat on the LAUSD Board of Education to change the district I believed was failing its students, especially those with Special Education needs. My opponent was Tamar Galatzan, an entrenched incumbent who was backed by the charter school industry. I achieved the lowest cost per vote, just 69 cents, in the entire city during that election cycle. While it wasn’t enough to win the seat, our campaign helped knock Galatzan out of office. This helped to clear a pathway for change and raised expectations that accountability might finally follow.
By Carl J. Petersen6 days ago in Education


Comments
There are no comments for this story
Be the first to respond and start the conversation.