
Complete Guide to Using Google Search Console for Website Optimization
Learn how to use Google Search Console with this step-by-step guide. Discover essential features, fix site issues, improve mobile usability, and maximize your website's performance.

Google Search Console (formerly known as Google Webmaster Tools) is one of the most powerful tools for website owners and SEO professionals. It offers a wide range of features that help you monitor your website’s performance, fix any issues, and ultimately rank higher on Google search results. If you're looking to boost your website's SEO performance and make data-driven improvements, this guide will walk you through each step, providing detailed examples along the way.
Step 1: Setting Up Google Search Console
Before optimizing for better Google rankings, you need to set up your Google Search Console account for your website.
1.1 Create a Google Account
To begin, you need a Google account. If you don’t already have one, create a Google account.
Once you have your Google account, head over to the Google Search Console homepage and sign in.
1.2 Add Your Website to Search Console
Once logged in, you will be prompted to add your website as a property. There are two verification methods:
Domain Property: This method covers all URLs across your domain, including subdomains (like www and m versions) and multiple protocols (http and https).
URL Prefix Property: This method applies to a specific URL and its protocol. It's a simpler option for beginners who want to monitor a single version of their website.
To get started, enter your website’s URL and select URL Prefix Property for easier management.
1.3 Verifying Ownership
To complete the setup, you need to verify that you own the website. Google offers several verification methods, including:
HTML File Upload: Google provides a unique file that you upload to the root directory of your website.
HTML Tag: You can add a verification meta tag to the <head> section of your homepage.
Google Analytics: If you have Google Analytics installed on your site, you can use it to verify your property.
After selecting a verification method, follow the on-screen instructions, and click Verify.
1.4 Submit Your Sitemap
A sitemap is a file that lists all the pages on your website. Submitting a sitemap helps Google crawl and index your pages more effectively.
To submit your sitemap:
Go to the Sitemaps section in the left-hand menu.
Enter the URL of your sitemap (usually something like yourdomain.com/sitemap.xml).
Click Submit.
Once your sitemap is submitted, Google will start indexing your pages, improving your visibility on search results.
Step 2: Monitor and Analyze Your Performance
Once your site is verified and indexed, it's time to monitor how well your site performs on Google search results.
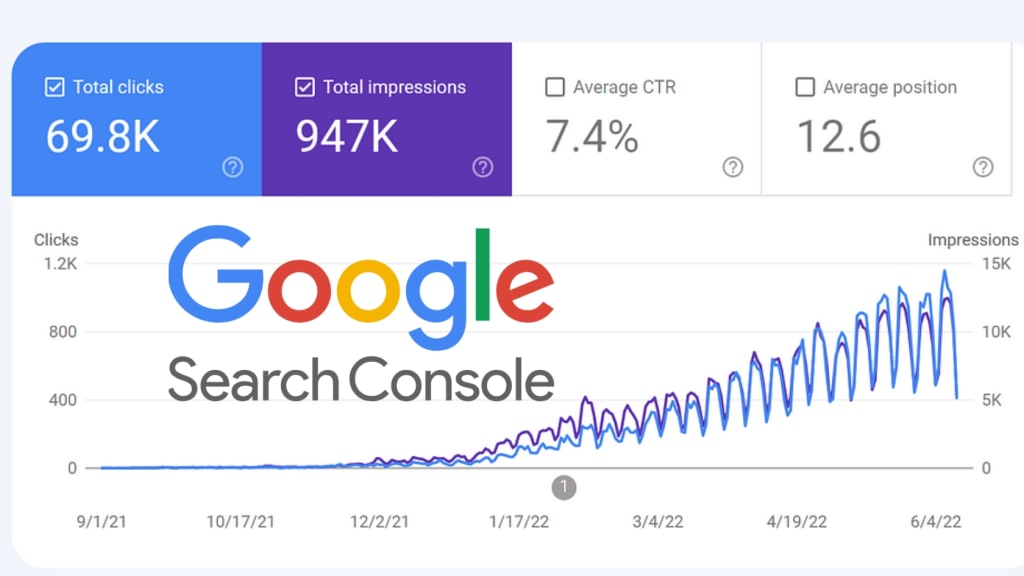
2.1 The Performance Report
The Performance tab in Google Search Console shows you key metrics about your website’s performance in Google Search. It includes:
Total Clicks: The number of times users clicked on your site from Google search results.
Total Impressions: How many times your site appeared in search results.
Average CTR: The click-through rate (CTR) is the percentage of impressions that turned into clicks.
Average Position: This metric shows your website’s average ranking for a particular search query.
For example, if your site appears 1,000 times (impressions) but only gets 20 clicks, your CTR is 2%. By analyzing these metrics, you can pinpoint which keywords bring the most traffic and identify opportunities for improvement.
Example: If you see a low CTR for high-impression queries, you can optimize your title tags and meta descriptions to be more engaging and relevant.
2.2 Analyze Your Queries
Within the Performance report, you can drill down into the Queries section to see the specific search terms users are entering to find your site.
Use this data to discover new opportunities to rank for relevant keywords and optimize pages that aren’t ranking well. For example, if you notice that you are ranking for a high-volume keyword but have a low average position, it might be time to enhance the content for that page.
Step 3: Identify and Fix Coverage Issues
Coverage issues refer to problems that prevent Google from crawling or indexing your site’s pages. Fixing these issues is critical for ranking well on search results.
3.1 Access the Coverage Report
Navigate to the Coverage report to see the current status of your pages in Google’s index. Here, you’ll see which pages are:
Valid: Successfully indexed.
Error: Pages that have issues preventing them from being indexed.
Excluded: Pages that are intentionally or unintentionally excluded from the index.
3.2 Common Errors and How to Fix Them
In the Coverage report, you’ll encounter several types of errors. Some of the most common include:
404 Errors (Page Not Found): These occur when a user tries to access a non-existent page. To fix this, either update or remove broken links or set up a 301 redirect to a relevant page.
Server Errors (5xx): These are server-side issues preventing Google from accessing your site. Check your server configurations and fix any issues.
Redirect Errors: These happen when redirects are incorrectly set up. Verify your redirection paths and ensure they point to the correct destination.
Once the issues are fixed, return to the Coverage report and click Validate Fix to notify Google of the corrections. For important pages, use the URL Inspection Tool to request re-indexing.
Step 4: Optimize for Mobile Usability
With Google’s mobile-first indexing, ensuring that your site is mobile-friendly is critical for higher rankings.
4.1 Mobile Usability Report
In the Mobile Usability section of Search Console, you’ll find insights into how well your site performs on mobile devices. Google flags mobile usability issues such as:
Clickable elements too close together.
Content wider than the screen.
Text too small to read.
4.2 Fixing Mobile Issues
Once you identify mobile usability issues, work with your developer or use a responsive design tool to fix them. Ensuring your site is mobile-friendly can significantly improve your chances of ranking well on both mobile and desktop search results.
Step 5: Improve Core Web Vitals and Page Experience
Core Web Vitals are a set of performance metrics that Google uses to evaluate user experience. Improving these metrics can positively impact your rankings.
5.1 Understanding Core Web Vitals
The three key metrics for Core Web Vitals are:
Largest Contentful Paint (LCP): Measures how fast the main content of a page loads. Know More
First Input Delay (FID): Measures how quickly a page becomes interactive. Know More
Cumulative Layout Shift (CLS): Measures how stable the page layout is during loading. Know More
5.2 Access the Core Web Vitals Report
In Search Console, navigate to the Core Web Vitals report to see how well your site performs on these metrics. Google will categorize your URLs as Good, Needs Improvement, or Poor based on these factors.
5.3 Improving Core Web Vitals
Here are some ways to improve your Core Web Vitals:
LCP: Optimize images by compressing them and ensure your server response times are fast.
FID: Reduce the number of JavaScript elements that load on the page.
CLS: Define size attributes for images and videos to prevent unexpected shifts in page layout.
Step 6: Leverage Backlinks and Internal Links
Both backlinks (external links) and internal links are crucial for SEO.
6.1 Monitor Backlinks
In the Links report, you can see which websites are linking to your content. Backlinks are important because they serve as “votes of confidence” for your site. Aim to build high-quality backlinks from reputable sites in your niche.
6.2 Optimize Internal Links
Internal linking helps Google understand the structure of your website and the importance of each page. Make sure your internal links use descriptive, keyword-rich anchor text and connect your high-traffic pages to those that need a ranking boost.
Step 7: Submit New Content for Indexing
Every time you publish new content, you can use Google Search Console to speed up the indexing process.
7.1 Using the URL Inspection Tool
When you publish a new article or update an existing page, go to the URL Inspection Tool, enter the URL, and click Request Indexing. This ensures that Google crawls the page sooner, getting it into search results more quickly.
Maximizing Your SEO Potential with Google Search Console
Google Search Console is a powerful tool for improving your website’s SEO performance and ranking higher in search results. By following these steps—setting up Search Console, monitoring performance, fixing coverage issues, optimizing for mobile, improving Core Web Vitals, leveraging links, and submitting new content—you can systematically enhance your site’s visibility and performance on Google.
With regular monitoring and adjustments, you’ll be able to identify new opportunities for improvement and continuously boost your rankings. Implement these strategies today, and watch your website rise on the Google search results page!
About the Creator
Praveen Palkhade
I have been building and ranking websites since 2008. Over the years I've gotten to be quite masterful at my web design on many different CMS platforms.
Keep reading
More stories from Praveen Palkhade and writers in Education and other communities.
Financial Planning Tips for Successfully Managing Your Wealth as a Celebrity
Managing wealth can be challenging for anyone, but when you are a celebrity, the stakes are higher. Celebrities often face unique financial challenges that require careful planning and execution to maintain their wealth. In this article, we will discuss some essential tips for successful financial planning that can help celebrities manage their wealth effectively.
By Praveen Palkhade3 years ago in Education
THE POST- ONTOLOGICAL THOUGHT AND THE ABYSS OF NOTHINGNESS — ALEXIS KARPOUZOS
The meta-ontological thought of Alexis Karpouzos is constituted at a level where the traditional distinction between ontology and nihilism collapses. The nothing, as it appears in this context, is neither the opposite of Being nor its limit, but the groundless condition of its appearance. It is a nothing that is not conceived metaphysically as lack, negation, or absence, but corresponds to the mathematical zero: neither positive nor negative, non-polar, and at the same time capable of encompassing all possible values without identifying with any of them. This nothing does not negate the world; it makes possible its indeterminate genesis.
By alexis karpouzos5 days ago in Education
Education Technology SaaS Tools Market to Hit USD 155.4 Billion by 2034
Market Overview The Education Technology SaaS Tools market has grown rapidly as educational institutions increasingly rely on cloud-based software platforms to manage learning processes, administrative operations, and digital content delivery. Software delivered through the Software-as-a-Service model allows schools, universities, and training organizations to access scalable learning platforms without investing heavily in physical infrastructure. These tools support online learning management, student performance tracking, collaborative classrooms, and digital assessments.
By Roberto Cruma day ago in Education


Comments
There are no comments for this story
Be the first to respond and start the conversation.