
Bottom sheets using React Native Reanimated
bottom sheets ios/android

In the Reanimated library for React Native, a "bottom sheet" refers to a modal component that slides up from the bottom of the screen to display additional content or options. This can be implemented using the library's Animated.View component and manipulating the "translateY" property to control the position of the bottom sheet on the screen. An example of how to create a bottom sheet using Reanimated might involve setting up an Animated.Value to represent the position of the sheet, creating a gesture handler to respond to user inputs and manipulate the position value, and then using that value to control the translateY property of the Animated.View.
Bottom sheet usages:
Bottom sheets are often used in mobile apps to present additional information or options to the user without taking up the entire screen. Some common use cases for bottom sheets include:
Displaying a menu of options: A bottom sheet can be used to present a list of options for the user to choose from, such as a list of settings or actions that can be performed on a selected item.
Showing details: A bottom sheet can be used to present more detailed information about an item, such as a detailed view of a product in an e-commerce app or a more detailed view of an event in a calendar app.
Form inputs: A bottom sheet can be used to present a form for the user to fill out, such as a contact form or a search form.
Showing notifications: A bottom sheet can be used to show notifications to the user, such as new messages or updates, without interrupting the main flow of the app.
Showing Filters: A bottom sheet can be used to present the filter options to the user, such as filter by category, price range, location, etc.
These are just a few examples of how bottom sheets can be used in mobile apps, and the specific implementation will depend on the requirements of the app and the user experience you want to create.
Code for bottom sheet using reanimated:
import React, { useEffect, useState } from "react";
import {
View,
Text,
StyleSheet,
TouchableOpacity,
Dimensions,
} from "react-native";
import { PanGestureHandler } from "react-native-gesture-handler";
import Animated, { runOnJS, useAnimatedGestureHandler, useAnimatedStyle, useSharedValue, withTiming } from "react-native-reanimated";
const deviceHeight = Dimensions.get("window").height;
const DEFAULT_HEIGHT = deviceHeight * 0.6;
const MAX_HEIGHT = deviceHeight * 0.1;
const TOP_THRRESHOLD = deviceHeight * 0.5;
const BOTTOM_THRESHOLD = deviceHeight * 0.8;
const BottomSheet = ({open, setOpen}) => {
const dragY = useSharedValue(deviceHeight);
useEffect(() => {
if (open) {
dragY.value = withTiming(DEFAULT_HEIGHT)
}
}, [open])
const onGestureEvent = useAnimatedGestureHandler({
onStart: (e, ctx) => {
ctx.translationY = dragY.value;
},
onActive: (e, ctx) => {
const currentValueY = e.translationY + ctx.translationY;
if (currentValueY < MAX_HEIGHT) {
dragY.value = MAX_HEIGHT;
} else {
dragY.value = currentValueY;
}
},
onEnd: (e, ctx) => {
const currentValueY = e.translationY + ctx.translationY;
if (currentValueY < TOP_THRRESHOLD) {
dragY.value = withTiming(MAX_HEIGHT);
return;
}
if (currentValueY > TOP_THRRESHOLD && currentValueY < DEFAULT_HEIGHT) {
dragY.value = withTiming(DEFAULT_HEIGHT);
return;
}
if (currentValueY < BOTTOM_THRESHOLD) {
dragY.value = withTiming(deviceHeight);
runOnJS(setOpen)(false);
}
}
});
const sheetContainer = useAnimatedStyle(() => {
return {
top: dragY.value
}
})
return (
<Animated.View style={[styles.bottomSheetContainer, sheetContainer]}>
<PanGestureHandler onGestureEvent={onGestureEvent}>
<Animated.View style={styles.dragView} />
</PanGestureHandler>
</Animated.View>
);
};
const HomeScreen = () => {
const [open, setOpen] = useState(false);
return (
<View style={styles.container}>
<View style={styles.parentView}>
<TouchableOpacity onPress={() => setOpen(true)}>
<Text style={styles.touchText}>Open Bottom Sheet</Text>
</TouchableOpacity>
</View>
<BottomSheet open={open} setOpen={setOpen} />
</View>
);
};
const styles = StyleSheet.create({
container: {
flex: 1,
backgroundColor: "rgba(0,0,0, 0.8)",
},
parentView: {
alignItems: "center",
justifyContent: "center",
flex: 1,
},
touchText: {
color: "white",
fontSize: 40,
},
bottomSheetContainer: {
flex: 1,
position: "absolute",
top: DEFAULT_HEIGHT,
bottom: 0,
left: 0,
right: 0,
backgroundColor: "white",
borderTopLeftRadius: 16,
borderTopRightRadius: 16,
},
dragView: {
height: 40,
borderTopLeftRadius: 16,
borderTopRightRadius: 16,
overflow: "hidden",
backgroundColor: "lightgray",
},
});
export default HomeScreen;
In conclusion, bottom sheets are a useful tool for mobile app development that allows for the presentation of additional information or options to the user without taking up the entire screen. The Reanimated library for React Native provides a way to implement bottom sheets using the Animated.View component and by manipulating the "translateY" property to control the position of the bottom sheet on the screen. The library's usePanGestureHandler can be used to create the gesture handler and track user's touch events to update the bottom sheet. Bottom sheets are commonly used for displaying menus of options, showing details, form inputs, showing notifications, and showing filters. The specific implementation of a bottom sheet will depend on the requirements of the app and the user experience you want to create.
About the Creator
Aashik Hameed AJ
Im a software engineer.
Keep reading
More stories from Aashik Hameed AJ and writers in Education and other communities.
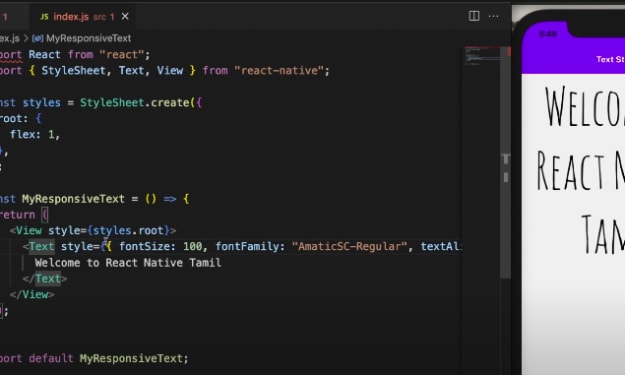
React-Native Custom Font Family
React Native allows you to use custom fonts in your app by adding them to your project and then referencing them in your styles. The process of adding custom fonts to a React Native project created with react-native-cli is a bit different than adding them to a project created with Expo. Here's an overview of the steps you'll need to take:
By Aashik Hameed AJ3 years ago in Education
Rising Graduation Rates Mark a Turning Point in Education Success
A New Chapter in Rising Graduation Rates Rising graduation rates across the United States show a hopeful change in the education system. Over the past several years, more students have completed high school and received their diplomas. This improvement reflects stronger teaching strategies, better student support, and increased involvement from families and communities.
By Tom Walter Wake Forest6 days ago in Education


Comments
There are no comments for this story
Be the first to respond and start the conversation.