

In this article i will teach you how to create a login page with html and css.
1. HTML Structure
<!DOCTYPE html> This is an indicator that this content of this web page has been formatted using the HTML5.
for a web page which is significant for this web page has context and says that it is written in hypertext markup language and English is the major language of this LOGIN page.
<head> Section: Includes Metadata that is utilized in order to form Login page.
Title Section: Defined by the <title> tag, it is displayed in the title bar of the browser, as ‘Login’.
CSS Links:
Used to call a style that is named in the “style.css” file to enrich Enhance Web Design.
<link href=’https:This is used to host icons to enhance the UI from the third party by using the following link: <link href=’https://unpkg.com/[email protected]/css/boxicons.min.css’ rel=’stylesheet’>
2. Body Section
Body sections holds the visible part of the Login page.
Establishes centralized Layout of the Maximum main Container.
Is used to create another wrapper inside the container so that you can have much control over the positioning of the content.
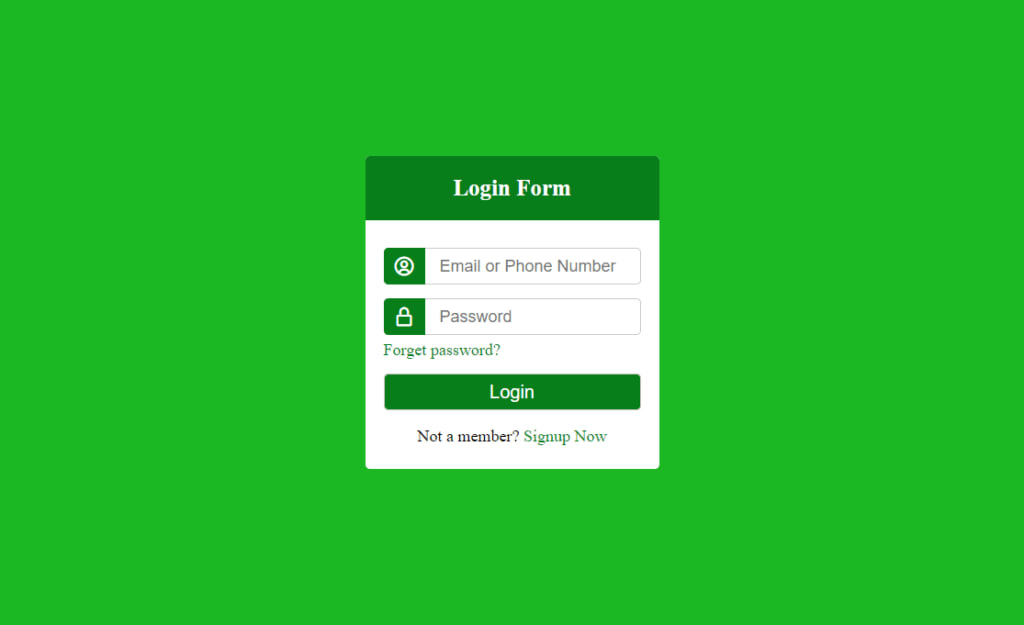
The title text, which is normally Login Form, is displayed with personalized design using a “title” class, and likely the style is defined on style.css.
As used in the HTML code <form action=”#”> the <form> Tag is used to created login form . It is necessary for entering the information to the same form using the “#”action.
Email/Phone Row: form control of type text and the linestyle of the font type is bx of username circle and the input of the form is email or phone number and the input is mandatory
This piece of code builds a row for an email or phone in the form. It consists of an icon, which is bx bx-user-circle and another text field where the user either a smartphone number or an email can be entered.
Furthermore, the input field is marked as mandatory, with an asterisk symbol * before it.
Password Row:There should also be a rectangular field and password icon that looks like a lock: <div class=”row”><i class=’bx bx-lock-alt’></i><input type=”text” placeholder=”Password” required></div>
This row of the password forms an added row in the form; it consists of the icon (bx bx-lock-alt) and the input area for entering the password is also needed.
About the Creator
Usama Yousaf
I am the founder of Sparkify Solutions
Keep reading
More stories from Usama Yousaf and writers in Chapters and other communities.
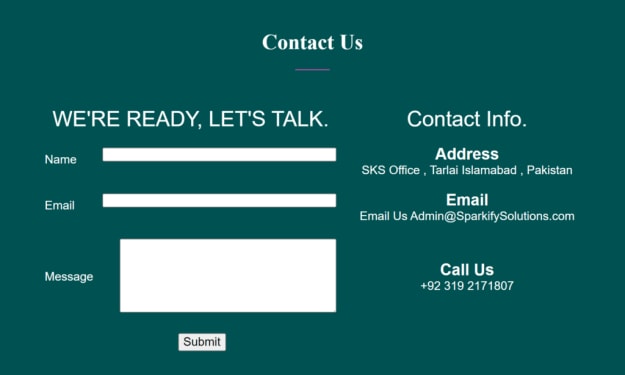
CREATE A CONTACT US PAGE WITH HTML ONLY
Learn How to create contact us page using HTML only. Employ table tags when creating a Contact US web page. Oh! okay make two columns the first column to retrieve the data from the visitor and the second one to display the Contact Info.
By Usama Yousafabout a year ago in Chapters
Fair Exchange, No Robberies
Dark Memoirs - Index There are at least two kinds of people in the world: those who write this half-arsed kind of intro to a story that looks to separate the rare and the norm, and those who realise it's an overused framing device and don't.
By Paul Stewart13 days ago in Chapters


Comments
There are no comments for this story
Be the first to respond and start the conversation.