
[Tutorial] How to Burn MP4 to DVD on Mac and Windows
Learn how to convert MP4 to DVD format on Windows and macOS with 3 best software.

Not long ago, while organizing my video collection, I came across a treasure trove of MP4 video files. Some were travel videos capturing scenic views, while others captured family gatherings and moments with friends. I wanted to burn these MP4 files into DVDs to watch them on a player and big screen. So, I tried three of the most popular MP4 to DVD converters, all of which are effective, each with its own strengths and weaknesses. If you also want to convert MP4 to DVD and relive those cherished moments with family, this article is for you. Let's explore how to easily use these three DVD creators.
Convert MP4 to DVD with DVDFab DVD Creator [Popular Method]
DVDFab DVD Creator is an easy-to-use MP4 to DVD converter that allows you to burn videos to standard DVD format and save them as a DVD folder or ISO file on your hard drive. It's not limited to MP4 files; it supports over 200 video formats, including MKV, AVI, MOV, and more as source files. The software supports both DVD-9 and DVD-5 output, with options for compression or maintaining the original quality. My favorite feature is the extensive customization options it provides. You can add external subtitles and choose from various preset menu templates to customize the appearance of your DVD menus, including text size, colors, background images, and more. The diverse menu styles ensure that your MP4 burns come with attractive and user-friendly menu navigation.
What we like:
- Compatible with over 200 video formats like MP4, MOV, and MKV.
- Combine multiple videos into one with high quality and fast speed.
- Support DVD-9 and DVD-5, and can adjust file size to fit the disc.
- Remove unwanted subtitles and audio tracks, and add external subtitles.
- Customizable menu templates for different themes, holidays, and scenes.
- Support settings of video formats such as PAL or NTSC.
- Offer built-in video editing tools for customizing your videos.
- Compatible for both Windows and macOS.
What we don't like:
- Not available for Linux.
How to Burn MP4 to DVD with DVDFab DVD Creator?
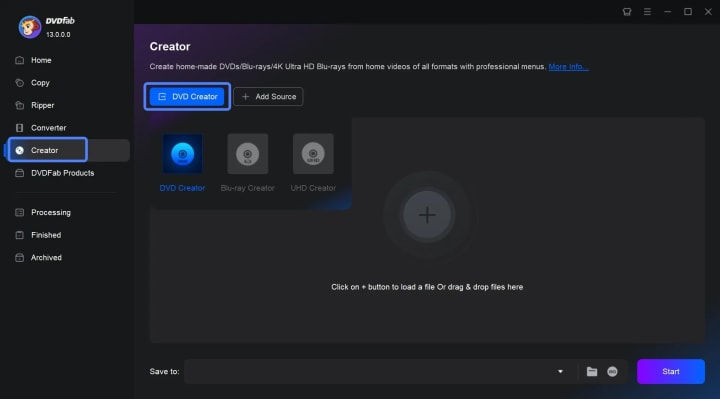
Step 1: Download DVDFab DVD Creator from the official website and install it on your computer. Then, launch DVDFab DVD Creator.
Step 2: Select the "Creator" tab from the left pane and choose "DVD Creator" mode. You can directly drag and drop the video files or folders to the main interface, or click the "+Add Source" button to import the video files. All the videos added will be burnt to one output. Wait till DVDFab completes the analysis process.
Step 3: After loading the source files, you can click the drop-down menus for audio tracks and subtitles on the main panel to select the desired audio and subtitle options. You can also click "Add External Subtitles" to upload external subtitle files.
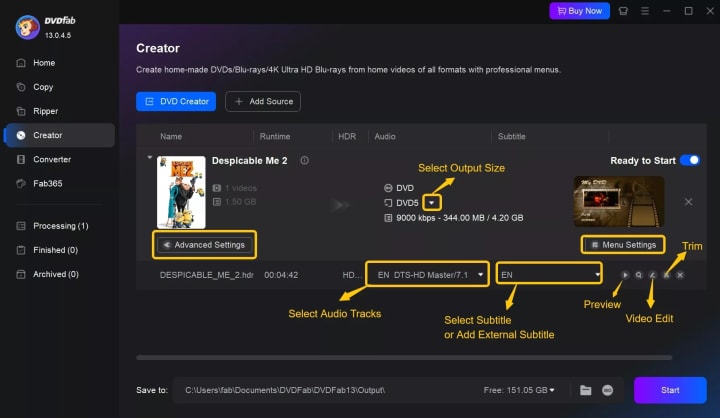
Step 4: Open the "Advanced Settings" panel to adjust the label name, set video quality and output (DVD5 or DVD9), and choose "Fit to Disc" if needed. Set the Menu Properties like TV standard (NTSC or PAL) and aspect ratio, and how you wish to play the copy, starting from a menu or the title.

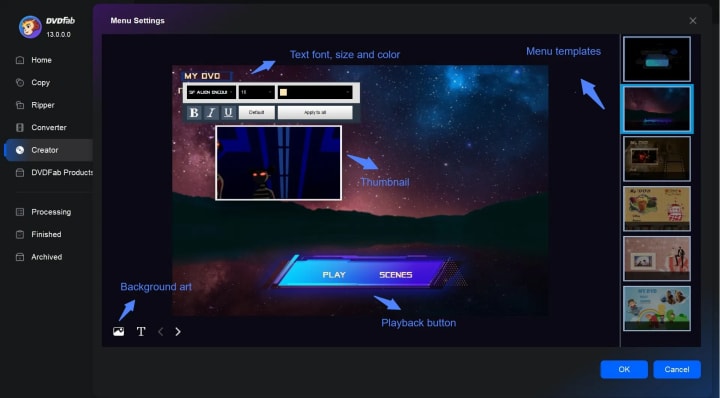
Step 5: Go to the "Menu Settings" to choose a built-in DVD menu template and personalize it per your liking, such as changing the background image and adding text. If you want to edit your videos, click the "Video Edit" and "Trim" button to crop footage, adjust effects, add watermarks, customize subtitles and more.
Step 6: Insert a blank DVD into your computer's DVD drive and set the drive as a target in the SAVE TO field. Click the "Start" button to convert the videos to DVD format and burn them to a DVD.
Burn MP4 to DVD Using ImgBurn
ImgBurn is a free MP4 to DVD converter for Windows. Since its release in 2005, it has become a popular choice for users seeking a straightforward tool to burn MP4 to DVDs and even Blu-ray discs. Despite its discontinuation in 2013, ImgBurn remains a reliable option for many users. It is designed to streamline the process of creating DVDs from video content, including homemade movies. You can use it to burn one or multiple MP4 videos to a DVD, directly burn them onto either DVD5 or DVD9 discs. If you prefer creating a hard disk copy, you can also save the project as an ISO image file.
What we like:
- It's open-source freeware with a portable version that doesn't require installation.
- Create data discs, audio CDs, video DVDs, and Blu-ray discs.
- Verify the data on a disc after burning to ensure accuracy.
- Create disc image files from files on your computer or network.
- Offer advanced features like image queueing, and layer break selection for dual-layer DVDs, as well as changing the burning speed and enabling buffer underrun protection.
What we don't like:
- Windows only.
- Does not support creating custom menus for DVDs.
- Imgburn has stopped updating since 2013, which may lead to compatibility issues.
- Some versions of ImgBurn's installer have been reported to include adware. (Make sure download it from the official site)
❗You might get a positive false alarm from the firewall when you install ImgBurn. But simply ignoring this message and allowing the software to install, the software can run without any issues on my computer.
How to Convert MP4 to DVD Format via ImgBurn?
Step 1: Install and run ImgBurn on your computer.
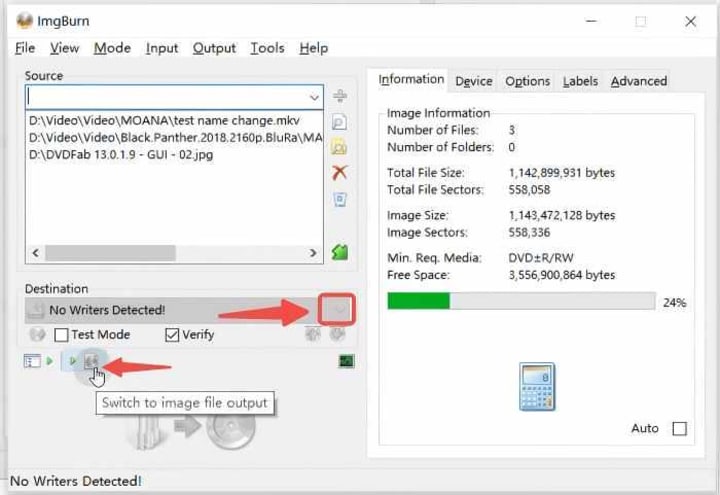
Step 2: Select "Write files/folders to disc" from the main menu. Alternatively, you can choose the "Create image file from files/folders" to save the output to your hard drive if needed.
Step 3: Use the "Browse for a folder" or "Browse for a file" button to select the video file to burn to a DVD.
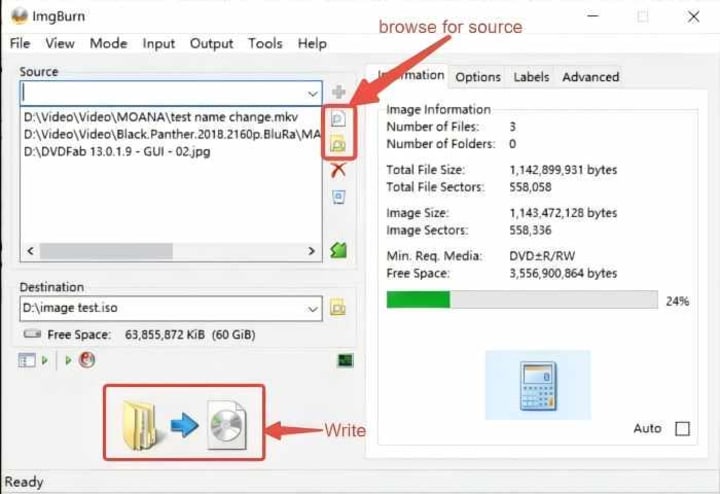
💡Tips: If you change your mind and wish to save it as an Image file instead, click on the button on the lower left pane to switch it.
Step 4: Load a blank DVD into the destination burner.
Step 5: On the right window, calculate the image size, and adjust the writing speed, etc. We suggest using 4x, 6x, or 8x instead of the full burning ratio of the disc to ensure a stable burning process. However, the default settings provided by ImgBurn are perfect for burning discs, so if you are not sure how to set them, simply skip this part.
Step 6: Click the "Write" button to burn the videos to DVD.
Create DVD from MP4 Using DVD Flick
DVD Flick is a user-friendly MP4 to DVD converter that is also completely free and open-source. It allows you to effortlessly convert and burn popular video formats like MP4 to DVD format, saving the final output as an ISO Image file on your computer or directly burning your videos onto blank DVDs. With DVD Flick, you have the ability to seamlessly adjust the order of titles on your DVD and choose between single-layer and double-layer disc formats to suit your specific needs.
What we like:
- Support over 45 container formats, including MP4, AVI, MPEG, and more.
- Support importing subtitles and extra audio tracks to different videos.
- Allow for the creation of simple DVD menus, providing a basic navigation structure.
- Support settings of video formats such as PAL or NTSC.
- Free and open-source project for Windows.
What we don't like:
- Limited selection of menu templates and options.
- Lack of support for advanced video editing features.
- Occasional stability issues and slow encoding speed, especially for larger video files.
- The last update was released in 2009, which may lead to compatibility issues with newer operating systems.
💡In my experience, some video files cannot be loaded as a source, even though those videos can be loaded successfully using other DVD creator software. However, most MP4 files serve as reliable source material for DVD creation with DVD Flick.
How to Convert MP4 Videos to DVDs with DVD Flick?
Step 1: Install and run this free MP4 to DVD converter on your computer.
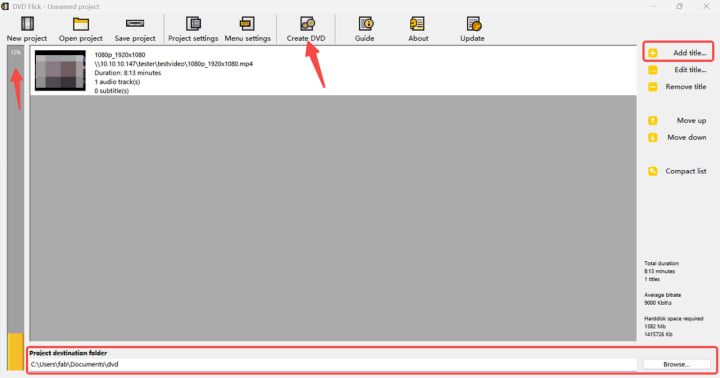
Step 2: Click the "Add title" button to import the video files you want to burn to a DVD. You can add multiple files at once.
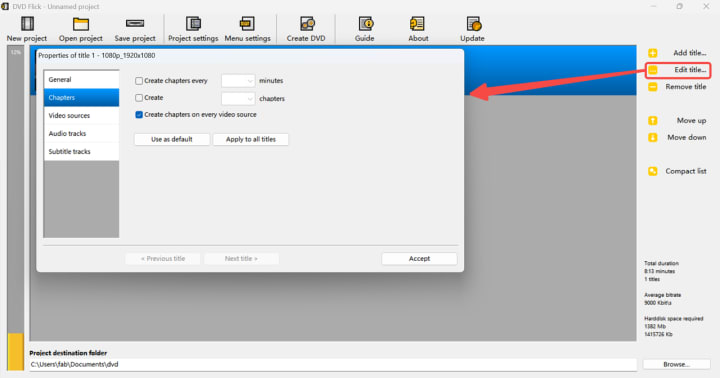
💡Tips: After highlighting a certain title, you can click the "Edit title..." button to open the properties of the title, where you can set the aspect ratio of the target, create chapters to your liking, add external subtitles as well as add audio tracks.
Step 3: Once you have added all your video files, you can customize the DVD menu by selecting a template from the list.
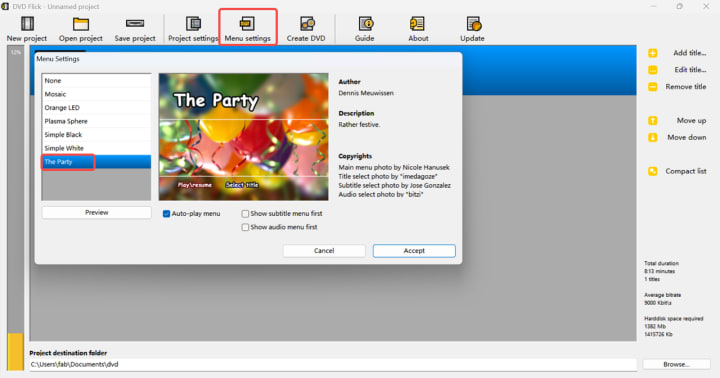
Step 4: Next, click the "Project Settings" button to configure the DVD settings, such as video/audio bitrate, how titles play, video format (PAL/NTSC), and disc label.
Step 5: If you want to save the file as an ISO image, tick the "Create ISO image" option in the Burning tab. On the other hand, tick the option "Burn Project to disc", set the burner in the "Drive" field, and confirm the changes by selecting the "Accept" button on the window.
Step 6: After you have made all the necessary adjustments, click on the "Create DVD" button to start the DVD-burning process.
Conclusion
In this article, we've explored three of the most popular MP4 to DVD burners: DVDFab DVD Creator, ImgBurn, and DVD Flick. Each of these converters has its strengths and limitations: If you're looking for a hassle-free and feature-rich DVD burning experience like me, DVDFab DVD Creator is the way to go. If you prefer open-source and free MP4 to DVD converter or are using an older version of Windows, ImgBurn is a great choice. So, choose the one that best aligns with your preferences.
About the Creator
Wenny
Hi there, I'm Wenny, a technical writer sharing multimedia solutions accessible for everyone. Read my articles to turn "how?" into "let's do it!"
Japan Smart Doorbell Market Size and Forecast 2025–2033
Market Snapshot The Japan Smart Doorbell Market is expected to reach US$ 736.05 million by 2033, up from US$ 212.53 million in 2024, expanding at a robust CAGR of 14.8% from 2025 to 2033. Rapid urbanization, increasing adoption of smart home technologies, and rising demand for home security systems are driving market growth. Advancements in AI, video analytics, and wireless connectivity are further strengthening consumer demand for smart doorbell systems.
By jaiklin Fanandisha day ago in 01
Data Anonymization Techniques to Ensure Privacy in Modern Enterprises
Enterprises today work with massive volumes of data coming from customers, users, employees, and digital systems. This data is critical for analytics, reporting, artificial intelligence, and strategic decision making. However, much of it contains sensitive or personal information that cannot be exposed or misused. With strict data privacy regulations and growing awareness around data protection, organizations must find a way to use data responsibly.
By Vinod Vasava4 days ago in 01


Comments
There are no comments for this story
Be the first to respond and start the conversation.