
3 Free and Paid DVD Burning Software for Windows 10/11/8/7
Discover DVD burners for Windows 11/10/8/7—tested picks with pros/cons, quick setup steps, and FAQs to help you create discs fast.


If you are looking for free DVD burning software for Windows 8 to back up your files, documents, audio, or videos, you'd better search "DVD burner Windows 10," as Windows 10 was the most widely used version of Windows. Let's run tests and find out the best paid and free DVD burning software for Windows 11/10/8/7 to burn a DVD per your liking quickly.
The Best DVD Burner for Windows 11/10/8/7: DVDFab DVD Creator
I like DVDFab DVD Creator because it focuses on one job and does it well: turning everyday video files into playable DVD-Video you can watch on a living-room DVD player, a console like PS5/Xbox, or software players. It accepts 200+ input formats (MP4, MKV, AVI, MOV, M2TS, FLV, VOB, TS, etc.), lets me author a menu with ready-made templates I can customize, and then outputs straight to a blank disc or to an ISO/VIDEO_TS folder. There's a real-time preview, basic built-in editing (trim/crop, watermark, external subtitles, brightness/contrast), and it taps multi-core CPU plus GPU acceleration (CUDA/AMD/Intel Quick Sync). It supports Windows 11/10/8.1/8/7 (32 or 64 bit), and there's a dedicated macOS version available as well.
Pros
- Wide format & output support. Converts from 200+ video formats to standard DVD; can target DVD-5/DVD-9 on DVD±R/RW/DVD±R DL, or export ISO/folder if I want to test first or archive.
- Menu authoring that's actually usable. Template library with periodic updates, plus fine-grained tweaks (backgrounds, thumbnails, fonts, button states).
- Built-in quick edits. Trim/crop, watermark, add external subtitles, adjust brightness/contrast—handy for last-mile fixes.
- Speed-ups. Multi-core + GPU acceleration with up to 50× faster processing claimed; there's also a real-time preview to sanity-check before burning.
Cons
- Not freeware. But there's a free trial.
- Acceleration depends on your hardware.
How to use this DVD burning software on Windows 8 and other Windows versions?
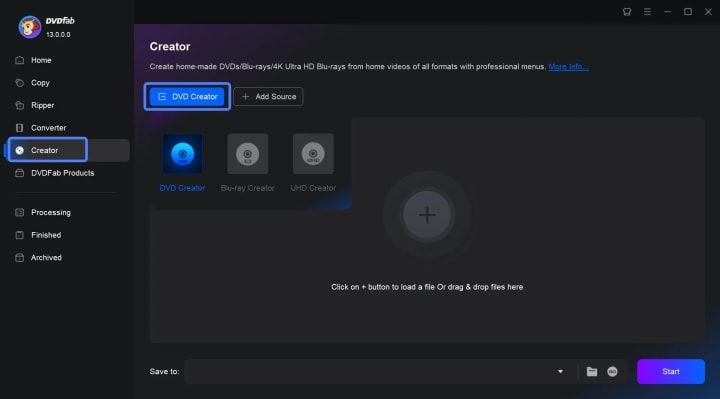
Step 1. Import your videos
Open DVDFab → choose "Creator" → select "DVD Creator". Click "Add Source" (or drag and drop) to load the clips you want on the disc.
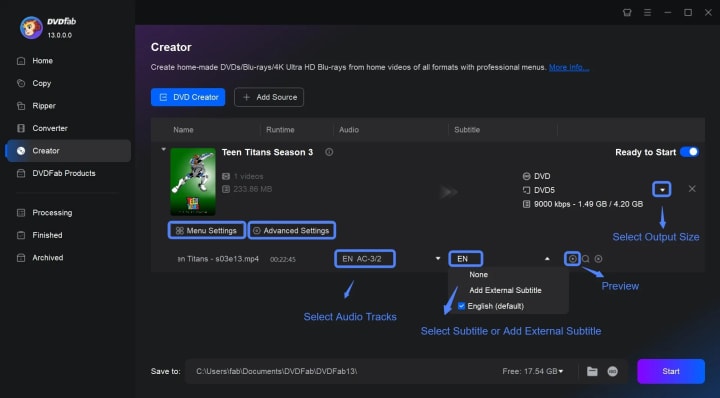
Step 2. Set disc and menu options (and do light edits)
Click "Advanced Settings" to pick the output size ("DVD-5" or "DVD-9") and quality/preset. Open "Menu Settings" to choose a template and customize backgrounds, thumbnails, text (font/size/color), and button behavior. If needed, use the built-in editor to "Trim", "Crop", add a "Watermark" and so on.
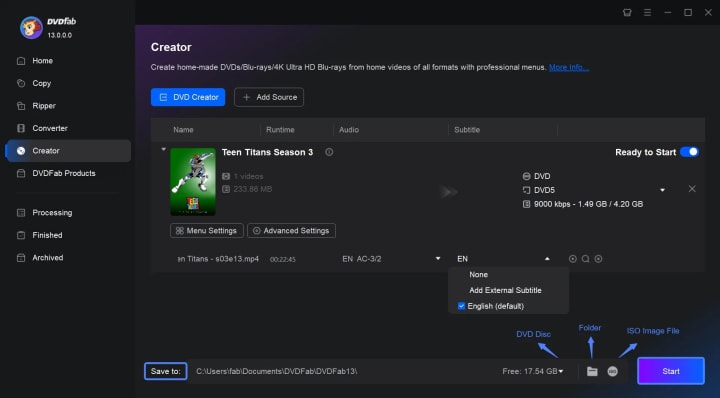
Step 3. Choose where to output and start
In "Save to", pick your optical drive to burn now, or choose "Folder (VIDEO_TS)" or "ISO" to author to the hard drive first (recommended for testing). Click "Start" to begin burning.
The Best Free DVD Burning Software for Windows 10: ImgBurn
ImgBurn is a long-standing free DVD burner for Windows that has earned a reputation for rock-solid burn reliability. It's Windows-only and can write just about anything you throw at it—image files (e.g., ISO/BIN), file/folder compilations for data discs, and even audio via cue sheets—to CDs, DVDs and Blu-ray media. It also builds images from discs or from files/folders, and its Verify (and Discovery) tools help confirm a freshly written disc is fully readable and test your drive/media quality. Although development has been dormant since v2.5.8.0 (June 16, 2013), our tests show it still runs normally on Windows 10 and Windows 11.
Pros
- Capable of creating data discs, audio CDs, video DVD/Blu-ray discs.
- Support setting layer-break if you want to burn dual-layer DVDs, changing the burning speed, and enabling buffer underrun protection.
- Allow for creating ISO image files from files/folders saved on your computer or network.
- Provide Test Mode before burning and support verifying the disc after burning.
Cons
- Windows only.
- Imgburn hasn't been updated for a long time.
- Menu creation or templates are not an option.
How to use this DVD burning software on Windows 11/10? Learn details for using ImgBurn here:
Step 1. Download & install
Download and install ImgBurn from the official website.
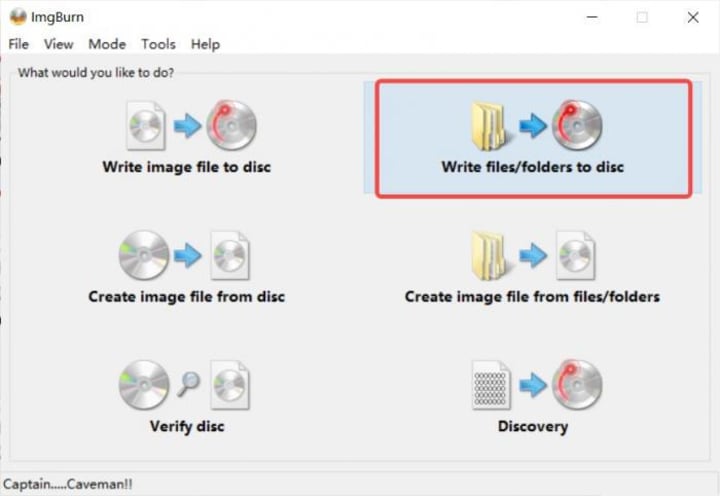
Step 2. Choose the write mode
Launch ImgBurn and, in the Ez-Mode Picker, select "Write files/folders to disc".
Step 3. Add your content
Use the folder or file buttons to import the video files and folders you wish to burn to DVDs.
Step 4. Select the target drive
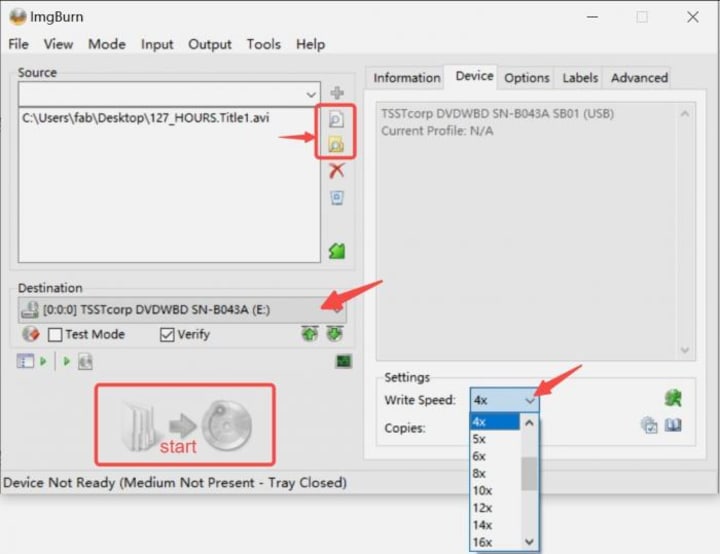
Insert a blank DVD, then choose your burner under "Destination".
Step 5. Set basic options
Open the right-hand "Device" tab and choose "Write Speed". If you're unsure, leave the default or "AUTO".
Step 6. Start burning
Click the Start button (folder → disc icon) to begin. Wait for ImgBurn to finish; if "Verify" is enabled, it will check the disc automatically afterward.
Free DVD Burning Software for Windows 8: DVD Flick
When I need a totally free authoring tool on an older Windows machine (like Windows 8), I reach for DVD Flick. It specializes in turning everyday video files into a playable DVD-Video with optional menus, multiple audio tracks, and external subtitles. After encoding, it can burn to disc or simply create an ISO/VIDEO_TS folder so I can test in a software player first. It's lightweight, no adware, and supports 45+ formats/60+ video codecs/40+ audio codecs, which is more than enough for home projects. Officially, it supports Windows 2000/XP/Vista/7 with very modest CPU/RAM requirements. In practice, community reports and my own experience show it still runs on Windows 8, and even Windows 10/11, just fine.
Pros
- Authoring features that matter: basic menus, chapters, multiple audio tracks, and external subtitle.
- Flexible outputs: burn straight to disc or create ISO/folder for testing or later burning. There's also an option to verify the disc after burning.
- Plays well with ImgBurn under the hood (historically bundled/updated), which helps with reliable disc writing.
- Free and no ads; small install and simple UI.
Cons
- Stale development: v1.3.0.7 has been the de-facto final release for years; don't expect HEVC or modern GPU acceleration.
- Official OS list stops at Win7 (even though it generally runs on Win8/10/11).
- Basic menus/templates and slower encodes on today's standards (CPU-only MPEG-2). Community notes occasionally mention quirks with menu behavior.
How to use this Free DVD Burning Software on Windows 8?
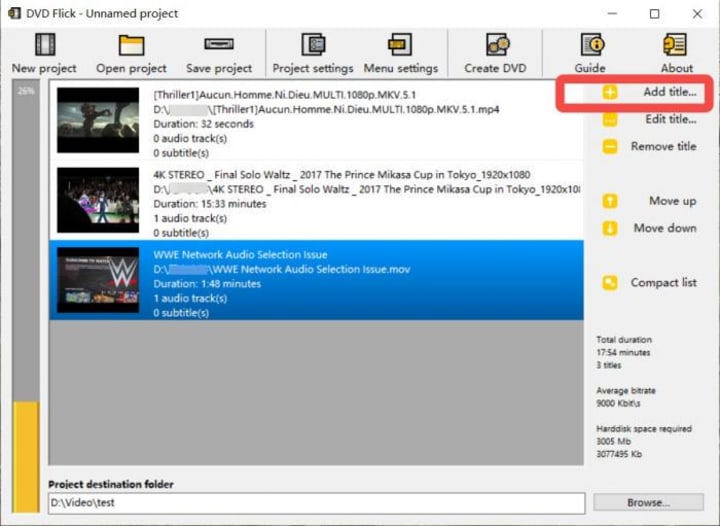
Step 1. Import videos and set chapters/subtitles
Launch DVD Flick and click "Add title" (or drag-drop) to load your videos. Select a title and hit "Edit title" to set "Chapters" (by count or time interval). In the same window you can "Add" external subtitle files and "Add" extra audio tracks if needed.
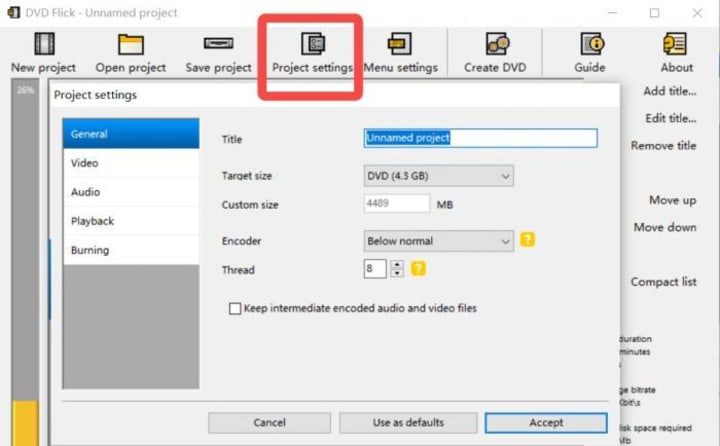
Step 2. Configure the project
Click "Project settings". Under "General", choose "Target size" (e.g., "DVD-5" 4.3 GB or "DVD-9"). Under "Video", set "Target format" (PAL/NTSC/Mixed) and "Encoding profile" ("Fast/Normal/Best"). For very long projects (~3 hours), avoid "Fast" to protect quality. At the bottom of the main window, choose a destination folder with plenty of free space.
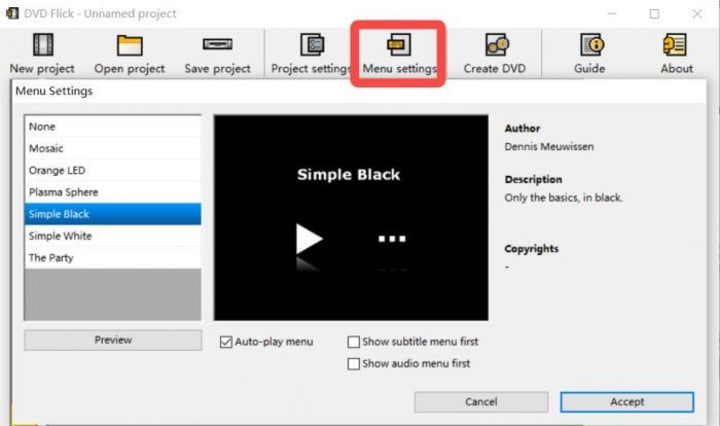
Step 3. Add a menu (optional)
Click "Menu settings", pick a template, "Preview" it, then enable "Enable menu" (or choose "None" if you don't want one).
Step 4. Choose output: burn or ISO
In "Project settings" → "Burning", you can tick "Burn project to disc" (pick your drive and label), or tick "Create ISO image" to build an ISO you can test and burn later. There's also an option to "Verify disc" after burning.
Step 5. Start
Hit "Create DVD". Encoding begins and the app generates your VIDEO_TS, ISO, and/or writes to disc per your choices.
FAQ about Free DVD Burning Tool for Windows 10
Q1. Do we have a free DVD burner for Windows 10?
Yes, in Windows 10, we can use the built-in DVD burner to burn files and videos.
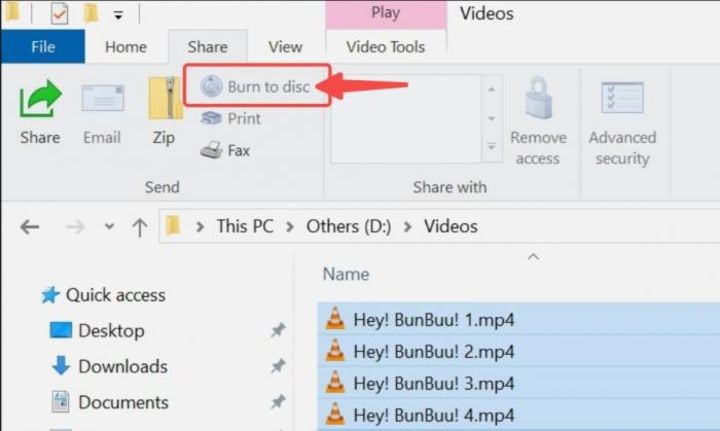
Step 1. Open the folder that contains the files and videos you want to burn in Windows File Explorer.
Step 2. On the top, switch to "Share", select the videos, and then select "Burn to disc."
Step 3. Insert a blank DVD to continue the process.
Q2. Must I install additional tools to burn video files to a DVD?
In the earlier versions of Windows (e.g. Windows 7), you can use Windows Media Player as a burning tool for burning CDs/DVDs. In the latest Windows 10 and Windows 11, you can also use the "Burn to disc" feature. However, if you want to enhance the burning experience and make the created DVD more compatible, it's better to rely on a dedicated DVD burner for Windows 10/11 system to convert the videos to DVD video format first, and then burn DVDs. You may consider the following software: DVDFab DVD Creator, CDBurnerXP, and more.
Q3. Can you create menus while using a free DVD burner for Windows 8?
Yes. Free DVD burners like DVD Flick, can create a menu while burning DVDs. Paid software like DVDFab DVD Creator also provides the menu features. All of them can produce DVD-video format output and burning DVDs.
Conclusion
There are many DVD burners for Windows 8 and other Windows systems. Some DVD burning software is compatible with CDs and Blu-rays in addition to regular DVDs, some provide a user-friendly interface allowing you to burn the videos to DVD effortlessly, while some others may lack advanced video or menu editing capabilities, the left part may no longer receive regular updates. Anyhow, it is worth testing with different DVD burning software for Windows 11/10 to find the one that best fits your requirements.
About the Creator
Wenny
Hi there, I'm Wenny, a technical writer sharing multimedia solutions accessible for everyone. Read my articles to turn "how?" into "let's do it!"
Italian Brainrot: Gen Alpha
If you walk through a bustling piazza in Milan or stand near a school gate in Rome during the afternoon rush, you might hear a conversation that feels like a glitch in the linguistic matrix. You’ll see a group of twelve-year-olds, dressed in matching tech-fleece tracksuits, shouting about "Skibidi," debating who has the most "Aura," and accusing each other of being from "Ohio." To anyone born before the year 2010, this sounds like a collective mental breakdown. But to the architects of this new reality—Generation Alpha—it is the only language that makes sense.
By Teodor Monescu7 days ago in 01


Comments
There are no comments for this story
Be the first to respond and start the conversation.