
🚀 Speed Up Your Django App with Celery and CloudAMQP: Simple Background Tasks
Building Scalable Django Apps with Celery and RabbitMQ
Have you ever been irritated when your website takes too long to complete a task, such as creating a report or sending an email? If so, you've come to the correct spot! To avoid making your users wait, we'll demonstrate how to make your Django application manage these sluggish tasks in the background.
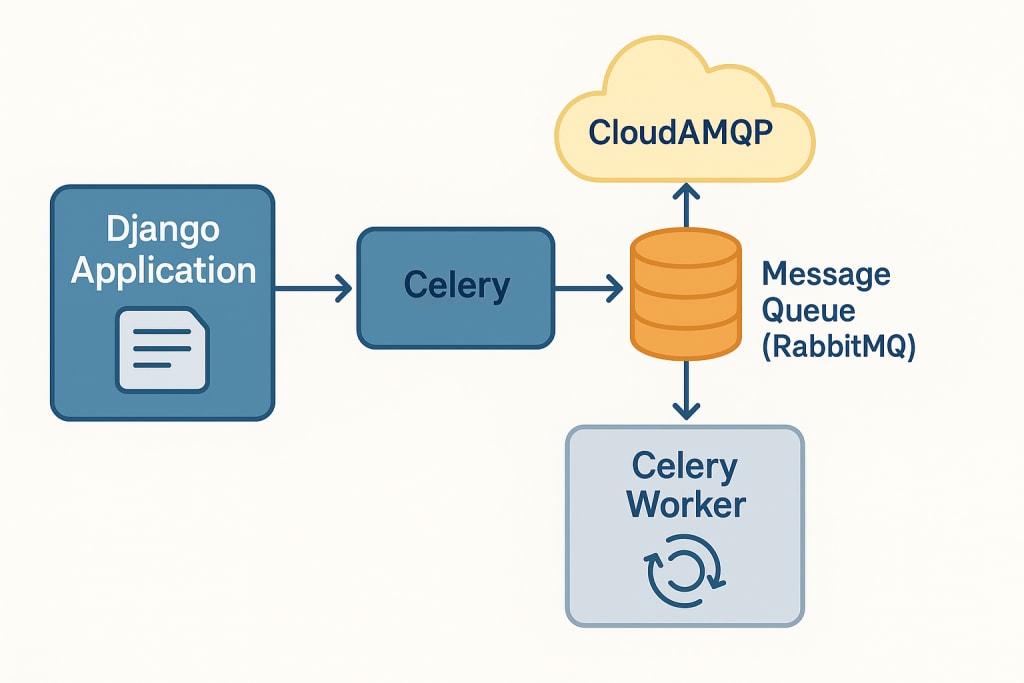
We'll make use of two useful tools:
Celery: Consider it a worker bee that handles the tedious tasks that go on behind the scenes.
CloudAMQP: This is comparable to a cloud message box that Celery uses to get commands. Although it uses RabbitMQ, CloudAMQP makes it very easy to use and doesn't require any setup.
The Benefits of Background Tasks
Imagine that after registering on your website, a user must wait a very long time to receive a confirmation email. Or they select "Download Report" and are left with an endless spinning spinner.
That's because all of the hard work is being done by your website at that very moment. Not the best!
✅ The Solution? Let Celery do that work in the background. It's similar to having a helper who handles the tasks while maintaining a responsive and speedy website.
CloudAMQP: What is it?
CloudAMQP functions similarly to a pre-made task delivery service. It makes use of RabbitMQ, a protocol for programs to talk to each other but makes it easy to use. Nothing special needs to be installed on your computer. You can send and receive tasks in the cloud with CloudAMQP, which is ideal for Django and Celery.
🛠️ Let's Begin: Step by step
First Step: Create a Free CloudAMQP Account
Sign up at CloudAMQP.
Make a free account (the "Mini" free plan, they call "Loyal Lemming (LavinMQ)" plan, is ideal for experimenting).
You'll need your CLOUDAMQP_URL shortly.
Step 2: Make a New App and Django Project
Install Django and Celery
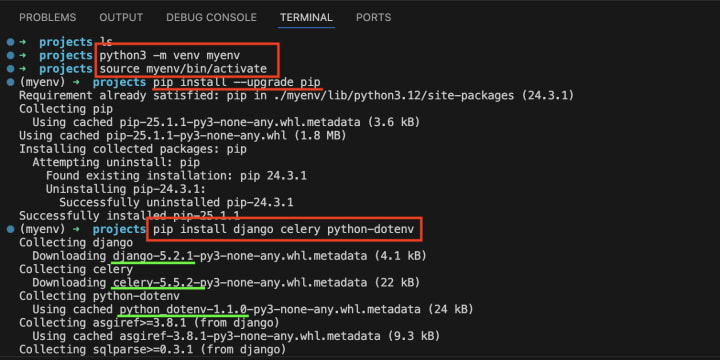
Optional: Create a virtual Python environment (named myenv) if you want to separate for environment for each project with different version of libraries.
python3 -m venv myenv
Activate virtual environment
source myenv/bin/activate
If you don't already have Django, install it:
pip install django
Create new Django project:
django-admin startproject myproject
Open the project folder:
cd myproject
Make a new sample application:
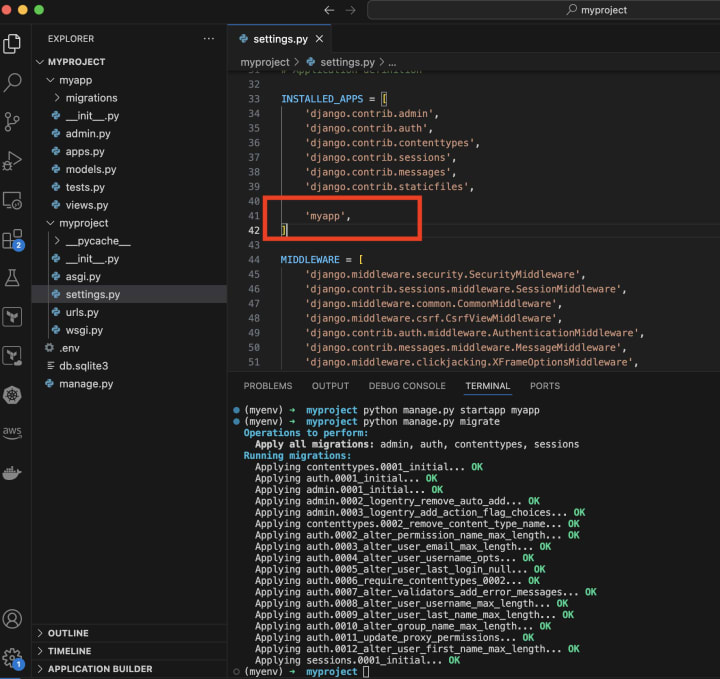
python manage.py startapp myapp
Set this in Django setting
myproject/myproject/settings.py
INSTALLED_APPS = [
...
'myapp',
]
Get things ready and start your website (just to make sure it works):
python manage.py migrate
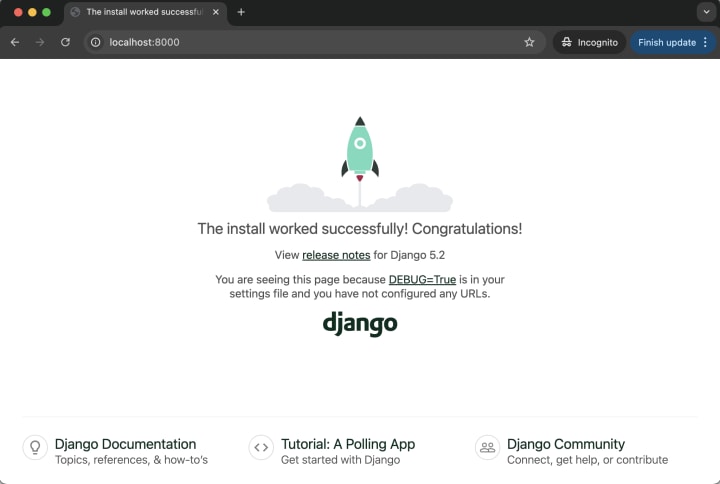
python manage.py runserver
Screenshot for setting Django app
Check Django running on your browser
Step 2: Install Celery
pip install celery python-dotenv certifi
This install celery for task queues and python-dotenv to read .env file from local for more secured way to store sensitive information like username and password or CloudAMQP URL and its credentials.
Step 3: Make a .env File
In main Django project folder, create a file named .env and put your CloudAMQP link inside:
CLOUDAMQP_URL=amqps://your_username:your_password@your_host/your_vhost
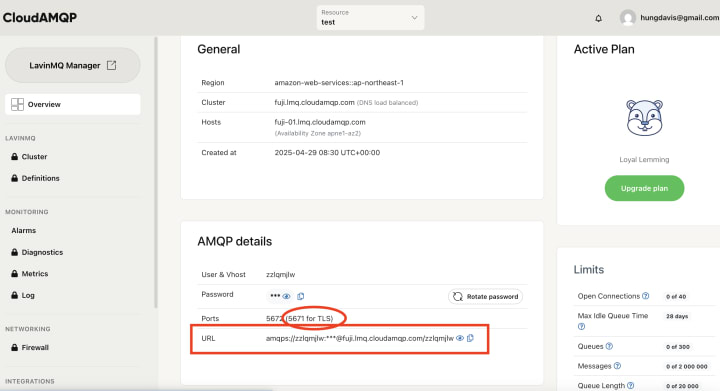
CloudAMQP Credentials Example:
Please login into your CloudAMQP dashboard to get credential information like screenshot bellow:
Step 4: Set Up Celery in Django
Create a file named celery.py inside your myproject folder:
import os
from celery import Celery
os.environ.setdefault("DJANGO_SETTINGS_MODULE", "myproject.settings")
app = Celery("myproject")
app.config_from_object("django.conf:settings", namespace="CELERY")
app.autodiscover_tasks()
@app.task(bind=True, ignore_result=True)
def debug_task(self):
print(f'Request: {self.request!r}')
In myproject/myproject/__init__.py, add this line:
from .celery import app as celery_app
__all__ = ("celery_app",)
Now, open settings.py and add these Celery settings:
# Put this to your top settings.py
import os, ssl, certifi
from dotenv import load_dotenv
load_dotenv()
# Put these to end of settings.py
CELERY_BROKER_URL = os.environ.get('CLOUDAMQP_URL', 'amqp://guest:guest@localhost:5672//')
CELERY_RESULT_BACKEND = "rpc://"
CELERY_ACCEPT_CONTENT = ["json"]
CELERY_TASK_SERIALIZER = "json"
CELERY_BROKER_USE_SSL = {
"ca_certs": certifi.where(),
"cert_reqs": ssl.CERT_REQUIRED,
"ssl_version": ssl.PROTOCOL_TLS_CLIENT,
}
5. Make Your First Task
Inside your myapp folder, create a file named tasks.py:
# myapp/tasks.py
from celery import shared_task
@shared_task
def do_heavy_work():
# Imagine this takes a long time to do
# ... do some hard work for the report ...
return "Task done!"
The @shared_task thing tells Celery that this function can run in the background.
6. Start the Celery Worker
Open a new terminal and run this command (make sure your Django server is still running in the other window):
Terminal 1:
celery -A myproject worker -l info
Terminal 2:
python manage.py runserver
This starts Celery and it will listen for tasks to do.
7. Tell Celery to Run a Task
Example: Send email
Now, let's see how to actually run that sends an email
task in the background. In your Django code (like in a view), you can do this:
# myapp/tasks.py
from celery import shared_task
from myapp.utils import process_send_email
@shared_task
def send_email(to_email):
process_send_email(to=to_email) # This might take a while
print(f"Email sent to {username}")
And you'd run it like this:
# myapp/views.py
from django.http import JsonResponse
from myapp.tasks import send_email
def register_user(request):
# Do stuff for register user, then
if request.method == "POST":
send_email.delay("[email protected]")
return JsonResponse({"status": "email queued"})
# ...
Celery automatically finds these functions because of app.autodiscover_tasks().
The .delay() command is a quick way to tell Celery to run the task.
8. Make Celery Easier to Understand
Instead of using Celery's default names like .delay() and @shared_task, let's make our own that are easier to read. Create a file named task_utils.py inside your myproject folder:
from celery import shared_task as queued_task
def push_to_queue(task, *args, **kwargs):
"""Send a task to Celery to run now."""
return task.delay(*args, **kwargs)
def schedule_to_queue_with_options(task, args=None, kwargs=None, **options):
"""Send a task to Celery with extra settings (like when to run it)."""
return task.apply_async(args=args or (), kwargs=kwargs or {}, **options)
def try_again_later(task_instance, **kwargs):
"""Tell a failed task to try running again later."""
return task_instance.retry(**kwargs)
📌 Quick look at extra options:
schedule_to_queue_with_options(task, args=["data.csv"], countdown=60, expires=3600)
Some common options:
countdown: Wait this many seconds before running.
eta: Run at a specific date and time.
expires: If not run by this time, forget it.
queue: Send to a specific worker group.
retry: Should it try again if it fails?
9. Create a Task Using Our New Names
Now, in myapp/tasks.py, let's use our friendlier names:
from myproject.task_utils import queued_task
from time import sleep
@queued_task
def send_welcome_email(user_email):
# Pretend sending an email takes a while
sleep(10)
print(f"Sending welcome email to {user_email}")
10. Run the Task from Django
Here's how you might start the send_welcome_email task when someone signs up:
from myproject.task_utils import push_to_queue
from myapp.tasks import send_welcome_email
from django.http import JsonResponse
def register_user_view(request):
# ... your signup code ...
user_email = "[email protected]"
# Instead of sending the email now, tell Celery to do it
push_to_queue(send_welcome_email, user_email)
return JsonResponse({"status": "email queued"}) # Tell the user it's being sent
Remember to keep your Celery worker running with:
celery -A myproject worker --loglevel=info
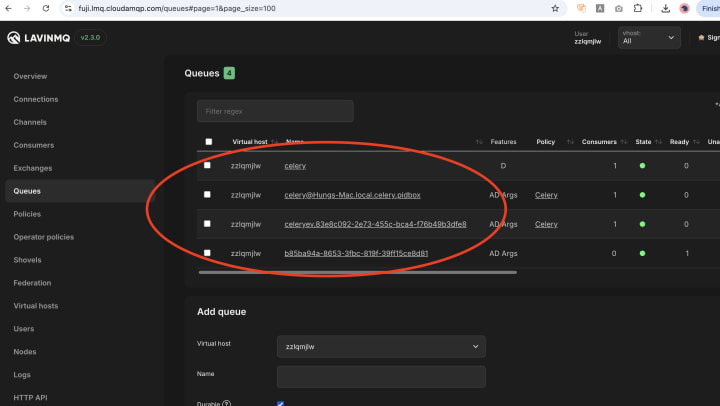
11. How the Tasks are Managed (Bref)
Celery and CloudAMQP use a special system to keep track of tasks, not your Django database. But imagine it like a simple list:
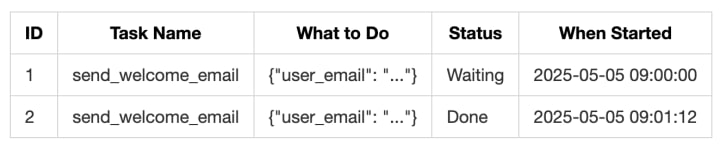
CloudAMQP (RabbitMQ) is the real manager here, making sure Celery workers get the tasks.
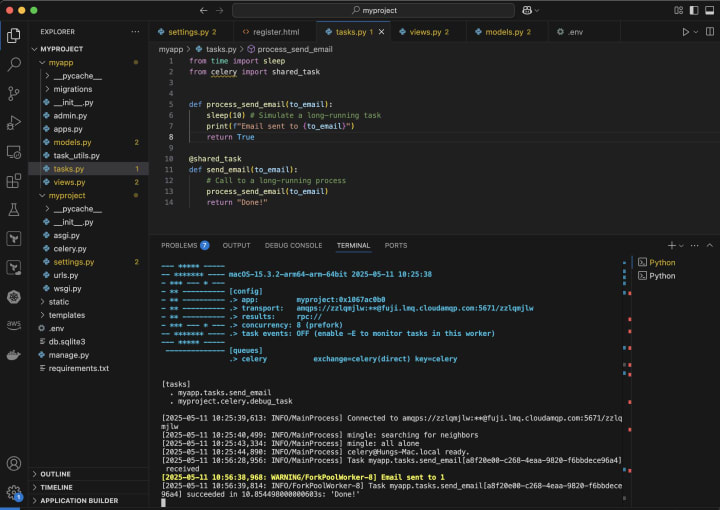
Sample Screenshots:
Celery running workers:
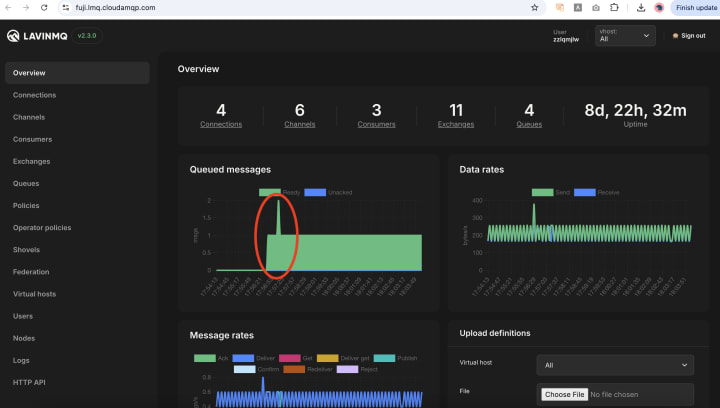
Check CloudAMQP dashboard:
🎯 Why This is Great for Your Django App
Using Celery for slow tasks makes your Django app much better:
✅ Happy Users: Your app feels fast because they don't have to wait for slow things to finish.
✅ No More Website Freezing: Your server won't get stuck on long tasks.
✅ More Control: You can retry tasks that fail, schedule them to run later, and keep your website code cleaner.
Visualization for an use case of background task:

✅ Example 1: Fast Signups (Emails Sent Later)
# myapp/tasks.py
from myproject.task_utils import queued_task
@queued_task
def send_welcome_email(user_email):
# The actual work of sending the email
print(f"Sending welcome email to {user_email}")
# myapp/views.py
from myproject.task_utils import push_to_queue
from myapp.tasks import send_welcome_email
from django.http import JsonResponse
def register_user_view(request):
# ... handle signup ...
user_email = "[email protected]"
push_to_queue(send_welcome_email, user_email)
return JsonResponse({"status": "OK", "message": "Welcome email is on its way!"})
🎯 Benefit: Users get signed up quickly, and the email is sent in the background.
✅ Example 2: Making Big Reports Without Waiting
# myapp/tasks.py
from myproject.task_utils import queued_task
from .utils import make_big_report, save_report_to_file, email_report
@queued_task
def generate_and_send_report(user_id):
report_data = make_big_report(user_id)
file_path = save_report_to_file(report_data)
email_report(user_id, file_path)
Instead of making the user wait while this whole process happens, Celery does it in the background and can even email the user when it's done.
✅ Example 3: Trying Again if Things Go Wrong
# myapp/tasks.py
from myproject.task_utils import queued_task, try_again_later
import requests
@queued_task(bind=True)
def get_data_from_api(self, api_url):
try:
response = requests.get(api_url)
response.raise_for_status()
return response.json()
except requests.exceptions.RequestException as e:
try_again_later(self, countdown=60, exc=e)
return None
🧠 Final Thoughts
Celery and CloudAMQP are a great team for handling heavy tasks in Django.
It doesn't take much work to set up, and it makes your app much better for your users.
Using clear names for your task functions makes your code easier to understand.
✨ Now your Django app has the power to do things in the background! Go build something awesome! I will create another article for how we can build a scheduled tasks system, please check again.
Happy coding 😃
About the Creator
Hung Davis
A tech enthusiast who loves sharing experiences and ideas, making technology simple, accessible, and exciting for everyone. Sharing content breaking down tech topics into easy lessons to help others learn, grow, and innovate!
Keep reading
More stories from Hung Davis and writers in 01 and other communities.
AWS ElastiCache vs EC2 Redis: Which Caching Solution Should You Choose in 2025?
Introduction Is your application feeling sluggish? Are database queries becoming a bottleneck? Caching is your friend! But diving into the world of caching presents a big choice right away: do you go with a managed service like AWS ElastiCache (using the popular Redis engine), or do you roll up your sleeves and manage Redis yourself, maybe on an EC2 instance?
By Hung Davis9 months ago in 01
Understanding Winter Clothing and Its Role in Women’s Fashion
Winter clothing has long served a practical purpose: protecting the body from cold temperatures, wind, and moisture. Over time, however, it has evolved into a reflection of culture, technology, and personal style. For women in particular, winter wardrobes balance insulation, comfort, and visual appeal, adapting to diverse climates and lifestyles.
By charliesamuel7 days ago in 01
Ludacris and Nelly draw backlash over bookings at MAGA-coded music festival
Ludacris and Nelly headlining a mostly right-wing event is good for them. It’s also great for the genre of hip hop. The two rap veterans have showcased their talents on other stages. Why can’t they perform for mostly MAGA folks and grab that bag?
By Skyler Saunders4 days ago in Beat


Comments
There are no comments for this story
Be the first to respond and start the conversation.