
Replace Toner in Brother Printer: A Step-by-Step Guide
Replace Toner in Brother

When your Brother printer runs out of toner, it’s essential to replace it to ensure your documents continue printing with optimal quality. Replacing toner is a straightforward process that can be completed in just a few minutes. In this guide, we’ll walk you through the steps to replace the toner in your Brother printer effectively.
Why Replace the Toner?
Toner cartridges in Brother printers contain the powdery substance used to create text and images on paper. Over time, this toner depletes, resulting in faded or incomplete printouts. Regularly replacing your toner not only ensures high-quality prints but also extends the life of your printer by preventing damage caused by overused cartridges.
What You’ll Need:
A new toner cartridge compatible with your Brother printer model.
A clean, flat workspace.
A soft, lint-free cloth (optional, for cleaning).
Step-by-Step Instructions
Step 1: Prepare Your Workspace
Find a clean and flat surface near your printer to perform the replacement.
Lay down a sheet of paper or cloth to catch any stray toner particles.
Step 2: Power Off and Unplug the Printer
For safety, turn off the printer and unplug it from the power source. This prevents any accidental operation while you’re handling the internal components.
Step 3: Open the Printer Cover
Locate the printer’s front or top cover, depending on your model. Typically, it will be marked with a release lever or button.
Open the cover gently to access the toner cartridge and drum unit.
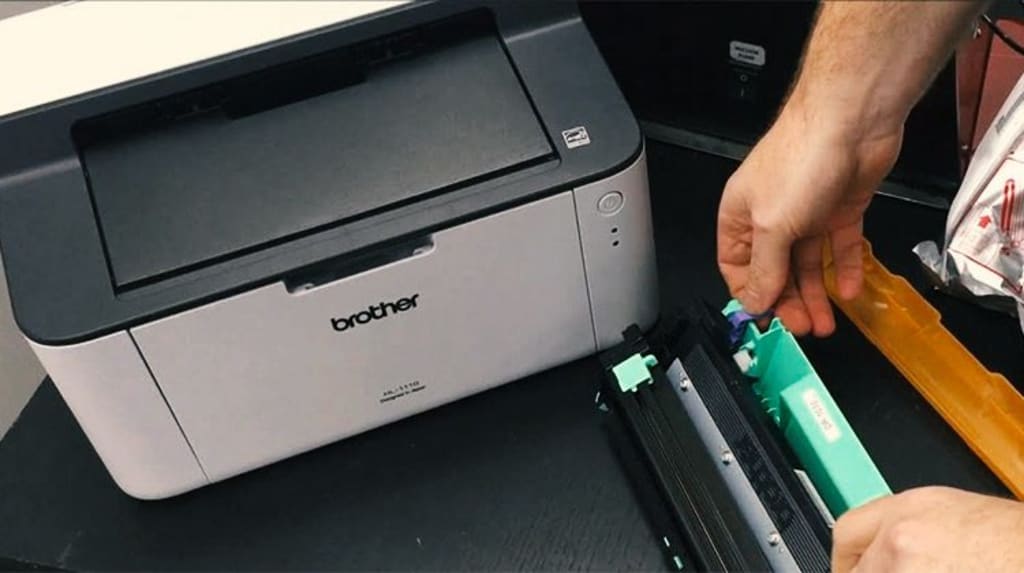
Step 4: Remove the Toner Cartridge
The toner cartridge is usually housed within a drum unit.
Pull out the drum unit assembly carefully.
Release the toner cartridge from the drum unit by pressing the lock lever on the side.
Remove the old toner cartridge and set it aside for recycling.
Step 5: Prepare the New Toner Cartridge
Take the new toner cartridge out of its packaging.
Gently shake it from side to side a few times to evenly distribute the toner inside.
Remove the protective cover or seal from the cartridge.
Step 6: Install the New Toner Cartridge
Insert the new toner cartridge into the drum unit. Ensure it clicks securely into place.
Check that the cartridge is seated properly to avoid printing issues.
Step 7: Reinstall the Drum Unit
Slide the drum unit assembly back into the printer.
Ensure it is aligned correctly and fits snugly into its compartment.
Step 8: Close the Printer Cover
Close the printer cover securely. You should hear a click indicating it is locked in place.
Step 9: Plug In and Test
Plug the printer back into the power source and turn it on.
Print a test page to verify the toner replacement was successful and check print quality.
Tips for Optimal Results
Use Genuine Toner Cartridges: While third-party cartridges may be cheaper, genuine Brother toner ensures the best quality and compatibility.
Recycle Old Cartridges: Most manufacturers, including Brother, offer recycling programs for used toner cartridges. Check their website for details.
Clean the Drum Unit: If your prints appear streaky or have spots, clean the drum unit gently with a lint-free cloth before installing the new toner.
Store Toner Properly: Keep spare toner cartridges in a cool, dry place away from direct sunlight to maintain their quality.
Common Issues and Troubleshooting
Toner Not Recognized: If the printer doesn’t detect the new toner, remove it, reinstall it, and ensure it clicks into place.
Poor Print Quality: If prints are faint or uneven, double-check that the cartridge was shaken properly before installation.
Error Messages: Clear any residual error messages by resetting the printer or consulting the user manual for your specific model.
Conclusion
Replacing the toner in your Brother printer is a simple task that ensures your printer continues to perform at its best. By following these steps, you can quickly and efficiently replace the toner and get back to printing high-quality documents. Regular maintenance, including timely toner replacement, helps extend the life of your printer and ensures consistent performance.
About the Creator
Tech Dogs
Tech Dogs, is the preferred choice for national laser printer repair service and toner supplies. We offer custom tailored service programs which address all aspects of owning and maintaining your corporate fleet of laser printers.
BIM Uncovered: The Reality Behind the Common Misconceptions
If you asked a room full of AEC professionals this question a decade ago, the answers would have been mixed. Today, however, the data is irrefutable: 66-87% of BIM users report a positive Return on Investment (ROI), yet a significant portion of the industry remains hesitant, paralyzed by outdated myths. In an era where digital transformation is no longer optional but a survival mechanism, clinging to common myths about BIM that need to be debunked isn't just a difference of opinion—it’s a business risk.
By Tesla CAD Solutionsabout 17 hours ago in 01
How to Become a Mobile App Developer in 2026
The Google ecosystem has undergone a tectonic shift where mobile development is no longer defined by syntax proficiency but by Agentic Optimization. This structural realignment means that risk exposure for developers now hinges on their integration into the Trust Graph rather than mere technical stack knowledge.
By Devin Rosario7 days ago in 01


Comments
There are no comments for this story
Be the first to respond and start the conversation.