
HTML Tips #90: Creating HTML5 Web Notifications
Web notifications are an excellent way to communicate with users and provide them with timely updates, even when they are not actively browsing your website.


This capability, introduced in HTML5, is a powerful tool for developers, as it allows the display of notifications directly on the user’s device, even when they are outside the browser window. In this guide, we’ll walk you through how to create HTML5 web notifications from start to finish.
What Are Web Notifications?
Web notifications are small, brief messages that appear on a user’s screen, typically outside of the browser window, even when the user is not actively interacting with the website. They can appear as banners, badges, or pop-up messages on the user’s device.
For example, if you have a messaging app or a blog, web notifications can alert users about new messages or posts even when they are not browsing your site.
Web notifications are supported by all modern browsers, but their usage requires permission from the user. This ensures that users are not bombarded with unwanted messages and have control over the notifications they receive.
Why Use Web Notifications?
Here are several reasons why implementing web notifications can enhance your web application:
- User Engagement: Notifications are a great way to keep users engaged and informed about updates, new features, or promotions.
- Personalization: You can send personalized notifications based on the user’s preferences, behaviors, or interactions with your site.
- Better User Retention: By sending relevant notifications, you can bring users back to your site after they’ve left, improving retention and engagement.
- Cross-Platform Compatibility: Notifications are not limited to just desktop browsers; they also work on mobile devices, providing a seamless experience across devices.
Key Features of HTML5 Web Notifications
Before jumping into the code, let’s first take a look at some of the key features of HTML5 notifications:
Notification Types:
- Simple Notification: A basic notification with a title, body, and an optional icon.
- Clickable Notification: This type allows you to include a URL, so when the user clicks the notification, it directs them to a specific page.
- Badge Notifications: Used primarily for mobile apps, these display a small count on the app icon, indicating the number of new messages or updates.
- Permissions: Notifications can’t be sent without the user’s consent. Browsers will ask the user for permission to send notifications. If they approve, notifications can be sent; if they deny, notifications won’t be displayed.
- Notification Life Cycle: Notifications can be shown as long as the user hasn’t dismissed or interacted with them. Developers can also programmatically close notifications after a set amount of time.
How to Create Web Notifications in HTML5
1. Requesting Notification Permission
The first step in using web notifications is to ask the user for permission. Notifications are a sensitive feature, and browsers ensure that users have control over which websites can send them.
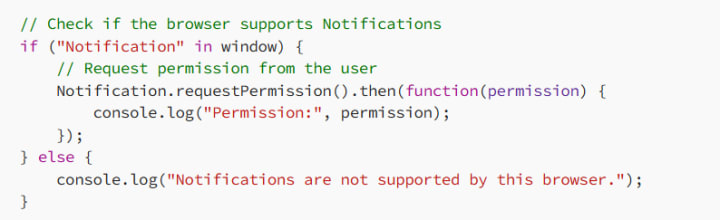
Here, the code first checks if the Notification API is supported by the browser. If it is, it requests permission using the requestPermission() method. The requestPermission() method returns a promise that resolves to either 'granted' (user allows notifications) or 'denied' (user denies notifications).
2. Creating a Simple Notification
Once the user grants permission, you can display a notification using the Notification constructor. A simple notification can include a title, body, and icon. Here’s an example:
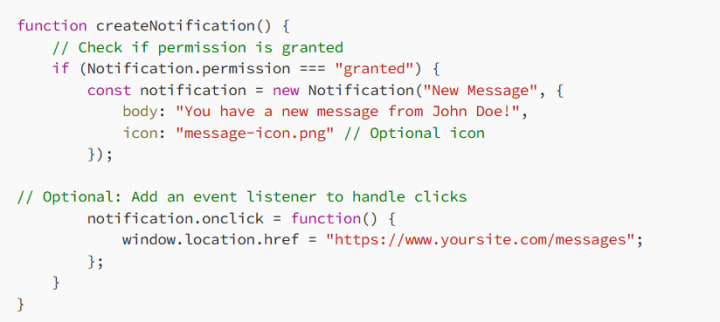
In the example above:
The notification has a title "New Message".
The body text is "You have a new message from John Doe!".
An optional icon can be added to make the notification more visually appealing.
You can add a click event listener to handle clicks on the notification, directing the user to a specific page (in this case, a message page).
3. Customizing the Notification
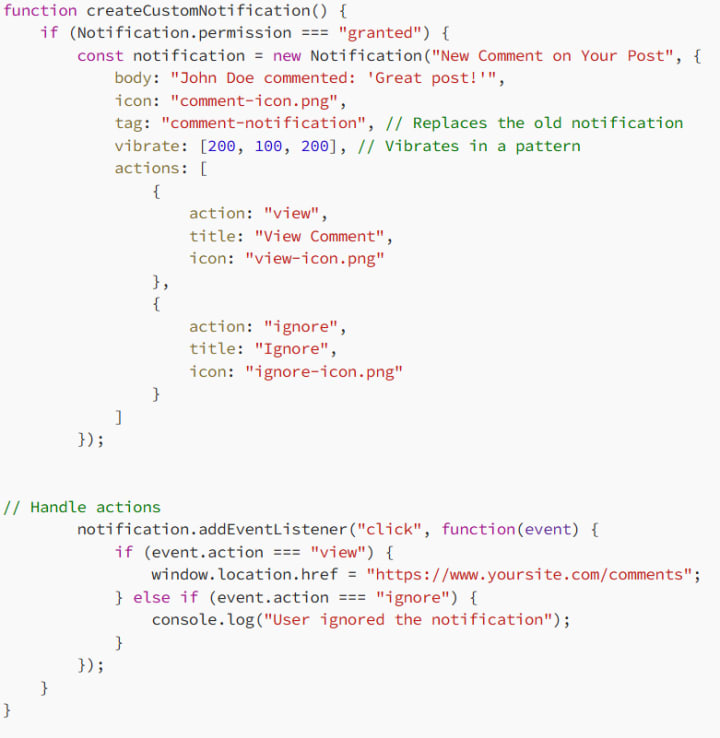
Web notifications are customizable. You can change how they behave by adding additional properties like vibrate, tag, and actions.
- Vibration: You can set the vibration pattern for devices that support it (e.g., mobile phones).
- Tag: Notifications with the same tag will replace the older notification, keeping the user’s notification panel clean.
- Actions: You can add buttons to notifications to allow users to interact with them.
Here’s an example that demonstrates these additional features:
4. Handling Notifications in the Background
Web notifications don’t just disappear after a few seconds. You can control when they should be dismissed or remain visible. For example, you can set a timeout to automatically close the notification after a specific time interval.

In the example above, the notification will automatically close after 5 seconds.
5. Testing Web Notifications
Testing web notifications can be tricky, especially since they require user permission. Here are some ways to effectively test notifications:
Local Testing: Web notifications only work on websites served over HTTPS or localhost. Make sure your website is running on a secure server.
Simulating Permission: Use the browser’s developer tools to simulate different permission states. In Chrome, for example, you can go to Developer Tools > Application > Notifications > and adjust permissions or trigger notifications manually.
Best Practices for Web Notifications
To ensure a good user experience, consider the following best practices when implementing HTML5 web notifications:
- Be Respectful: Don’t send notifications too frequently. Overuse can lead to users disabling notifications for your site.
- Context Matters: Only send notifications that are relevant to the user. For example, send alerts for new messages, updates, or important announcements.
- Permission Requests: Don’t ask for notification permissions immediately. Wait until the user has interacted with your website enough to understand its value.
- Provide Opt-Out Options: Allow users to turn off notifications easily, ensuring that they are always in control.
- Conclusion
HTML5 web notifications are a powerful tool to enhance user engagement and provide timely information. By following the steps in this guide, you can create effective and user-friendly notifications for your web applications. Always remember to respect user preferences, keep notifications relevant, and provide a way for users to opt-out if they no longer wish to receive them. With the right balance, web notifications can become an essential part of your web development toolkit.
About the Creator
MariosDev
Hi, I’m Marios! I’ve been a developer for over 9 years, crafting cool stuff and solving tricky tech puzzles. I’m a total tech enthusiast and love sharing my thoughts and tips through blogging. Also, in love with my bike!
Web3 Mobile Apps: What Actually Changes When You Build One
If you spend enough time around product teams, you’ll notice that Web3 tends to enter conversations in two very different ways. Sometimes it shows up as marketing language — the “future of the internet” narrative. Other times it appears as a practical engineering question: what actually changes when parts of your mobile stack stop living on your own servers?
By Valeriia Shulga2 days ago in 01


Comments
There are no comments for this story
Be the first to respond and start the conversation.