
How to Format an SD Card for a Dash Cam
In this article, you'll be guided through the SD card formatting for use in a dash cam.


Are you unsure which format your dash cam expects or why the card suddenly asks to be formatted again? These questions come up often, especially when drivers switch between devices or use the same card for long periods. A clean format restores the structure the dash cam needs, prevents recurring errors, and keeps new recordings from failing unexpectedly. We created this article to help you understand when formatting becomes necessary and which options provide the most reliable results across different systems.
Why Dash Cams Require Regular SD Card Formatting
Dash cams write video data continuously and overwrite old files in short recording cycles. This constant write-and-delete process fragments the file system much faster than typical camera or phone usage. Over time, fragmented structures increase the risk of corrupted clips, recording gaps, or sudden format prompts.
Regular formatting clears these leftover file references and restores a clean file structure that the dash cam firmware expects. It also removes hidden system files created by computers or other devices that may interfere with recording. While formatting does not repair worn memory cells, it helps maintain stable operation and predictable recording behavior while the SD card remains serviceable.
How to Format an SD Card for a Dash Cam Safely
Before we proceed in more detail with how to format an SD card, it’s a good idea to pause and prepare the SD card properly. Formatting clears the file system and removes all existing recordings, which also includes locked or emergency clips. Any important footage must be saved elsewhere first.
Start by taking out the memory card from the recording device mounted on the dashboard. A compatible reading tool links it to a desktop or laptop system. Files transfer smoothly when moved to protected storage space - examples include built-in hardware or portable solid-state units.
Direct file access often breaks down in this state. Errors appear, prompts loop, folders refuse to open, yet the data usually still sits on the card, untouched. According to our analysts, the safer route starts earlier than formatting. Create a full backup first, one that captures the card sector by sector, then proceed with formatting only after the copy exists and checks out. Once the data sits elsewhere and the card still responds at a basic level, you can move on to the formatting methods below. For additional guidance, you can also check this article.
Method 1: Format the SD Card Directly in the Dash Cam (Best Option)
The easiest way to format an SD card is directly through your camera settings. We recommend this option because the dash cam applies the correct file structure and folder layout automatically without any additional actions needed. Each dash cam uses its own menu layout, but the formatting logic remains similar across models.
Here is how to format an SD card for a dash cam:
1. Insert the SD card into the dash cam.
2. Power on the dash cam.
3. Open Settings or System.
4. Select Format SD Card or Memory Card Format

5. Confirm the action and wait until the process completes.
6. After formatting, restart the dash cam and confirm that recording starts normally.
Remember that although in-camera formatting works best for everyday use and initial setup, it’s not always possible, but there are some other methods you can try.
Method 2: Format an SD Card for a Dash Cam on Windows
Now, let’s move on to the computer-based formatting options. While it might sound complicated at first, it’s not that difficult if you know what to do. Windows OS offers several ways to format SD cards.
Start first with File Explorer. It works best when the card appears normally and shows no serious errors. The method rebuilds the file allocation table and prepares the card for new data without touching deeper structures. Use this method when Windows detects the SD card correctly and displays it under This PC.
Here is how to format your SD card using File Explorer:
1. Slide the SD card into the slot of a USB adapter plugged into the machine.
2. Start by launching File Explorer, then head over to This PC.
3. Press the right mouse button on the SD card, then choose Format from the menu that appears.

4. Choose the file system, FAT32 for cards up to 32 GB and exFAT for cards 64 GB and larger.

5. Leave Allocation unit size set to Default and enable Quick Format.

6. Click Start and confirm.

7. Safely eject the card and insert it into the dash cam.
For most dash cam users, this option solves recognition issues with minimal effort. If you can’t find your SD card under This PC, try checking if it shows up in Disk Management. Your computer may detect the physical device but cannot mount its file system. This situation is common with dash cam cards and does not always indicate serious damage.
And, the good news is that you can format an SD card there. Here is how:
1. Press Windows + X and select Disk Management.
2. Locate the SD card by its size and removable label.
3. Choose the partition on your SD card with a right-click, then pick Format from the menu that appears.
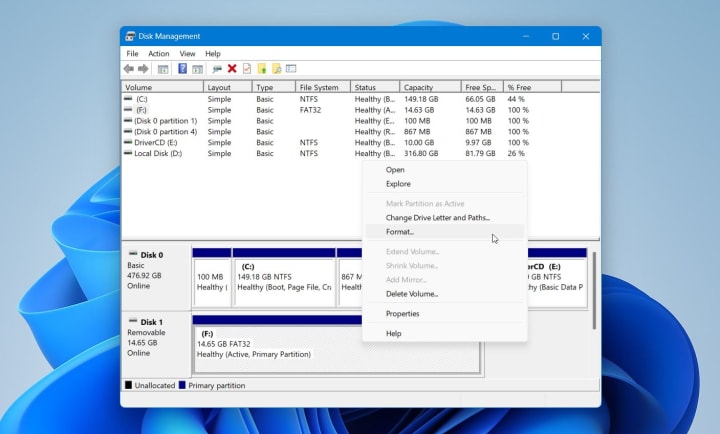
4. Assign a drive letter if Windows requests it.
5. Choose FAT32 or exFAT based on card capacity. FAT32 makes sense for smaller cards. Go exFAT if you’re dealing with bigger storage space.
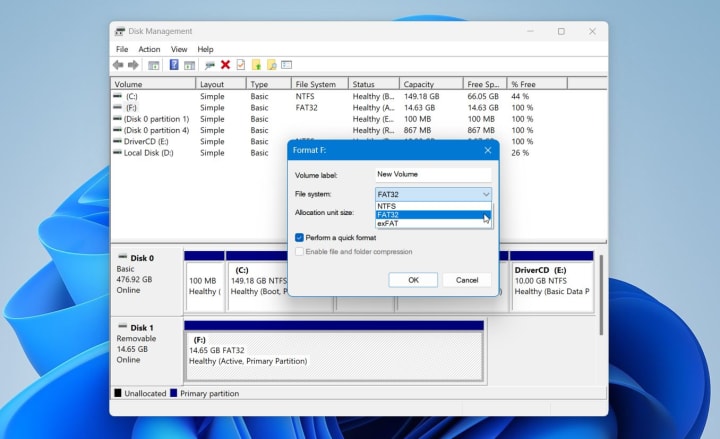
6. Leave allocation size on Default and enable Quick Format.

7. Confirm and wait for completion.

8. Eject the card and reinsert it into the dash cam.
Disk Management removes structural conflicts that block dash cam firmware from mounting the card correctly. Once the partition is rebuilt, the camera can initialize recording normally. In this way, Disk Management often resolves stubborn recognition issues that block dash cam recording.
Method 3: Format an SD Card for a Dash Cam on macOS
If you have macOS, it provides stable tools for this task, but correct settings matter, because macOS often defaults to settings that suit computers rather than embedded devices. You just need to select the correct scheme and file system to prevent recognition errors that dash cams commonly show after improper formatting.
Here is how to format an SD card on macOS:
1. Power off the dash cam and remove the SD card.
2. Insert the SD card into your Mac using a built-in slot or a reliable card reader.
3. Open Disk Utility (Applications → Utilities → Disk Utility).
4. In the left panel, select the SD card itself, not the volume beneath it.
5. Click Erase at the top of the window.

6. Set the format, FAT32 (MS-DOS FAT) for cards up to 32 GB or exFAT for cards 64 GB and larger. Please, avoid APFS or Mac OS Extended formats.
7. Choose Master Boot Record (MBR) as the scheme.
8. Enter a simple name for the card if needed.
9. Click Erase and wait for the process to finish.
10. Eject the SD card safely and insert it back into the dash cam.
After macOS formatting, many manufacturers still recommend a final format inside the dash cam to align folder structure and clip segmentation.
Common SD Card Formatting Problems in Dash Cams
Finally, we will talk about SD cards formatting mistakes. As unfortunately, even when formatting follows the correct steps, dash cams may still report errors or behave unpredictably. These issues often relate to file system mismatches, card wear, or interrupted write cycles rather than the formatting process itself. Below are the most common problems dash cam users encounter and how to approach them safely:
- Accidental formatting and lost dash cam footage. We understand that mistakes happen, but you’re lucky if you chose a quick format option. It only deletes file references, which means video files may remain recoverable until overwritten. If important footage was erased, stop using the card right away and avoid new recordings. Tools such as Disk Drill might analyze either the memory card directly or an exact copy, pulling back unbroken videos if nothing has overwritten the space since deletion.
- Formatting fails or stops with an error is a more common issue people seek help on Reddit. Formatting may fail when the SD card contains bad sectors or reaches the end of its write lifespan. A quick format may still be complete, but full formatting often exposes deeper problems. If formatting errors persist across multiple devices, we recommend replacing the card.
- The SD card formats successfully but recording does not start. In this case, the dash cam recognizes the card but cannot write data to it. We often see this error in cases of an unsupported file system or a write-protection state triggered by card errors. Formatting the card on a computer with FAT32 or exFAT and then performing a second format inside the dash cam usually restores normal operation.
- The dash cam keeps asking to format the SD card. This usually means the camera detects a file system it cannot work with or finds structural inconsistencies after previous recordings. On forums such as Reddit, you may find advice to reformat the card directly in the dash cam. It often resolves the issue. If the message appears again shortly after formatting, the SD card may no longer handle sustained write activity reliably.
Most SD card formatting problems in dash cams stem from compatibility limits or gradual media wear rather than user error. Formatting often restores normal operation, but it does not solve every situation. When errors persist or important footage disappears, data recovery or card replacement becomes the safer path.
Closing Note
A formatted card allows the dash cam to record confidently again. Treat formatting as part of routine maintenance rather than a last resort, and you reduce the risk of missing important footage. If unexpected issues surface or important files disappear, remember that recovery may still be possible after a quick format. We recommend support resources and practical guidance from Pandora Data Recovery Mentor can help assess recovery options and avoid irreversible loss.
FAQ
What happens if I use the wrong file system?
In our experience, the wrong file system usually leads to recognition or recording issues. Sometimes, startup triggers a repeated prompt to format the storage. Recording might begin normally yet terminate prematurely during use. At times, video data appears captured but does not store properly. Issues often go unseen until playback is attempted afterward.
Most dash cams expect FAT32 or exFAT depending on card capacity. Formats such as NTFS, APFS, or Mac OS Extended often cause compatibility problems because dash cam firmware does not support them. Reformatting the card with the correct file system typically resolves these issues without further action.
Why does my dash cam keep saying format SD card?
Most times, a recurring prompt to format appears when the device reads irregularities in how data is stored. Because of extended usage, transferring the memory card across gadgets might disrupt its organization. A mismatch in supported systems often plays a role too. When internal markers shift slightly, warnings tend to follow. Handling these alerts by processing the card inside the recorder typically helps. Should notices reappear quickly post-procedure, wear could be limiting consistent performance.
Does formatting an SD card delete dash cam footage?
Yes, formatting deletes all footage stored on the SD card, including normal recordings, event files, and locked clips. The process removes the file system structure and prepares the card for new data, leaving no recordings accessible afterward. If you choose Quick Format, there’s a chance you might recover files with data recovery software, but in case of Full Format the data is gone with no way to get it back. That’s why it’s important to back up files before formatting.
About the Creator
Pandora Data Recovery Mentor
Pandora Data Recovery Mentor offers expert, trusted guidance for rescuing lost files. Specialist-reviewed rankings & tips help you choose the best software or DIY tools to solve your data loss emergency.
Keep reading
More stories from Pandora Data Recovery Mentor and writers in 01 and other communities.
How Does Data Recovery Work – All You Need to Know
If important files such as photos, projects, or documents suddenly become inaccessible, it may seem like they have been permanently removed. Everything may appear normal until you notice a missing folder or an empty drive. The good news is that most deleted data isn’t gone immediately, and recovery tools can often bring it back.
By Pandora Data Recovery Mentor3 months ago in 01
How To See Who Unfollowed You On TikTok?
You might have several users following you after watching a video of you and probably won't proceed with others that you posted. The more terrible circumstance can be the point at which they aren't even people. A few bots are being utilized for playing with the calculation of TikTok.
By Intelligent Creator7 days ago in 01
How Digital Marketing Services will Drive Business Growth in 2026?
The boardroom conversation around marketing has changed. In 2026, growth discussions no longer revolve around impressions, clicks, or follower counts. They revolve around contribution, predictability, and durability. Leaders want to know whether marketing systems can produce revenue under pressure, adapt to platform shifts, and justify spend without constant resets.
By Jane Smith6 days ago in 01


Comments
There are no comments for this story
Be the first to respond and start the conversation.