
How to Create a CPAGRIP Account-Verify Tax and Payment Info
Step by Step Guide on Creating a CPAGRIP Account

In this no-fluff, step-by-step guide, I’m going to show you exactly how I created and verified my CPAgrip account—from filling out the tricky fields, submitting the tax form, to choosing the right payment method. No experience required.
How to Create a CPAgrip Account
Let’s not complicate things. Here’s exactly what I did to sign up, and what you need to do step by step:
➤ Step 1: Go to the CPAgrip Website
Start by visiting cpagrip.com's official website and click on "register" button at the top right corner of the home page. You can do this if you're using a phone, tablet, or PC, the site works well on all devices.
You can either click “Register” or "Sign Up" at the top right or bottom.
➤ Step 2: Fill Out the Registration Form
Here’s a rundown of the fields that might trip you up (they almost got me too!):
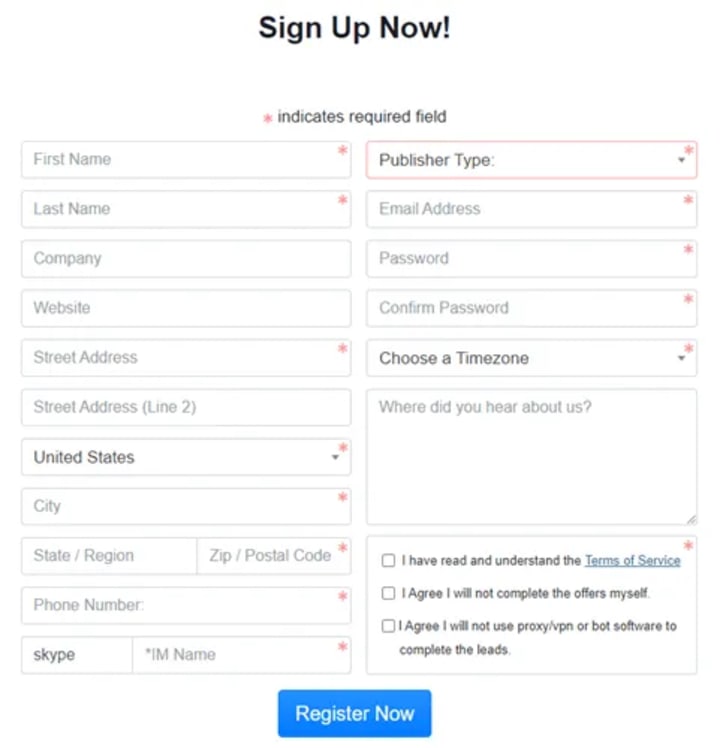
Company: Don’t worry if you don’t have one. I just entered my own name and it worked perfectly.
Website: Don’t stress! I didn’t have a website either. I used a link to my Facebook profile. It’s optional—but adds credibility.
Skype ID: This one stumped me initially. I created a free Skype account at skype.com, verified my email, and copied my Skype name from the settings. Note:where it says Skype you can change it to any other social media like Facebook or Instagram. Just click the “Skype”text and change it.


Zip/Postal Code: If you're not sure, just Google “postal code for [your town or country]”. I’m in Uganda and used “256” (just drop the ‘+’ if you’re using your country code instead).
Time Zone: A simple Google search like “time zone in Nigeria” or “time zone in India” gives you what you need.
Where did you hear about us?: This one’s easy. Just write Medium.com or YouTube or wherever you found this guide.
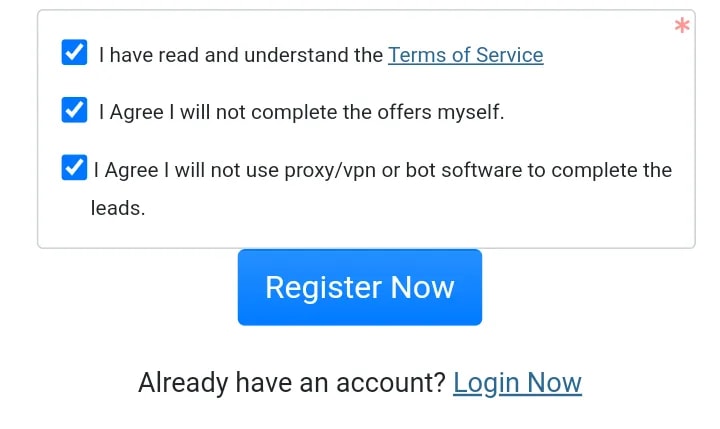
Once done, agree to the Terms and Conditions and click “Register Now.”
✅ Pro Tip: Use a professional-looking email address—something like [email protected]. It increases your approval chances.
Verifying Your CPAgrip Account
➤ Email Verification
Immediately after signing up, go to your email inbox and find a message from CPAgrip. Click the verification link. Easy!
➤ Manager Approval
I got approved without doing this but this part might be crucial if it takes a while. Every CPAgrip user is assigned a personal manager—and they often reach out via email or Skype to verify your intentions.
Here’s what helped me get approved quickly:
I replied to the email professionally.
I explained where I’d promote offers (social media + YouTube).
I told them I was still learning but committed to following CPAgrip’s terms.
Even if you’re a complete beginner, honesty and clarity work wonders here.
How to Add Tax Information to CPAgrip
Now that your account is live and verified, don’t skip this next part. I see too many people struggling here.
➤ Where to Find the Tax Forms
Log into CPAgrip.
Click “Account Settings” from the left sidebar.
Scroll down to “Tax Information”.
There are two forms:
- International Publishers: File W-8 (international)
• USA Publishers: File W-9 (USA)

Remember that you’re a publisher. If you come from other parts of the world except the USA, choose the first file which is the international publisher option.
➤ How I Filled My Form (As an International User)
Just choose/click on W-8 (international) for non-USA publishers (and for USA on W-9 form)
Just make sure you fill in the tax information to the best of your knowledge.

I used the exact name and address on my registration form. Just fill in the information you used while registering on your first page and once you’re done, click on the “save” button.
For TIN (Tax Identification Number), I selected “N/A” because I don’t have one.
I made sure to double-check everything before hitting save.
✅ Pro Tip: CPAgrip treats international publishers with respect—as long as you’re honest and consistent, you’ll get approved without a TIN.
Setting Up Your CPAgrip Payment Method
Let’s be honest—we’re doing this to make money. But unless you set up your payout method, you’ll just be watching your balance grow with no way to cash out. Don’t let that happen.
➤ Where to Set Payment Info
Log in and head to “Payment Center” or “Payout Settings.”
➤ Choose Your Payment Option

CPAgrip supports:
Payoneer
PayPal
ACH Bank Transfer (U.S. only)
➤ What I Use Personally
I went with PayPal—but it wasn’t easy at first. My country had issues with PayPal withdrawals. Here’s how I worked around it:
I created a PayPal account via paypal.com.
I linked it to a Chipper Cash Visa Card (or you can use an Airtel Mastercard or other virtual card).
Boom! I started receiving funds with no hassle.
If PayPal doesn’t work in your country, try Payoneer. I also use it, and it gives you USD, EUR, and GBP bank accounts that can connect easily to your local bank.
✅ Note: Always use the email address associated with your PayPal or Payoneer account. Then click Save.
➤ When Will You Get Paid?
CPAgrip uses a Net30 payout system. That means if you earn in May, you’ll get paid at the end of June. Stick with it and stay consistent.
Pro Tips for New CPAgrip Users
Here’s what I wish I knew when I started:
Don’t fake your details. It can get your account banned.
Stick to allowed promotion methods. Avoid spam or bots.
Start with content-locking or email submits. Easy to promote and convert.
Use tools like Bitly to track your links, and Canva to design creatives.
And yes, your account manager is your friend. Mine helped me get my first offer live within a day.
Conclusion
Setting up a CPAgrip account isn’t hard—but skipping a step can stall your progress for weeks. I’ve walked this path myself and wrote this guide to help you get it right the first time.
About the Creator
Keep reading
More stories from Invigorated Writer and writers in 01 and other communities.
JobWeiterbildung Scales Training Infrastructure to Address Mandatory Regulatory Requirements in Germany
Germany is renowned for its stringent regulatory framework, particularly concerning professional qualifications and continuous education. The concept of "Weiterbildung", which translates to further education or continuing professional development, is not merely encouraged but often legally mandated across a diverse range of industries. This pervasive requirement ensures that professionals across the nation consistently uphold high standards of competence, adapt to evolving industry practices, and comply with crucial safety protocols. For both individuals seeking to advance their careers and businesses striving to maintain operational legality and excellence, understanding and adhering to these mandates is paramount. The landscape of German professional development is complex, requiring a clear strategy to identify, access, and successfully complete the necessary training modules that are often tied to specific sectors and roles, preventing potential legal pitfalls and ensuring a skilled workforce.
By charliesamuel2 days ago in 01


Comments
There are no comments for this story
Be the first to respond and start the conversation.