
How to Copy DVD to Hard Drive on Windows & Mac
The best solution to copy your copy-protected DVDs to hard drive

Copying DVD to hard drive not only extends the lifespan of your discs, it also turns your movies and home videos into searchable, stream-ready files you can watch anywhere. Instead of hunting for a disc every time, you click once and play. From there, it’s easy to sync to a phone or tablet, back up to NAS, or organize with your media library
On a rainy Sunday last month I finally tackled a shoebox of old family DVDs. After moving the first few titles to my hard drive, I realized how much more often I re-watched them simply because they were now one click away in my media library—no rummaging through cases or dealing with a temperamental tray.
Heads-up: Laws around copy protection vary by country. I only make personal backups of discs I own and check local rules first.
Copy DVD to Hard Drive (Homemade Discs): The Direct Method
Homemade DVDs are usually unprotected, so copying is straightforward on both Windows and macOS.
Steps to Copy Unprotected DVD to Hard Drive
Step 1: Insert the DVD into your computer’s optical drive.
Step 2: Open File Explorer (Windows) or Finder (Mac) and select the DVD.
Step 3: Copy the VIDEO_TS (and AUDIO_TS, if present) folders to a new folder on your hard drive named after the title.
Step 4: Play via a media app that supports DVD folder playback (point to VIDEO_TS.IFO if needed).
- Why Direct Copy Often Fails on Commercial Discs:
Movies and TV box sets are typically distributed with protections (e.g., region codes, CSS, DRM) to control playback and copying. When I tried a studio title, the files would copy but played scrambled or with broken chapters—classic signs that you need a proper ripping workflow rather than a plain file copy.
How to Copy Protected DVDs to Hard Drive with DVDFab DVD Ripper
DVDFab DVD Ripper is a feature-packed DVD ripping software that allows you to copy and convert DVDs to a variety of formats. With its hardware-acceleration, you get the fastest way to copy any copy-protected DVD on your hard drive. Moreover, it offers a plethora of personalized settings for a smoother experience.
Highlights:
- Handy built-in editor: trim black lead-ins from camcorder footage, simple crop/rotate
- Device-ready profiles (MP4/MKV, etc.) so files play cleanly on TVs, tablets, and phones without extra tweaking
- One-stop workflow: detects the disc, lets you choose titles/chapters, audio tracks, and subtitles, then outputs directly to hard drive
Considerations: Free trial has feature limits
How to Use DVDFab DVD Ripper
Step 1: After downloading DVDFab 13, install and launch the application.
Step 2: Select the disc under the Ripper tab. You can choose the audio tracks, subtitles, chapters, and other aspects you want to rip.
Step 3: Click on Choose Other Profile and Format to set your preferences.

Pick a destination folder and rip DVD to harddrive by clicking on the Start option. Once you have the digital version of your DVD, you can simply copy-paste it on your hard drive.
How Copy DVD to Hard Drive with Fine Control Using HandBrake
HandBrake is an open-source video transcoder that is widely used for ripping DVDs. While it doesn’t handle copy-protected DVDs on its own, it can work with a plugin like libdvdcss to bypass protection.
Highlights:
- Free and open-source with presets like “Fast 1080p30” for quick, sensible results
- Deep control over bitrate/quality, resolution, filters, and subtitle handling
- Great for generating space-efficient MP4/MKV files for mobile viewing
Considerations: By default it doesn’t handle protected discs. Setup can feel technical the first time.
How to Use Handbrake
Step 1: Install HandBrake and, if needed, libdvdcss for copy protection.
Step 2: Insert the DVD, select the source in HandBrake, and choose your desired output format.
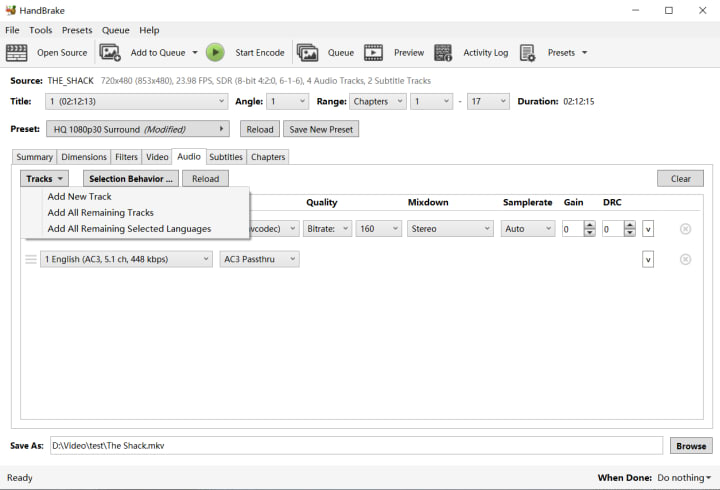
Step 3: Click "Start Encode" to begin ripping.
How to Copy a DVD to a Hard Drive with Lossless Titles Using MakeMKV
MakeMKV is a simple, one-click DVD and Blu-ray ripper that can bypass most copy protection on DVDs and convert them to the MKV format. It is primarily known for ripping DVDs into the MKV format without altering the original quality.
Highlights:
- Simple extraction that preserves original quality and chapters into MKV files
- Ideal for building a master archive on your hard drive or NAS
Considerations: Output is MKV only and files can be large. Many users pair it with another tool later to make a smaller MP4 for phones/tablets.
How to Use MakeMKV
Step 1: Install the app and launch MakeMKV.
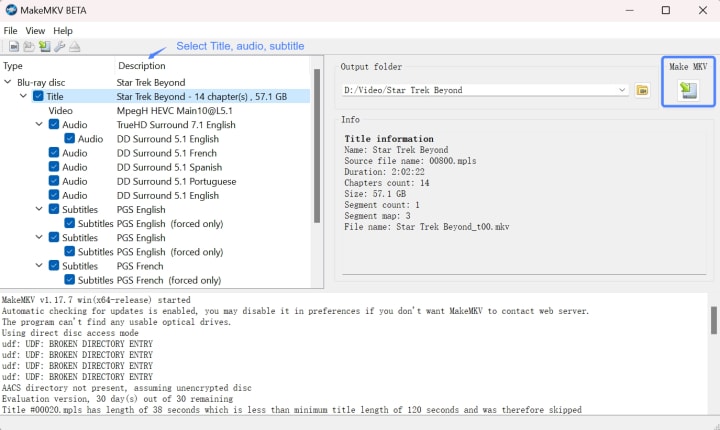
Step 2: To copy DVDs to hard drive, you will need to select the DVD drive first. Then, choose the output preferences.
Step 3: Start the ripping process and wait until it's done.
How do I keep subtitles when I copy DVDs to my hard drive?
Choose a tool that supports soft subtitles and chapter retention (e.g., MakeMKV for lossless structure, DVDFab for soft-sub MP4/MKV profiles).
Conclusion
The easiest wins are homemade discs—copy VIDEO_TS straight to your hard drive and you’re done. For commercial titles you own, a ripping workflow (where legal) preserves quality, subtitles, and chapters and produces files that play everywhere. My long-term combo is a lossless archive plus a smaller daily-use encode—organized, searchable, and ready to watch on any screen.
About the Creator
Diana
I’m a passionate Blu-ray collector who loves preserving the magic of physical media. Every now and then, I enjoy burning precious family videos onto discs, keeping memories alive in a tangible way.
Saudi Arabia Outdoor LED Lighting Market Size and Forecast 2025–2033
Saudi Arabia Outdoor LED Lighting Market at a Glance The Saudi Arabia Outdoor LED Lighting Market is expected to reach US$ 957.4 million by 2033, rising from US$ 318.96 million in 2024, registering a strong CAGR of 12.99% during 2025–2033. This expansion is primarily driven by large-scale infrastructure development, mega smart-city projects such as NEOM, The Line, and Qiddiya, and the country’s accelerating transition toward energy-efficient and sustainable lighting systems. Supportive government regulations, declining LED prices, and growing public awareness about energy conservation are further strengthening market momentum.
By Renub Research4 days ago in 01
Sergey Brin Becomes World’s No. 3 Richest—Overtakes Jeff Bezos, Larry Ellison After Alphabet Hits $4 Trillion
Topline Sergey Brin leapfrogged Oracle’s Larry Ellison and Amazon’s Jeff Bezos on Tuesday to become the world’s third-richest person, ranking again behind fellow Google cofounder Larry Page as parent firm Alphabet stock rallied to its latest milestone.
By Dena Falken Esq6 days ago in 01


Comments
There are no comments for this story
Be the first to respond and start the conversation.